 Gene-nie
GENE-NIE USER GUIDE
Hello There my fellow budding genealogists!! It looks like you have found me, The Gene-nie. I bet you are eager to command me around, after all, I work magic. Who am I, you may ask? Well, I am your personal genealogy assistant! Are you curious about me and how I work? Well then, we welcome you to this user guide, where we demystify the magic of Gene-nie and help you start your genealogy journey!
Table of Contents
- Introduction
- Using this guide
- Quick Start
- User Interface
- Using the Command Line Interface (CLI)
- Command Format
- Tutorial
- Features
- Features - Managing Person Profiles
- Features - Managing Attributes of Persons
- Managing Person Relationships
- General Features
- FAQ
- Known Issues
- Coming Soon
- Glossary
- Command Summary
Do you face issues trying to keep track of all your friends and family? Do you find it hard to remember who is related to who? Do you face issues trying to add people into your family tree with missing information? Fret not! Gene-nie here will magic away your issues!
Through the magic of Gene-nie you are able to
- manage all your contacts through Gene-nie
- keep track of the relationships between not only you but your also your contacts
- input and remember small details of each contact
- manage your relationship tree and history of friends and family
- and much more! You absolutely won’t regret choosing me. I am here to help you with all your genealogy needs!
Gene-nie is a desktop app for managing your contacts, built for use via a Command Line Interface (CLI).
Whether you are an expert genealogist or a budding enthusiast, this guide will help you get started with Gene-nie.
We will walk you through every step, from the basics of adding a person and their relationships to advanced features that will enchant you in your journey of genealogy.
Novice Users:
- If you are new to genealogy, we recommend you start with the Quick Start section.
- This section will guide you through the installation process and provide you with a quick overview of the app’s features.
Amateur Users:
- If you are familiar with genealogy, you can skip the Quick Start section and proceed to the Features section.
- This section will provide you with a detailed explanation of the app’s features and how to use them.
Advanced Users:
- If you are an expert genealogist, you can skip the Features section and proceed to the Command Summary section.
- This section will provide you with a quick summary of all the commands available in Gene-nie.
If you encounter any issues or have any questions, please refer to the FAQ section. You may also refer to the Known Issues section for any known bugs or limitations of the app. You are also welcome to contact us at Gene-nie@gmail.com for any further assistance.
Additionally, there will be symbols to help you navigate through this guide:
| Text Formatting | Meaning |
|---|---|
| Hyperlink to Header | Clickable hyperlink to navigate to another section |
command text |
Text relevant to Gene-nie’s user commands and executable file |
Ah, I see that you are excited to command me… Let me show you how to make me work my magic quickly!!
-
Ensure you have Java
11or above installed in your Computer. If not, see FAQ for instructions on how to install Java. -
Download the latest JAR file
Gene-nie.jarfrom here. The file can be found under the “Assets” section of the page as seen in the image below.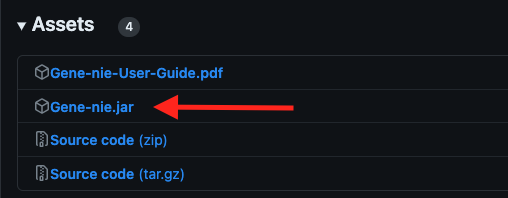
Figure 1: Download Location -
Copy
Gene-nie.jarto a convenient folder on your computer, using your file explorer. This will be referred to as Gene-nie’s home folder. -
Open a command terminal in the home folder (see OS-specific instructions below), and type
java -jar Gene-nie.jarto run Gene-nie. An example is shown below.

Gene-nie.jar file in a dedicated folder, with no other files in it.
cd (path), replacing (path) with the home folder path.
cmd in the address bar and press Enter.
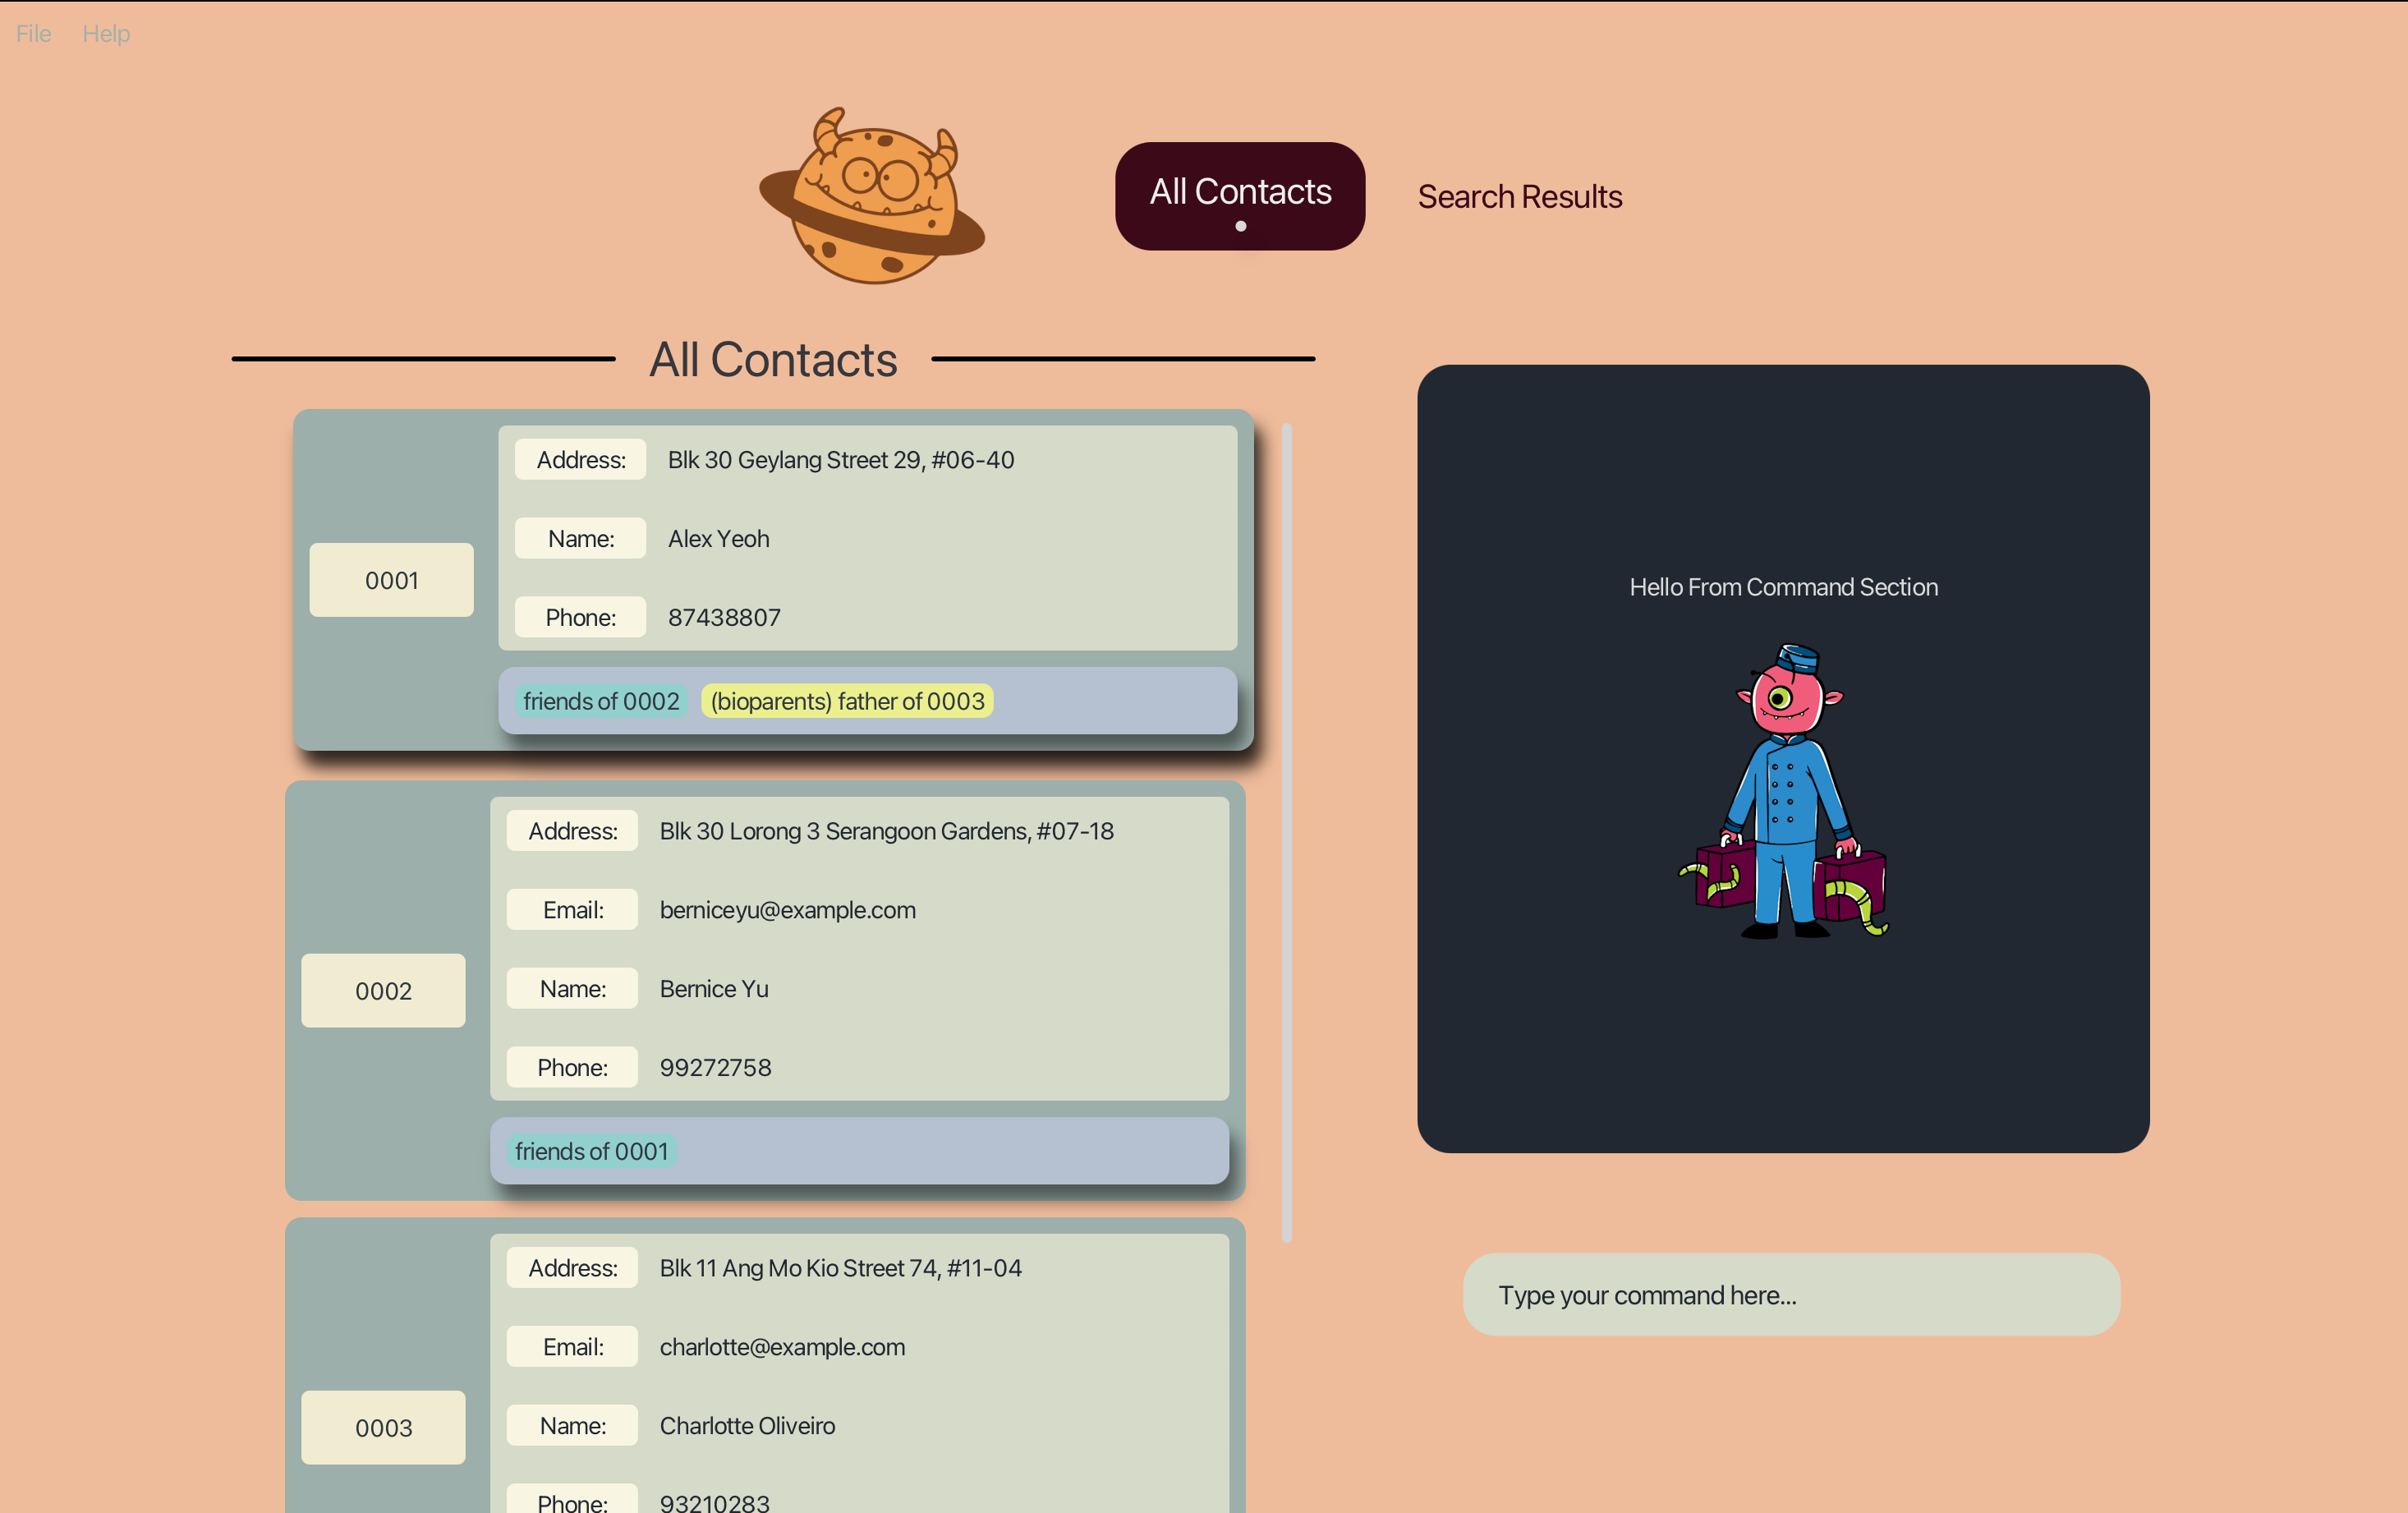
A window similar to the below should appear in a few seconds. Note how the app contains some sample data.
-
Type the command in the command box and press Enter to execute it. e.g. typing
helpand pressing Enter will open the help window. -
Refer to the Features below for details of each command.
-
Refer to the Command Summary for a quick summary of all commands.
Congratulations! You have successfully set up Gene-nie and are ready to start managing your contacts! But before we leave you, let us quickly run through the Command Line Interface (CLI).
You look lost, let my friends show you the way that I work!
Gene-nie has a simple and intuitive user interface that is designed to help you manage your contacts with ease. Let’s first take a closer look into at the main screen of Gene-nie.

-
Command Box:
- The command box is where you can enter your commands to interact with Gene-nie.
- Type your command and press enter to execute it.
- You can locate the list of commands to use in the Command Summary section.
-
Command Result:
- The command result panel displays the result of your command.
- If your command is successful, the result will be displayed in a green card.
- If your command fails, the result will be displayed in a red card.
-
Person List Panel:
- The person list panel displays all the contacts you have added to Gene-nie.
- Each contact is displayed as a card with their details.
- You can scroll through the contacts using the scroll bar on the right.
-
Menu Bar:
- The menu bar contains the main menu options for Gene-nie.
- You can access the help menu and exit the app from the menu bar.
-
Panel Switcher:
- The panel switcher allows you to switch between different panels in Gene-nie.
- You can switch between the “All Contacts”, “Search Results”.
Now that you are familiar with the main screen of Gene-nie, let us introduce to you the Search Result Panel of Gene-nie!
The Search Result Panel is where you can view the results of your anySearch and familySearch queries. It displays the contacts that match your search criteria including their relationship pathway. You can view the details of each contact and perform actions on them. Let’s take a closer look at the Search Result Panel!
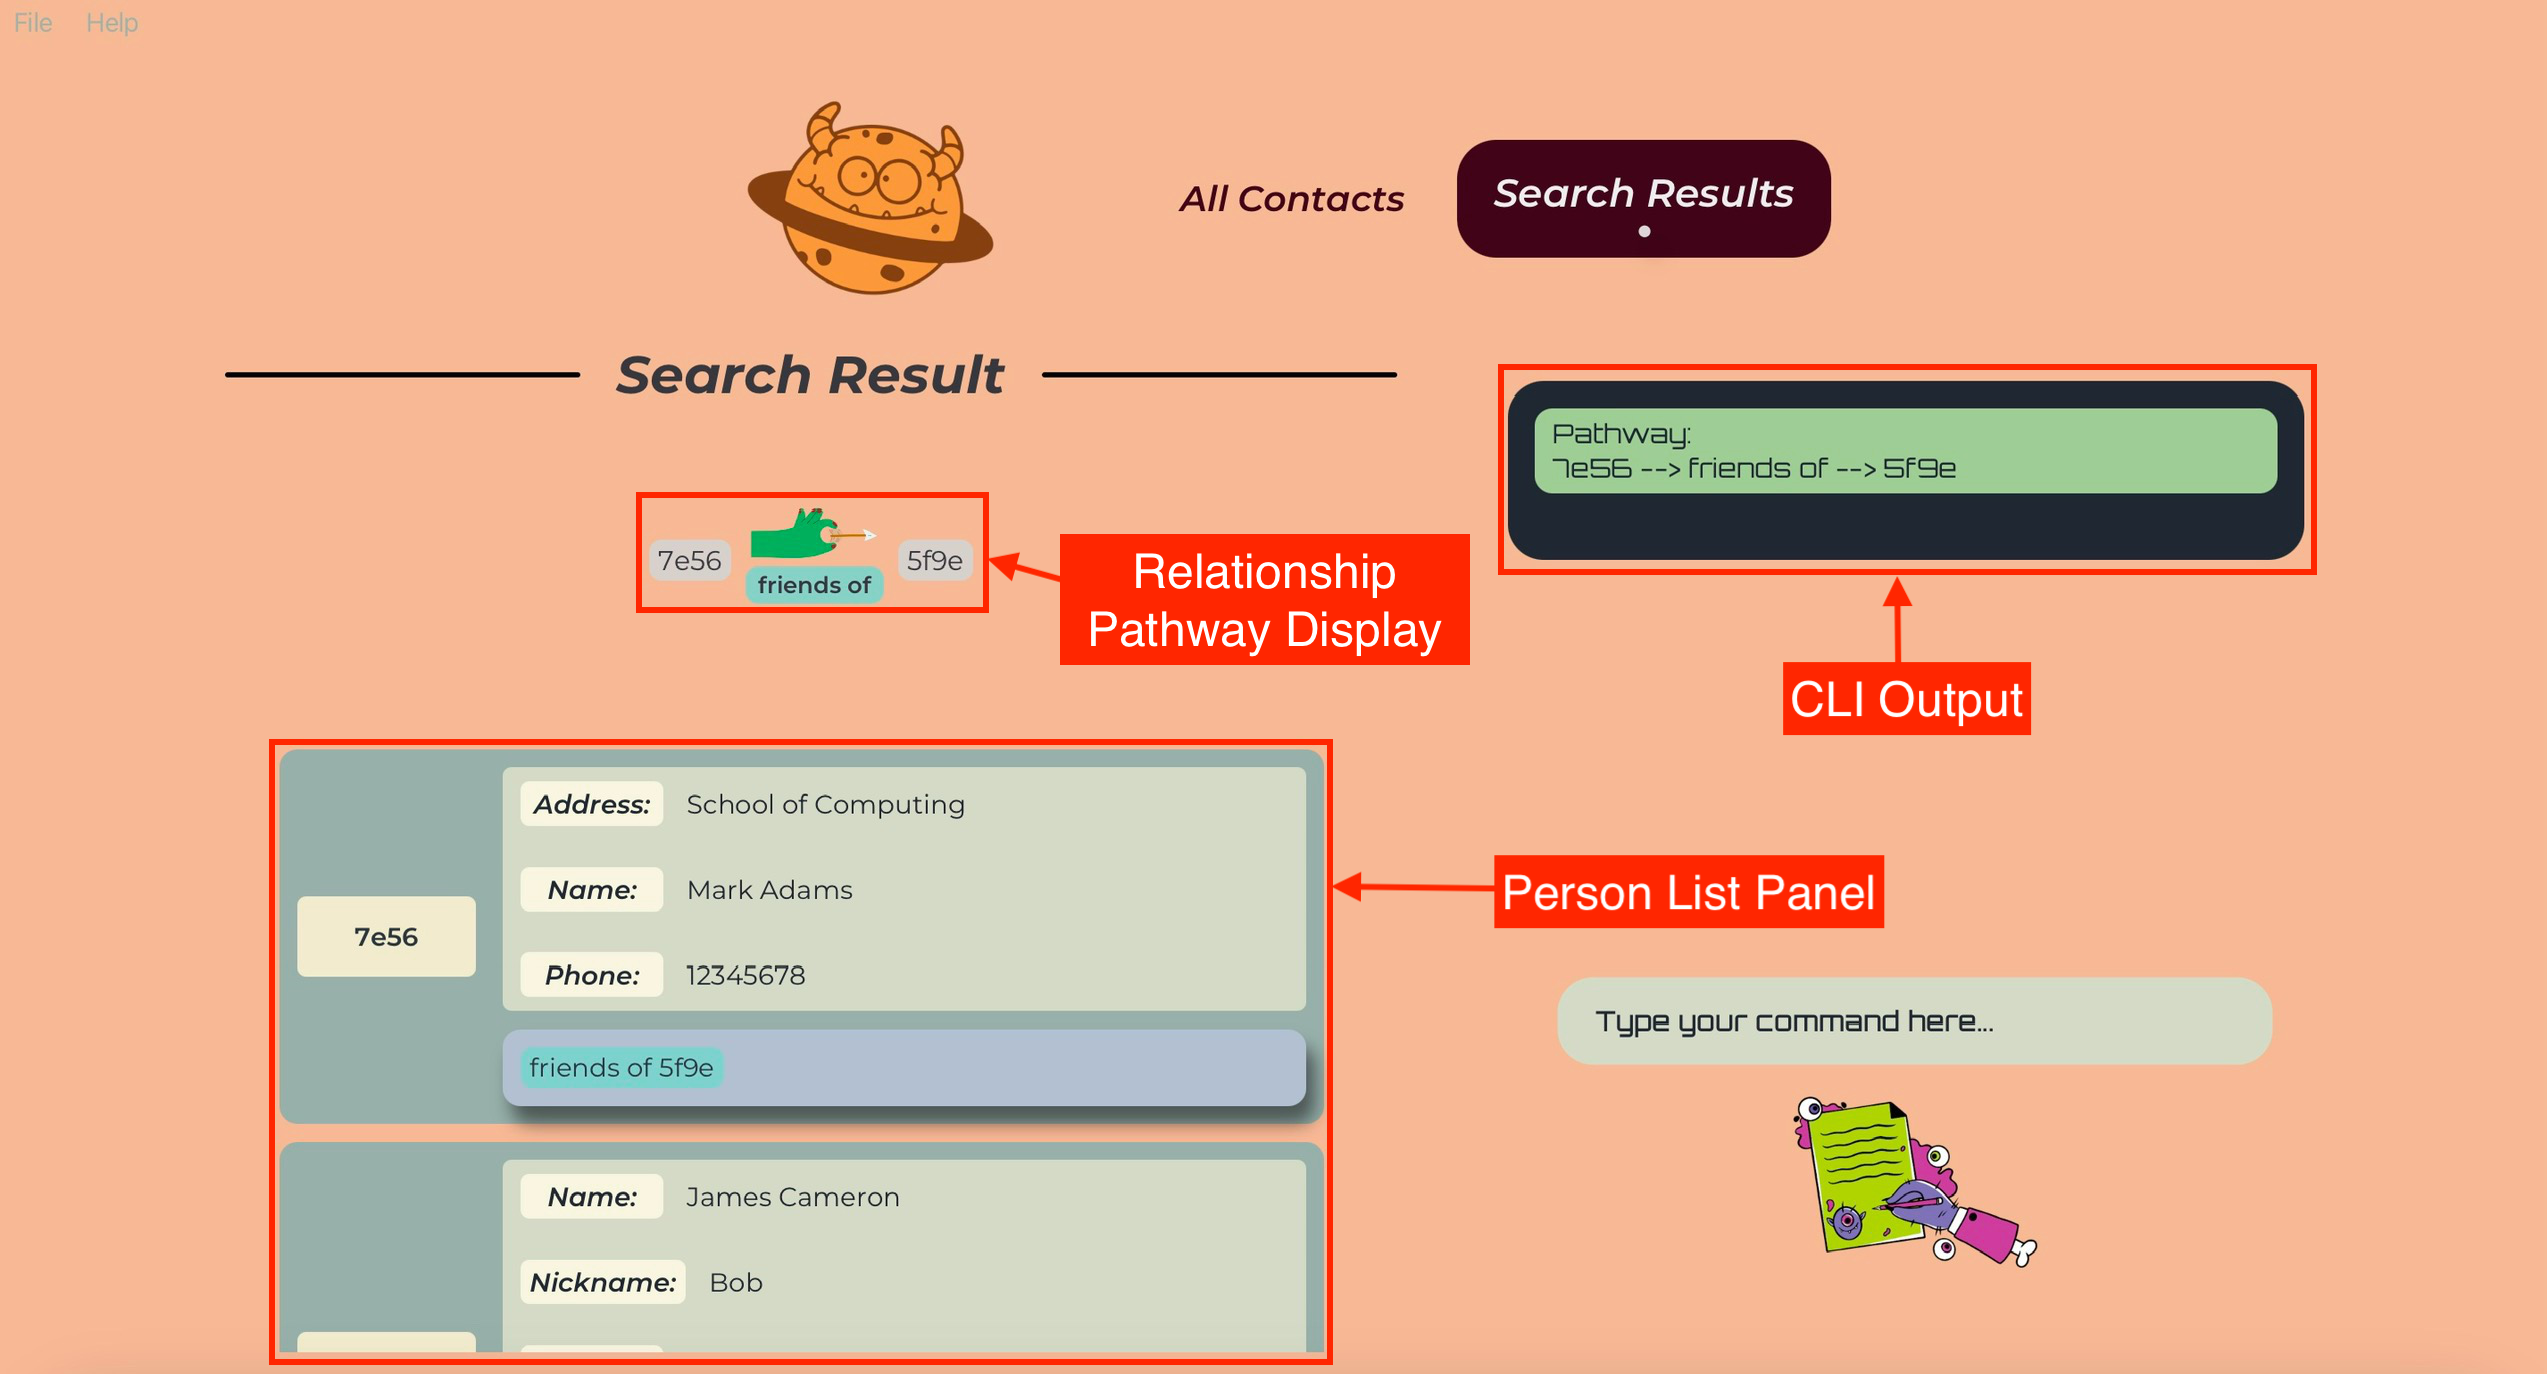
-
Person List Panel:
- The person list panel displays all the contacts that match your search criteria.
- Each contact is displayed as a card with their details.
- You can scroll through the contacts using the scroll bar on the right.
-
Relationship Pathway Display:
- The relationship pathway displays the relationship between the contacts in the search result.
- You can view the relationship pathway between the contacts to understand how they are related.
-
CLI Output:
- The CLI output displays the results of your search query in the CLI.
- You can view the details of the contacts that match your search criteria.
Having a mastery of the panels in Gene-nie, now we will introduce to you the individual components of the person card in Gene-nie!
The person card is where you can view the details of each contact you have added to Gene-nie. It displays the unique identifier, attributes, and relationships of the contact. Let’s take a closer look at the person card!
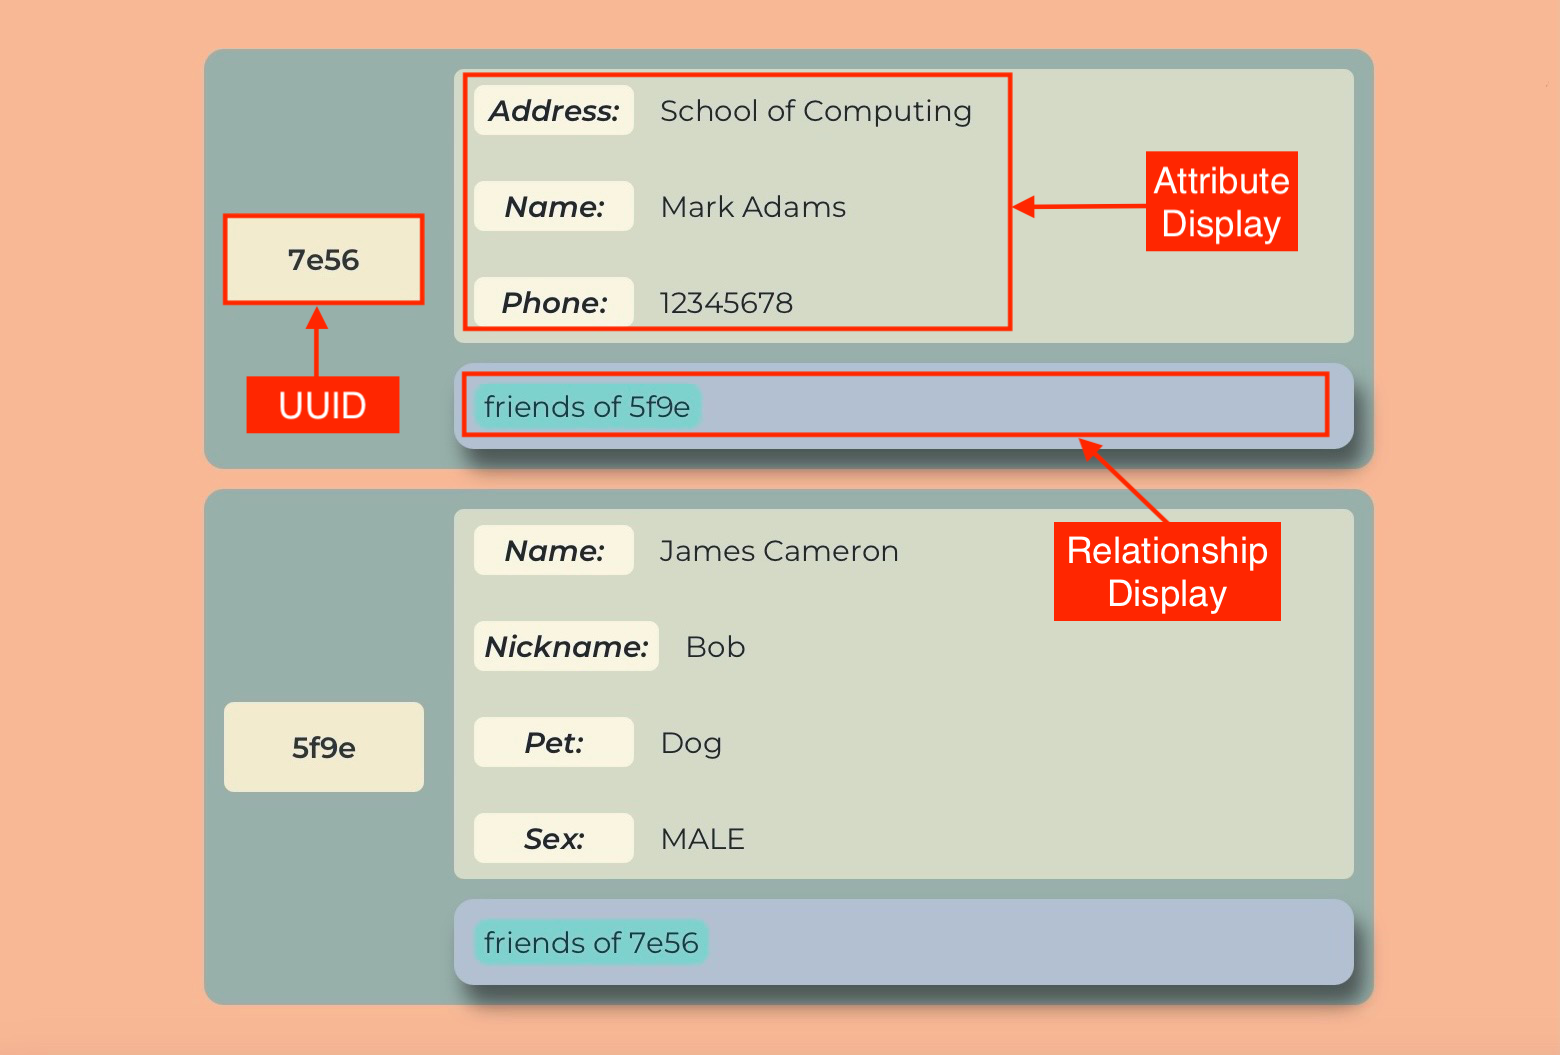
-
Unique Identifier (UUID):
- The unique identifier (UUID) is a 4-character code that is used to identify the contact (case-sensitive).
- You can view the UUID of the contact on the left of the person card.
-
Attribute Display:
- The attributes are the details of the contact that you have added to Gene-nie.
- You can view the attributes of the contact in the right of the person card.
-
Relationship Display:
- The relationships are the connections between the contact and other contacts in Gene-nie.
- You can view the relationships of the contact on the bottom of the person card.
Now that you are familiar with the user interface of Gene-nie, let us quickly start you on the magical world of Gene-nie!
I see that you are nervous… Don’t be! It is as easy as ABC!
Gene-nie is a desktop app that uses a Command Line Interface (CLI) for users to interact with the app. CLI is a text-based interface that allows users to input commands and receive responses via typing into our command box!
If you are still worried about using the CLI, let us demystify it for you! In fact, this is all there is to it:
Recall that the image above shows you the CLI interface of Gene-nie. It is akin to the magic words Aladdin uses to command the Genie!
You can key in your commands and Gene-nie will respond to your commands if correct!
Using CLI offers many advantages, such as:
- If you can type as fast you can think, Gene-nie can help you work magic faster!
- It takes up lesser memory and resources compared to a Graphical User Interface (GUI) app.
- It is cool! You can impress your friends with your command-line skills!
However, to make full use of our CLI interface, you need to:
- Familiarise yourself with the commands available in Gene-nie.
- Ensure you key in the correct commands accurately to get the desired results.
Nevertheless, if you are still unsure about using the CLI, do not worry! Ensure that you follow the Command Formats below and you will be able to use Gene-nie with ease!
Ah, you wish to command me to do your bidding! Fret not! I will show you the way… But make sure to REMEMBER THESE FORMATS OR ELSE!!!!
Notes about the command format:
-
Command keywords are case-insensitive. e.g.
addAttributecan beaddattribute,ADDATTRIBUTE, etc. -
Command keywords are have shortcuts that are case-insensitive. Shortcuts can be found in the description of each specific feature below. e.g.
addAttributecan beaa,aA, etc. -
Words in
UPPER_CASEare the parameters to be supplied by the user. e.g. inadd /Name NAME,NAMEis a parameter which can be used asadd /Name John Doe. -
Items in square brackets are optional. e.g.
/NAME name [/Phone PHONE]can be used as/NAME John Doe /Phone 98765432or as/NAME name. -
Items with
… after them can be used multiple times including zero times. e.g.[/ATTRIBUTENAME ATTRIBUTEVALUE]…can be used as/Name John Doe,/Name John Doe /Phone 98765432etc. -
Extraneous parameters for commands that do not take in parameters (such as
help,list,exitandclear) will be ignored. e.g. if the command specifieshelp 123, it will be interpreted ashelp. -
Extraneous characters before the specificed paramters for commands that take in parameters will be ignored. e.g. if the command specifies
addAttribute aaa /1234 /Name John, it will be interpreted asaddAttribute /1234 /Name John. -
UUID are 4 characters long and is case-sensitive.
-
Attribute names are not case-sensitive.
-
If you are using a PDF version of this document, be careful when copying and pasting commands that span multiple lines as space characters surrounding line-breaks may be omitted when copied over to the application.
Now that you are familiar with the command format, let us bring you through a short tutorial of how to use our magical app Gene-nie! Happy learning!
I can show you the world! Shining, shimmering, splendid! You better pay attention to my friends…
To properly make use of Gene-nie, let us take you through a tutorial of how to utilise Gene-nie! Regardless of your skill level, we will guide you through the basics of using Gene-nie!
Firstly, let us open the app! If you have forgotten how to you can refer to the Quick Start section above!
You will be greeted with our interface below populated with some sample data ready for you to work your magic!

Before we continue, make sure that you understand:
- The Command Format of Gene-nie
- The User Interface of Gene-nie
- The Command Line Interface (CLI) of Gene-nie
Now, let us start with the basics of Gene-nie!
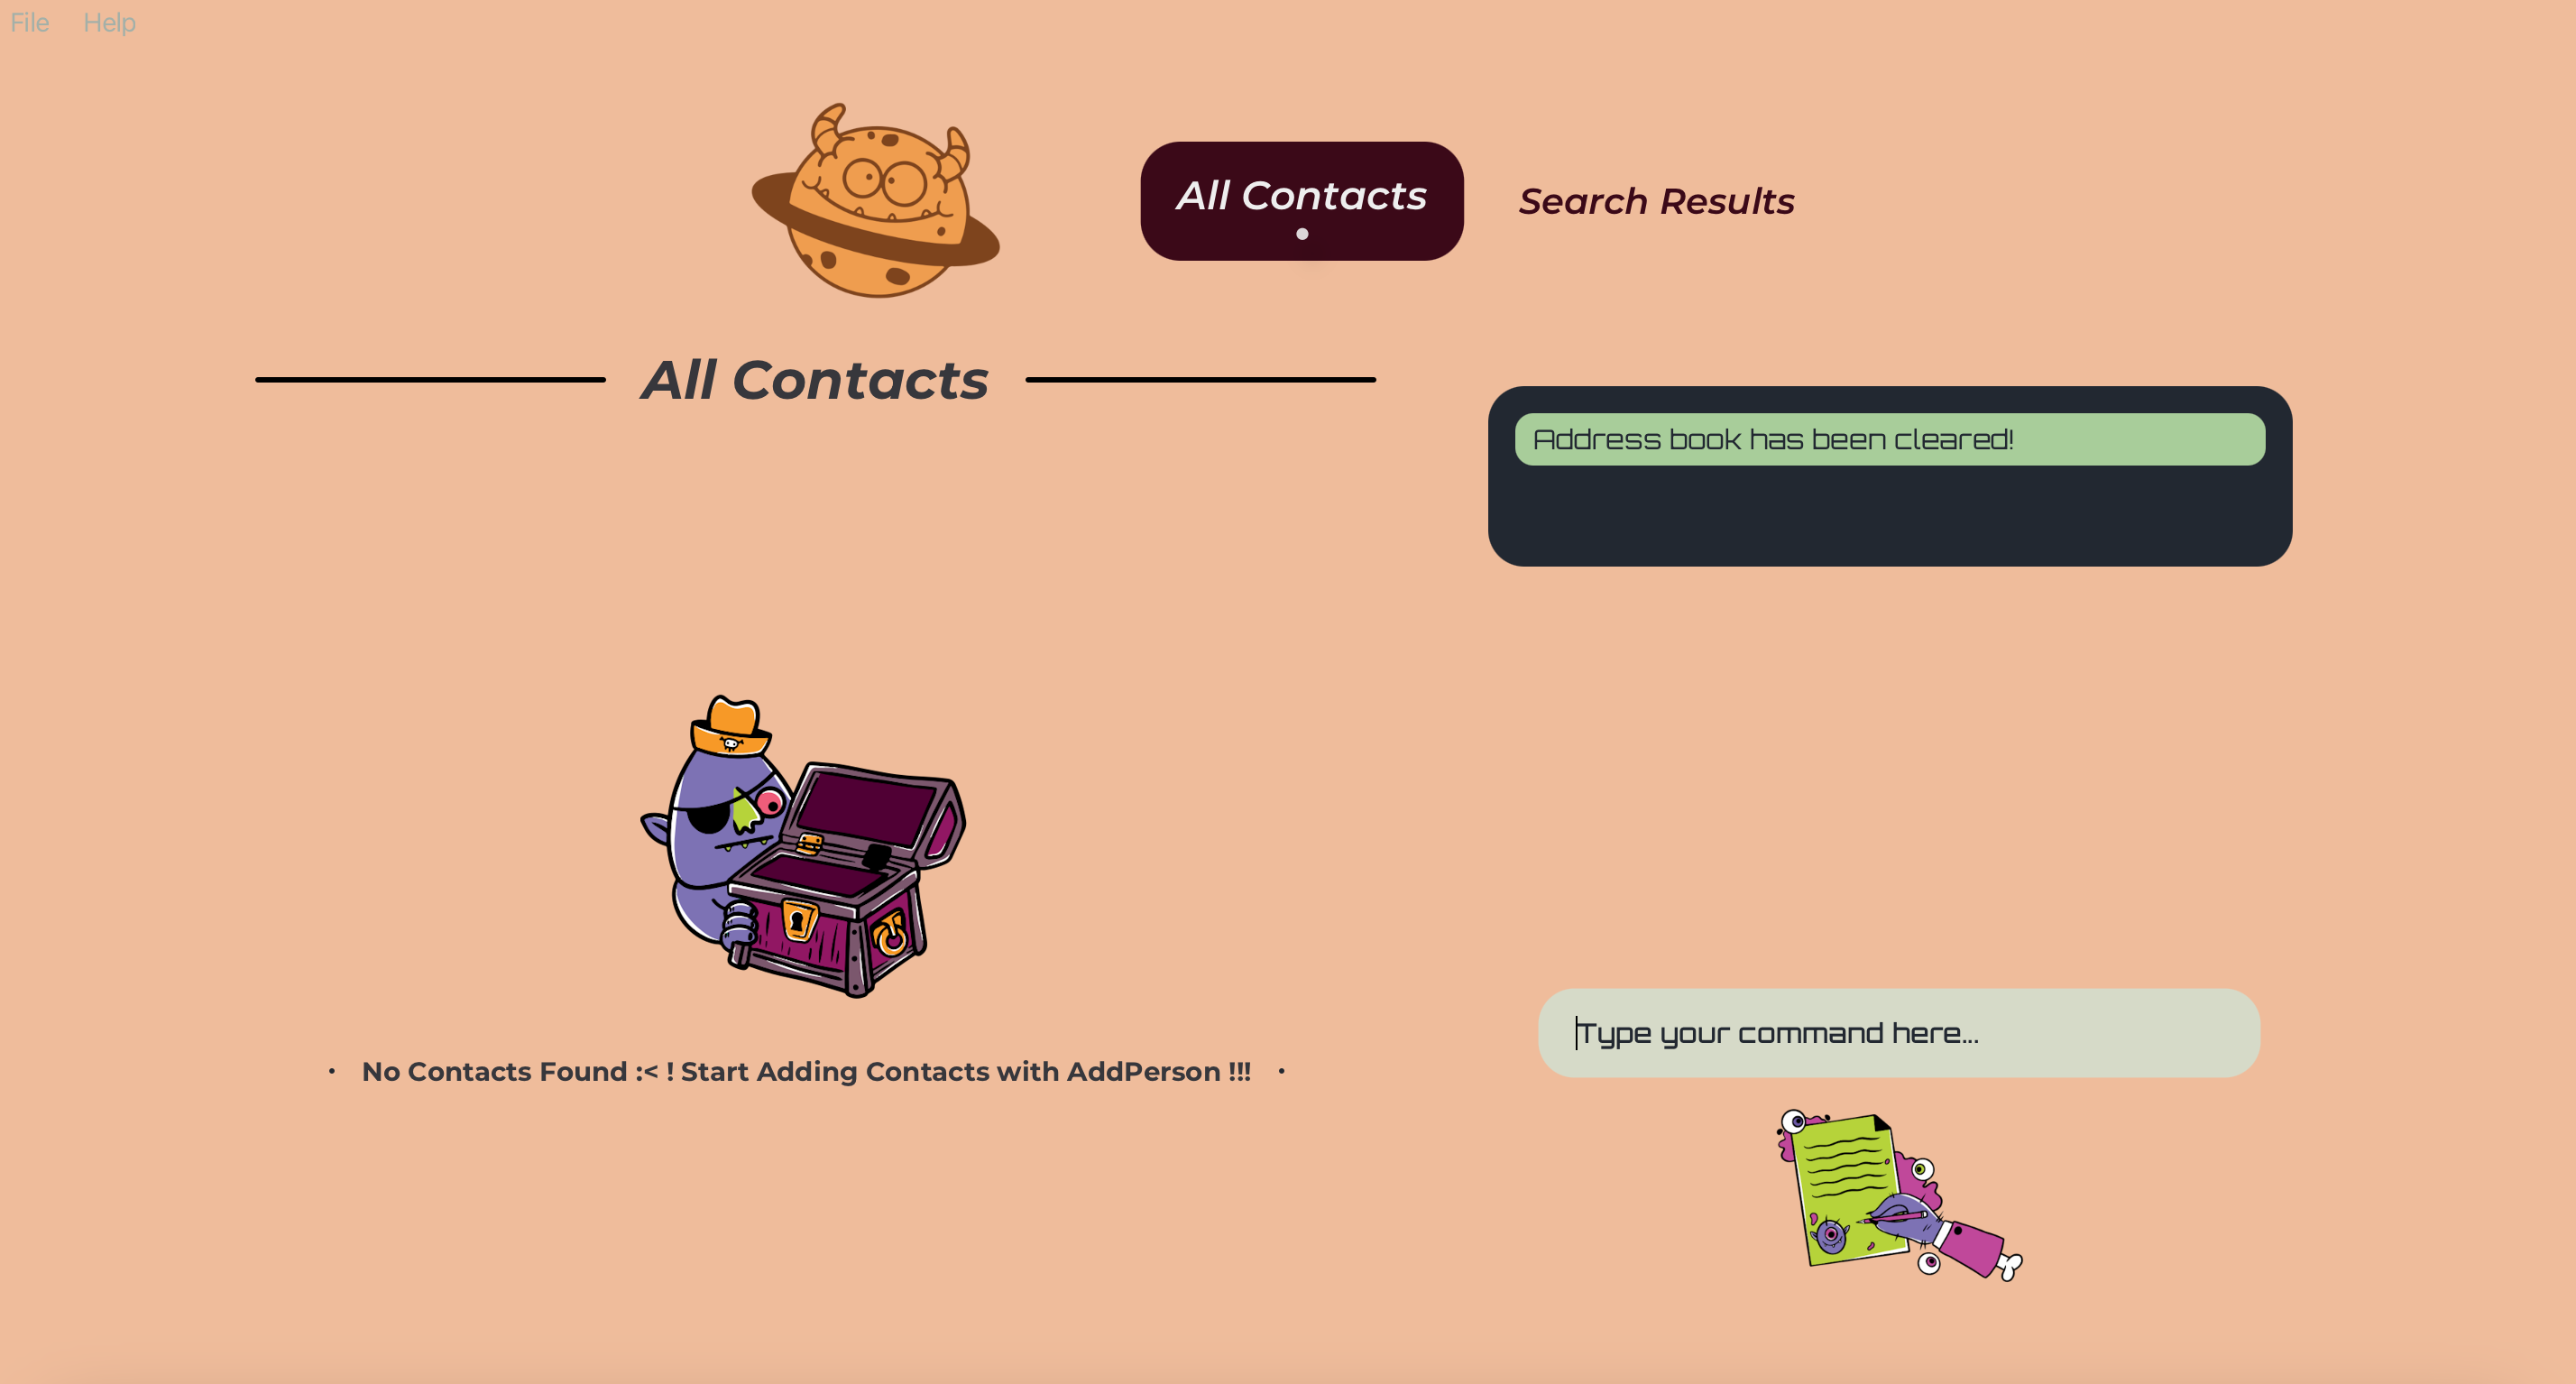
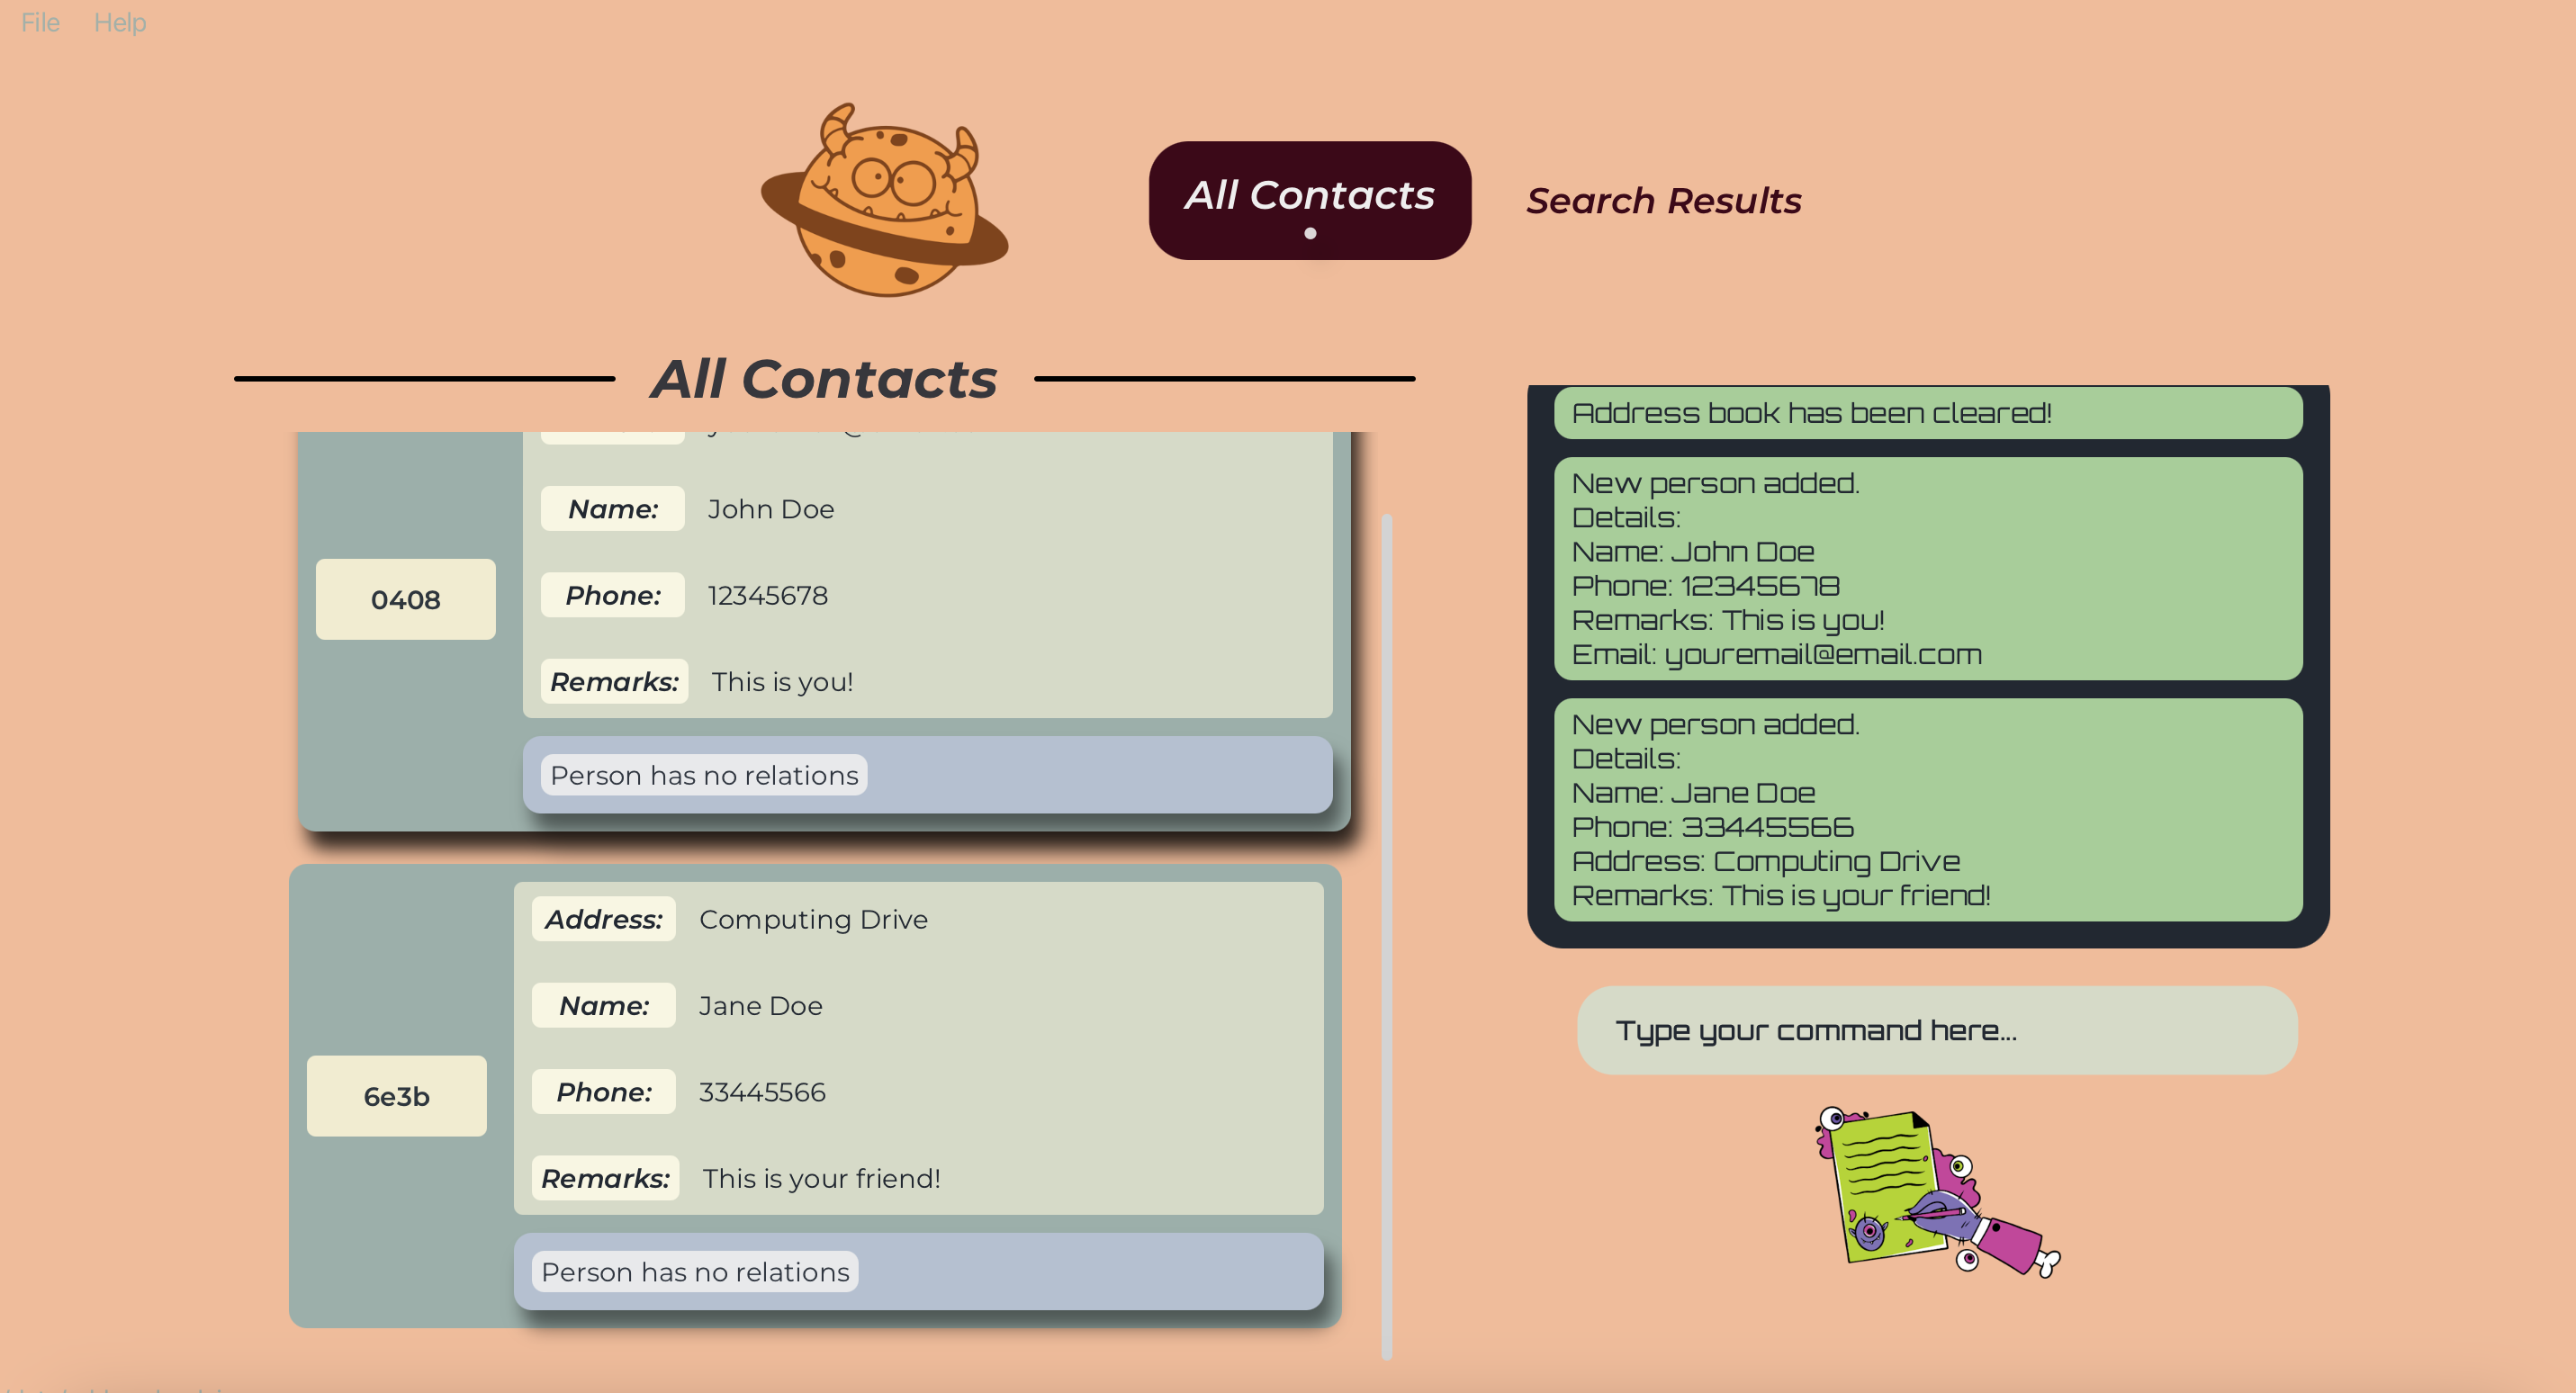
Clearing the Sample Data!
Before we start if you aren’t a fan of the imaginary friends we gave you, let us clear the sample data in Gene-nie! We will use the deleteAllPersons command to clear all the sample data! This leaves you with a clean slate to start your genealogy journey!
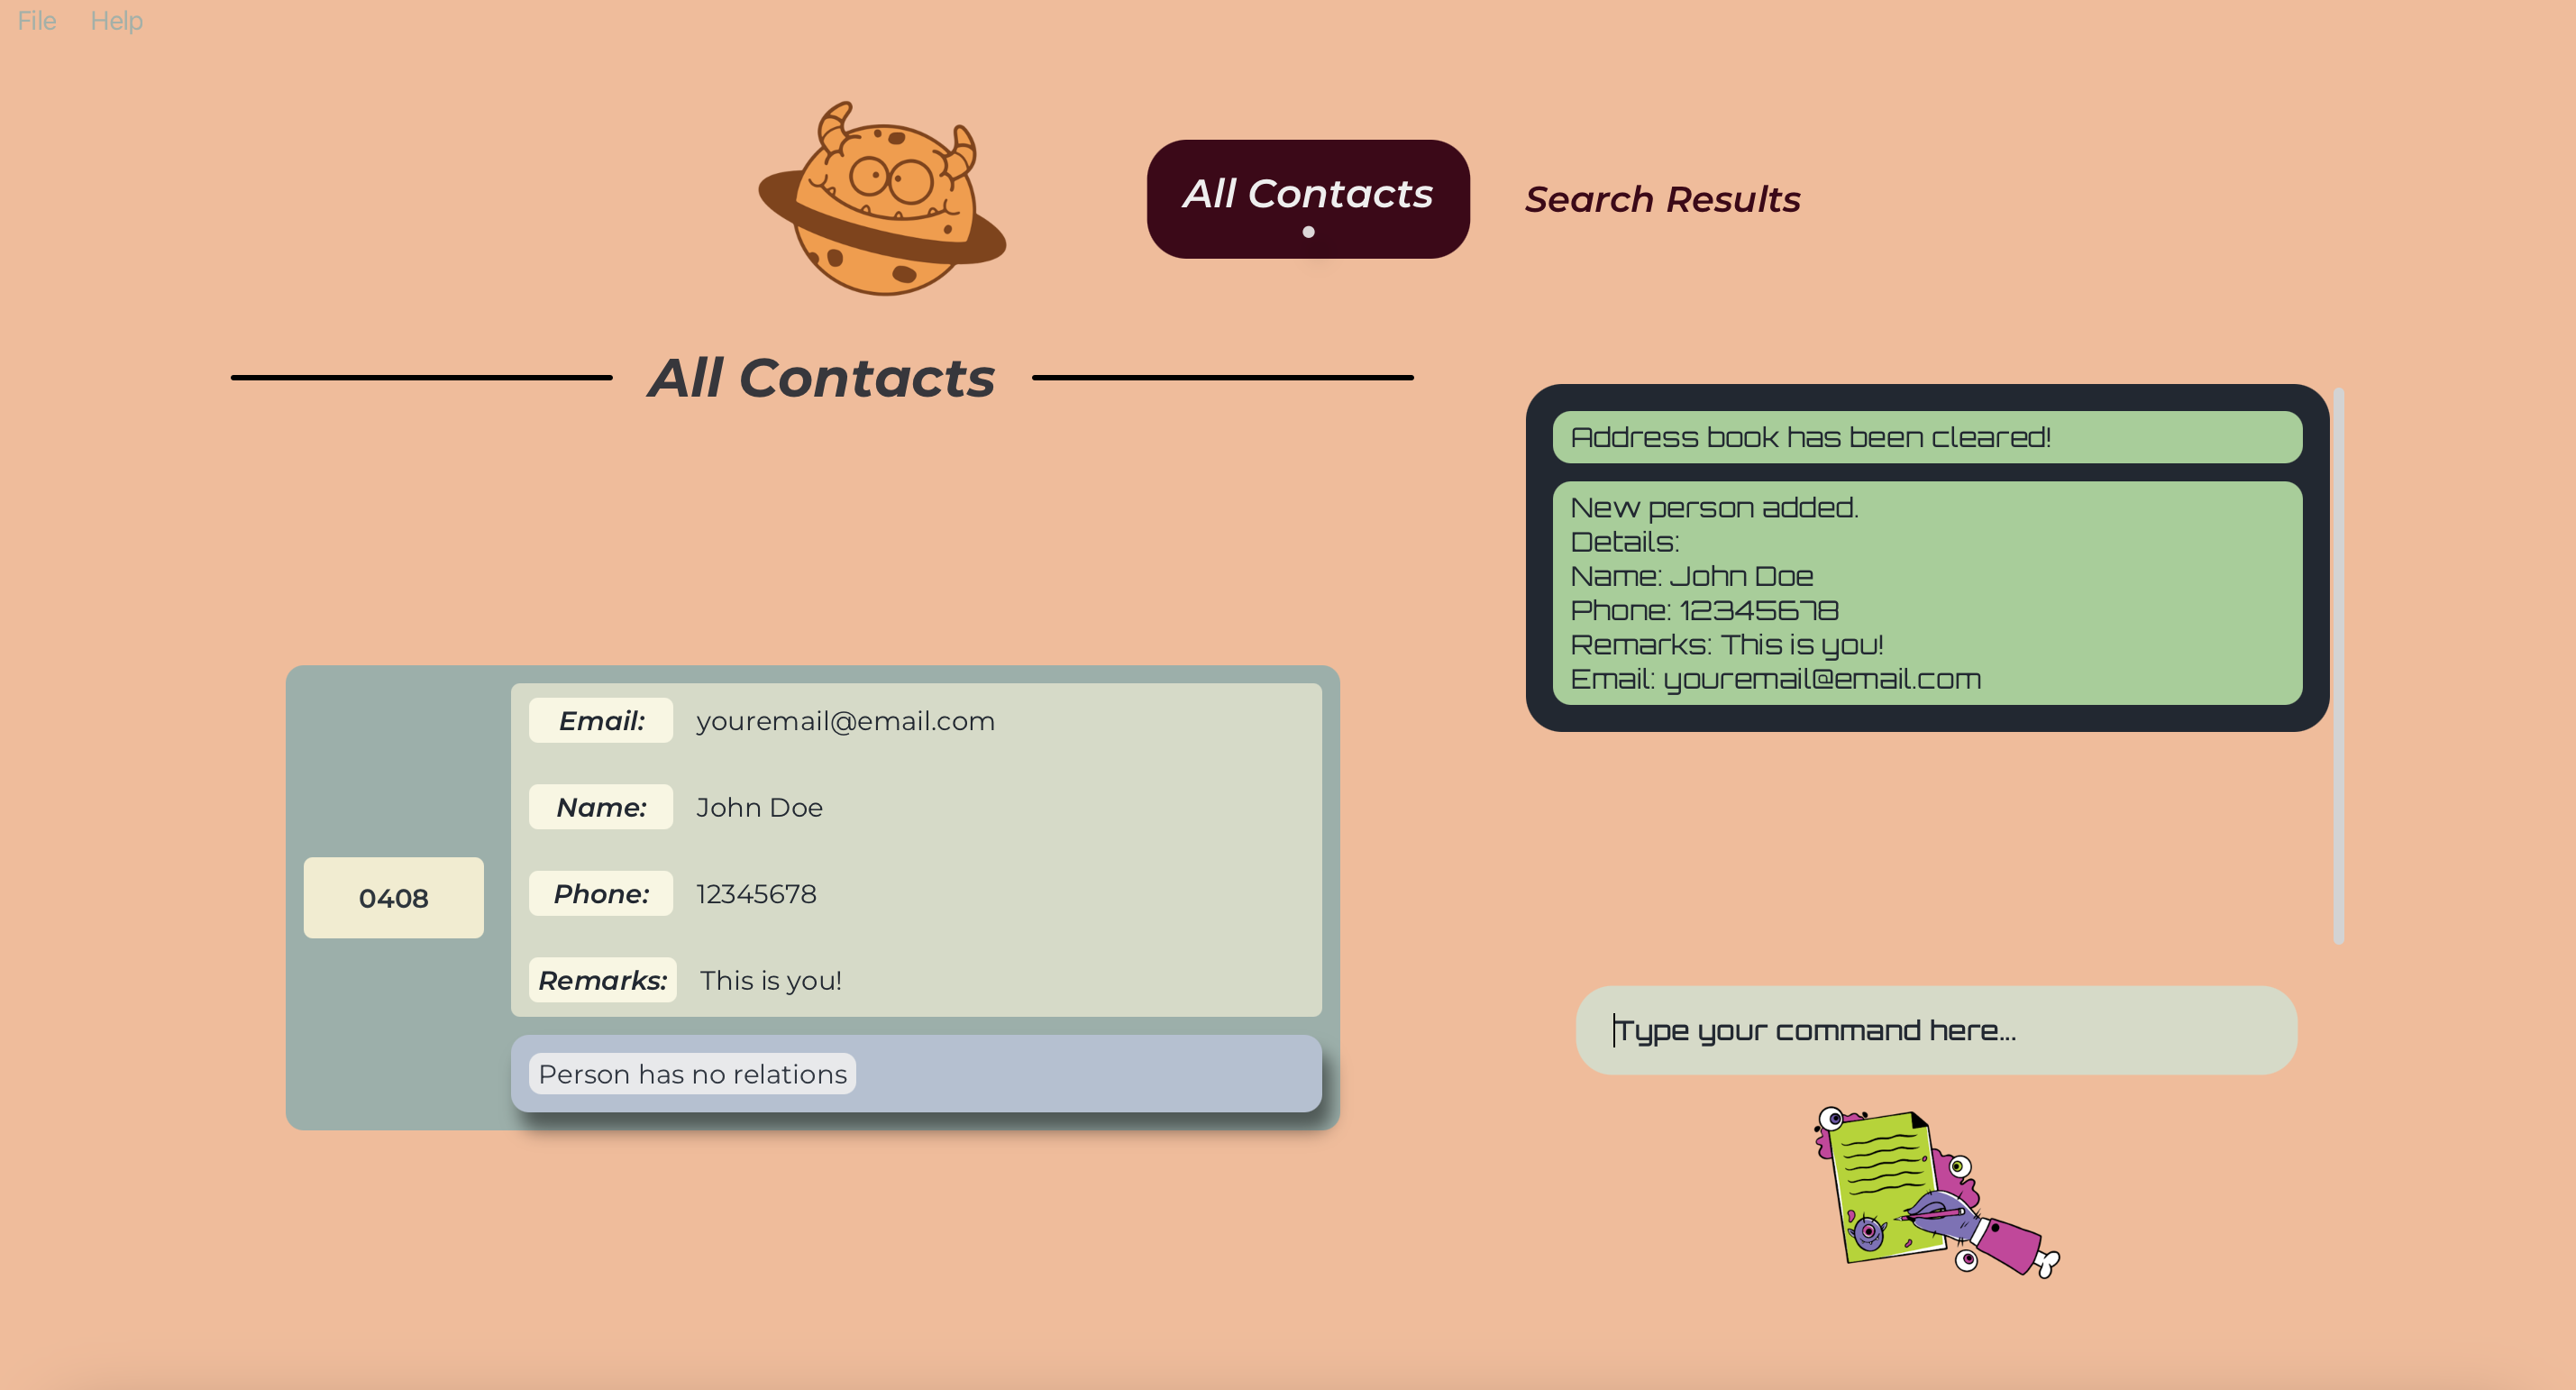
Adding Yourself!
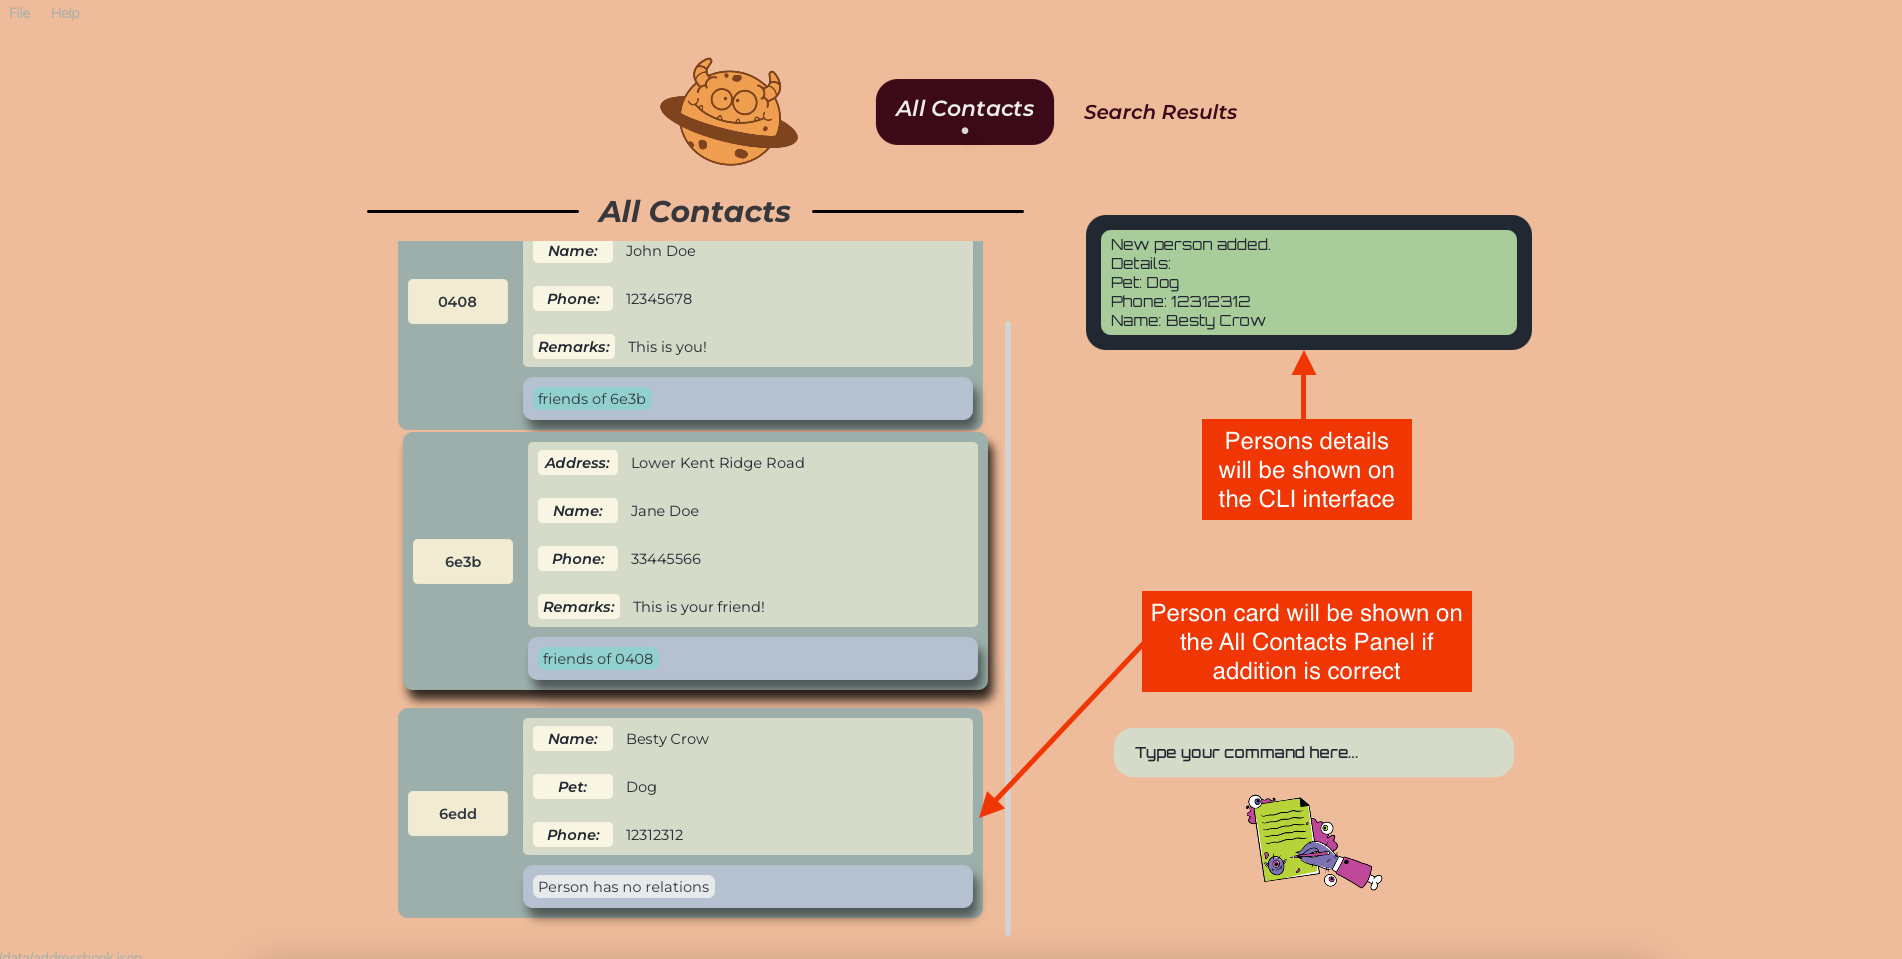
Now that we have a clean slate, let us add you into Gene-nie! We will use the add command to add yourself into Gene-nie! You can add your name, phone number, email, address, or any other details you wish to add! If you want to you are even able to add a person without any attributes!
Type this command add /name Your Name /phone Your Number /email youremail@email.com to add yourself into Gene-nie!
Adding Your Friend!
Now that you have added yourself, let us add your friend into Gene-nie! We will use the add command to add your friend into Gene-nie!
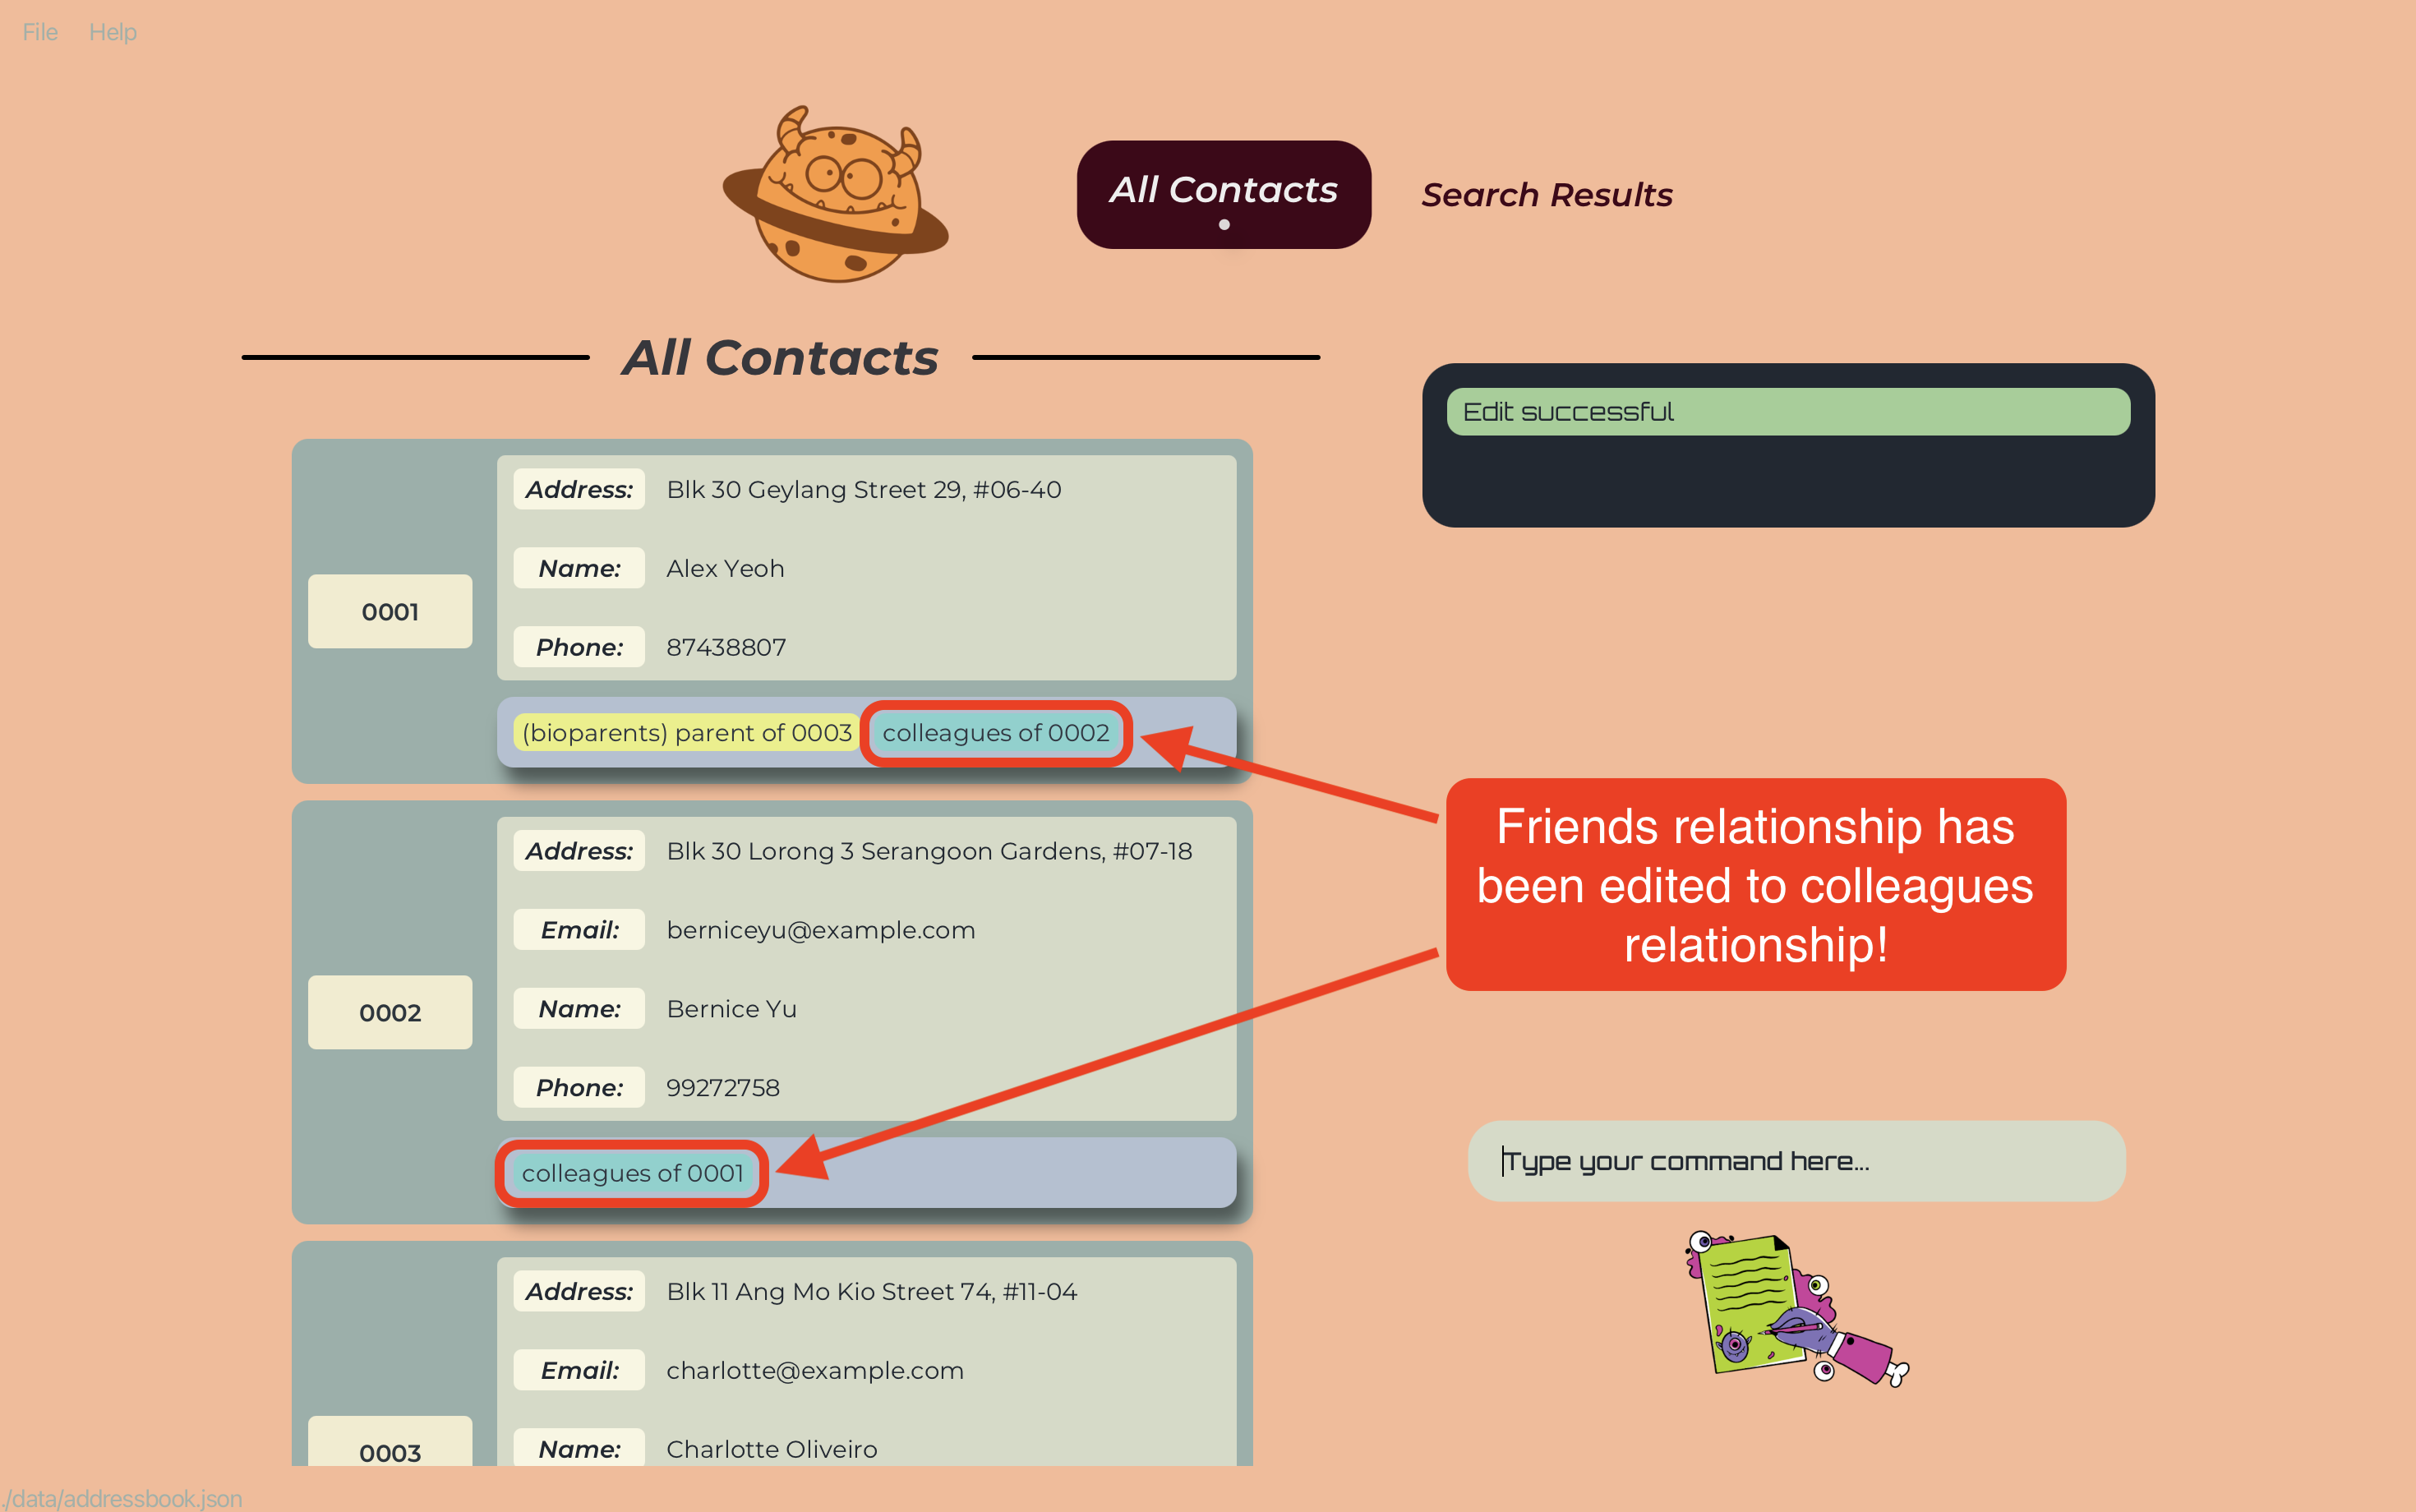
Editing you/your friend’s details!
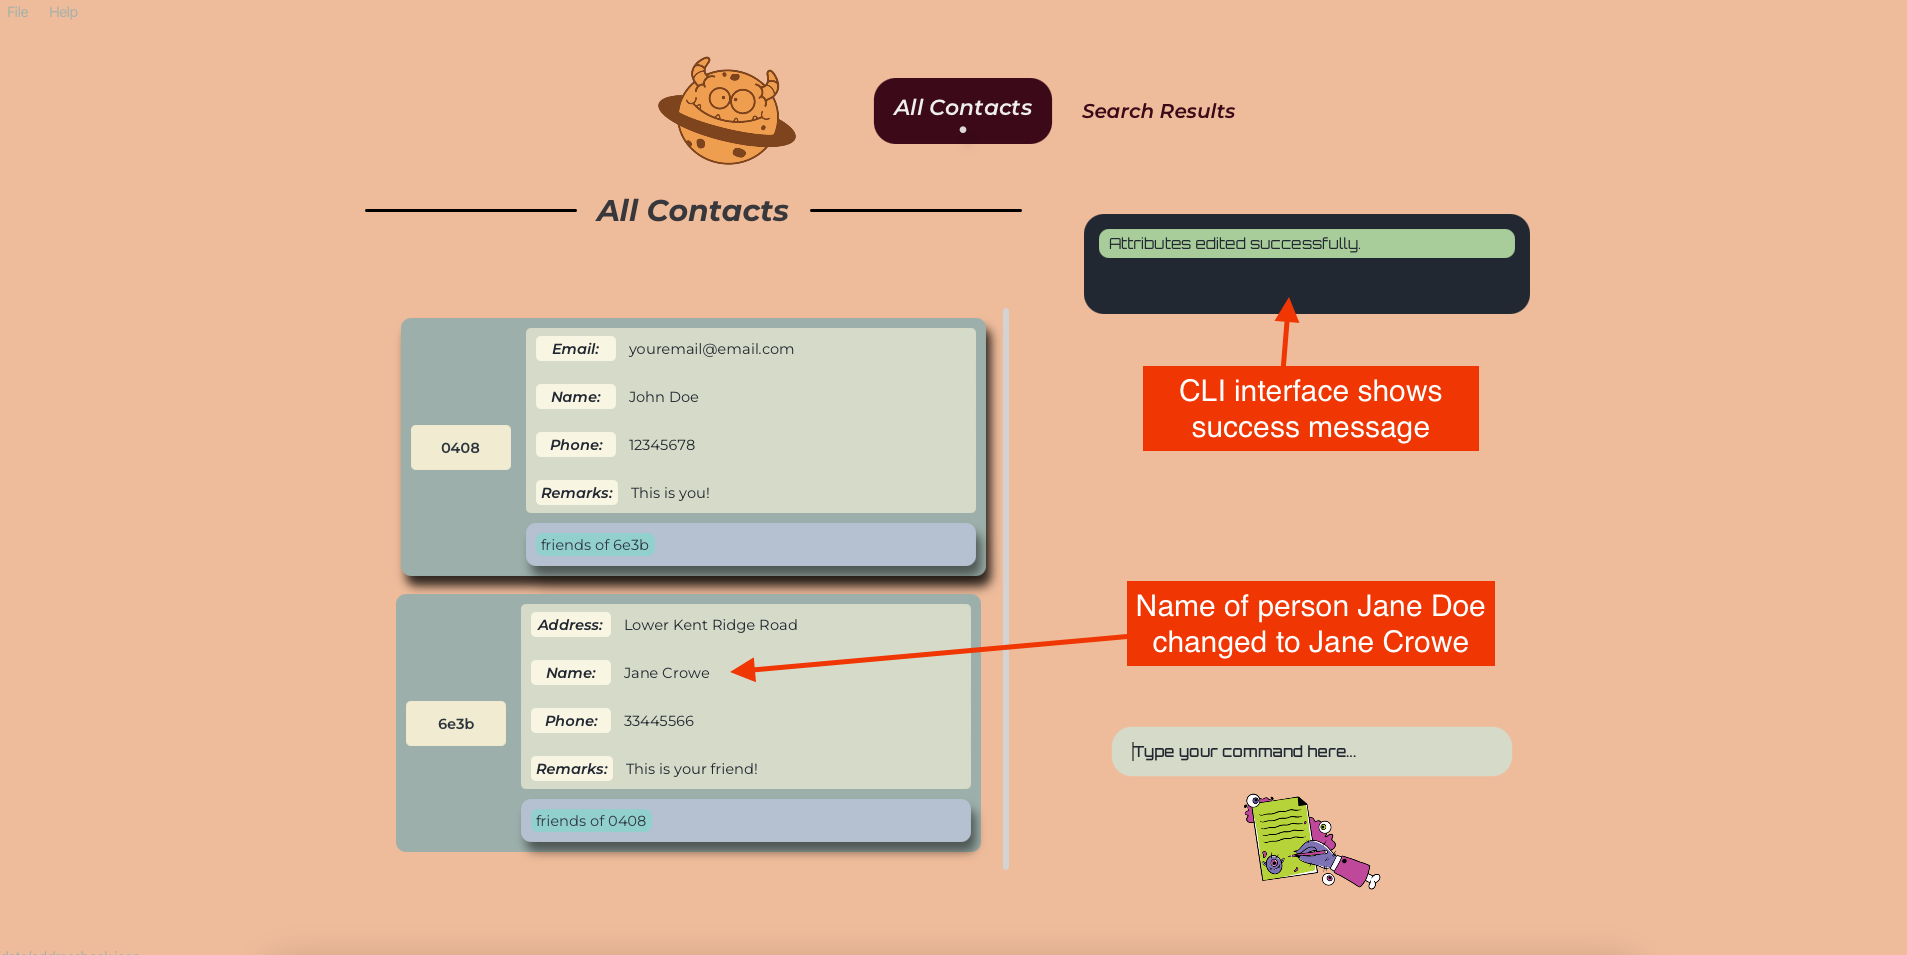
Now that you have added yourself and your friend into Gene-nie, you can edit your details or your friend’s details using the editAttribute command! You can edit any attribute you have added to yourself or your friend! Make sure that you follow the Attribute format when editing the details!
Type this command editAttribute /UUID /AttributeName New Value to edit the attribute of yourself or your friend!
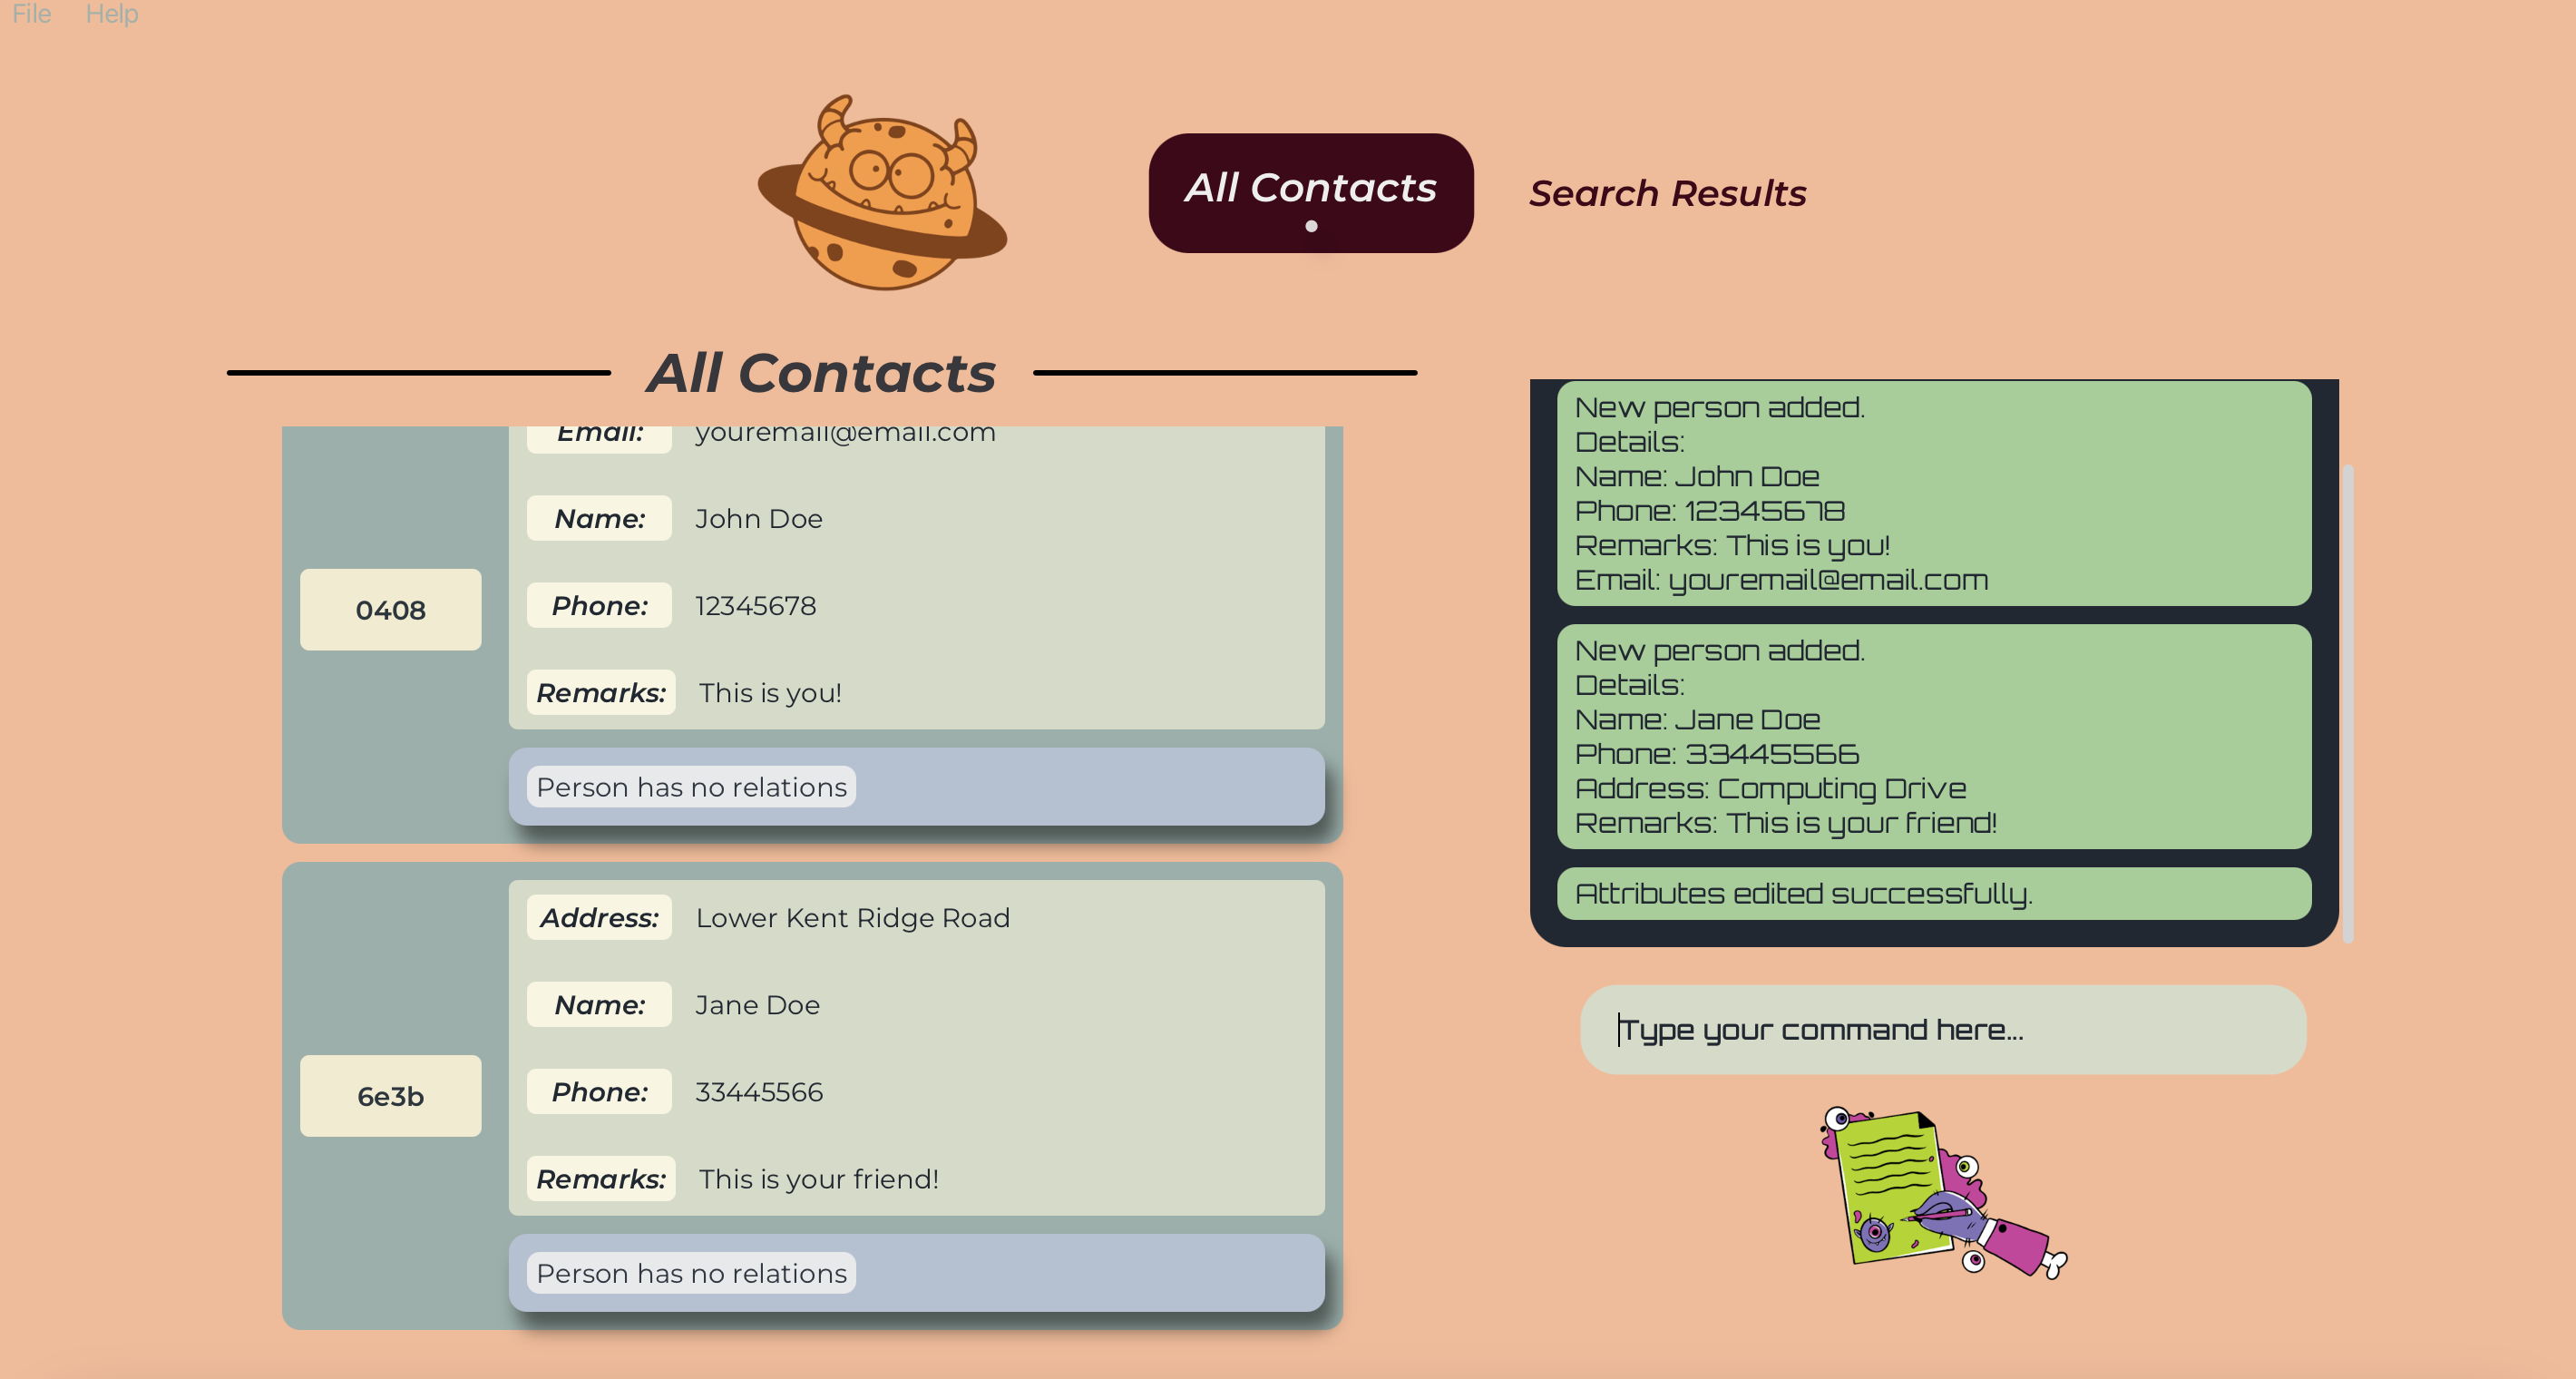
Well done! You have successfully edited the address of your friend! You can also edit any other details you wish to change as long as they exist!
Adding the Relationship!
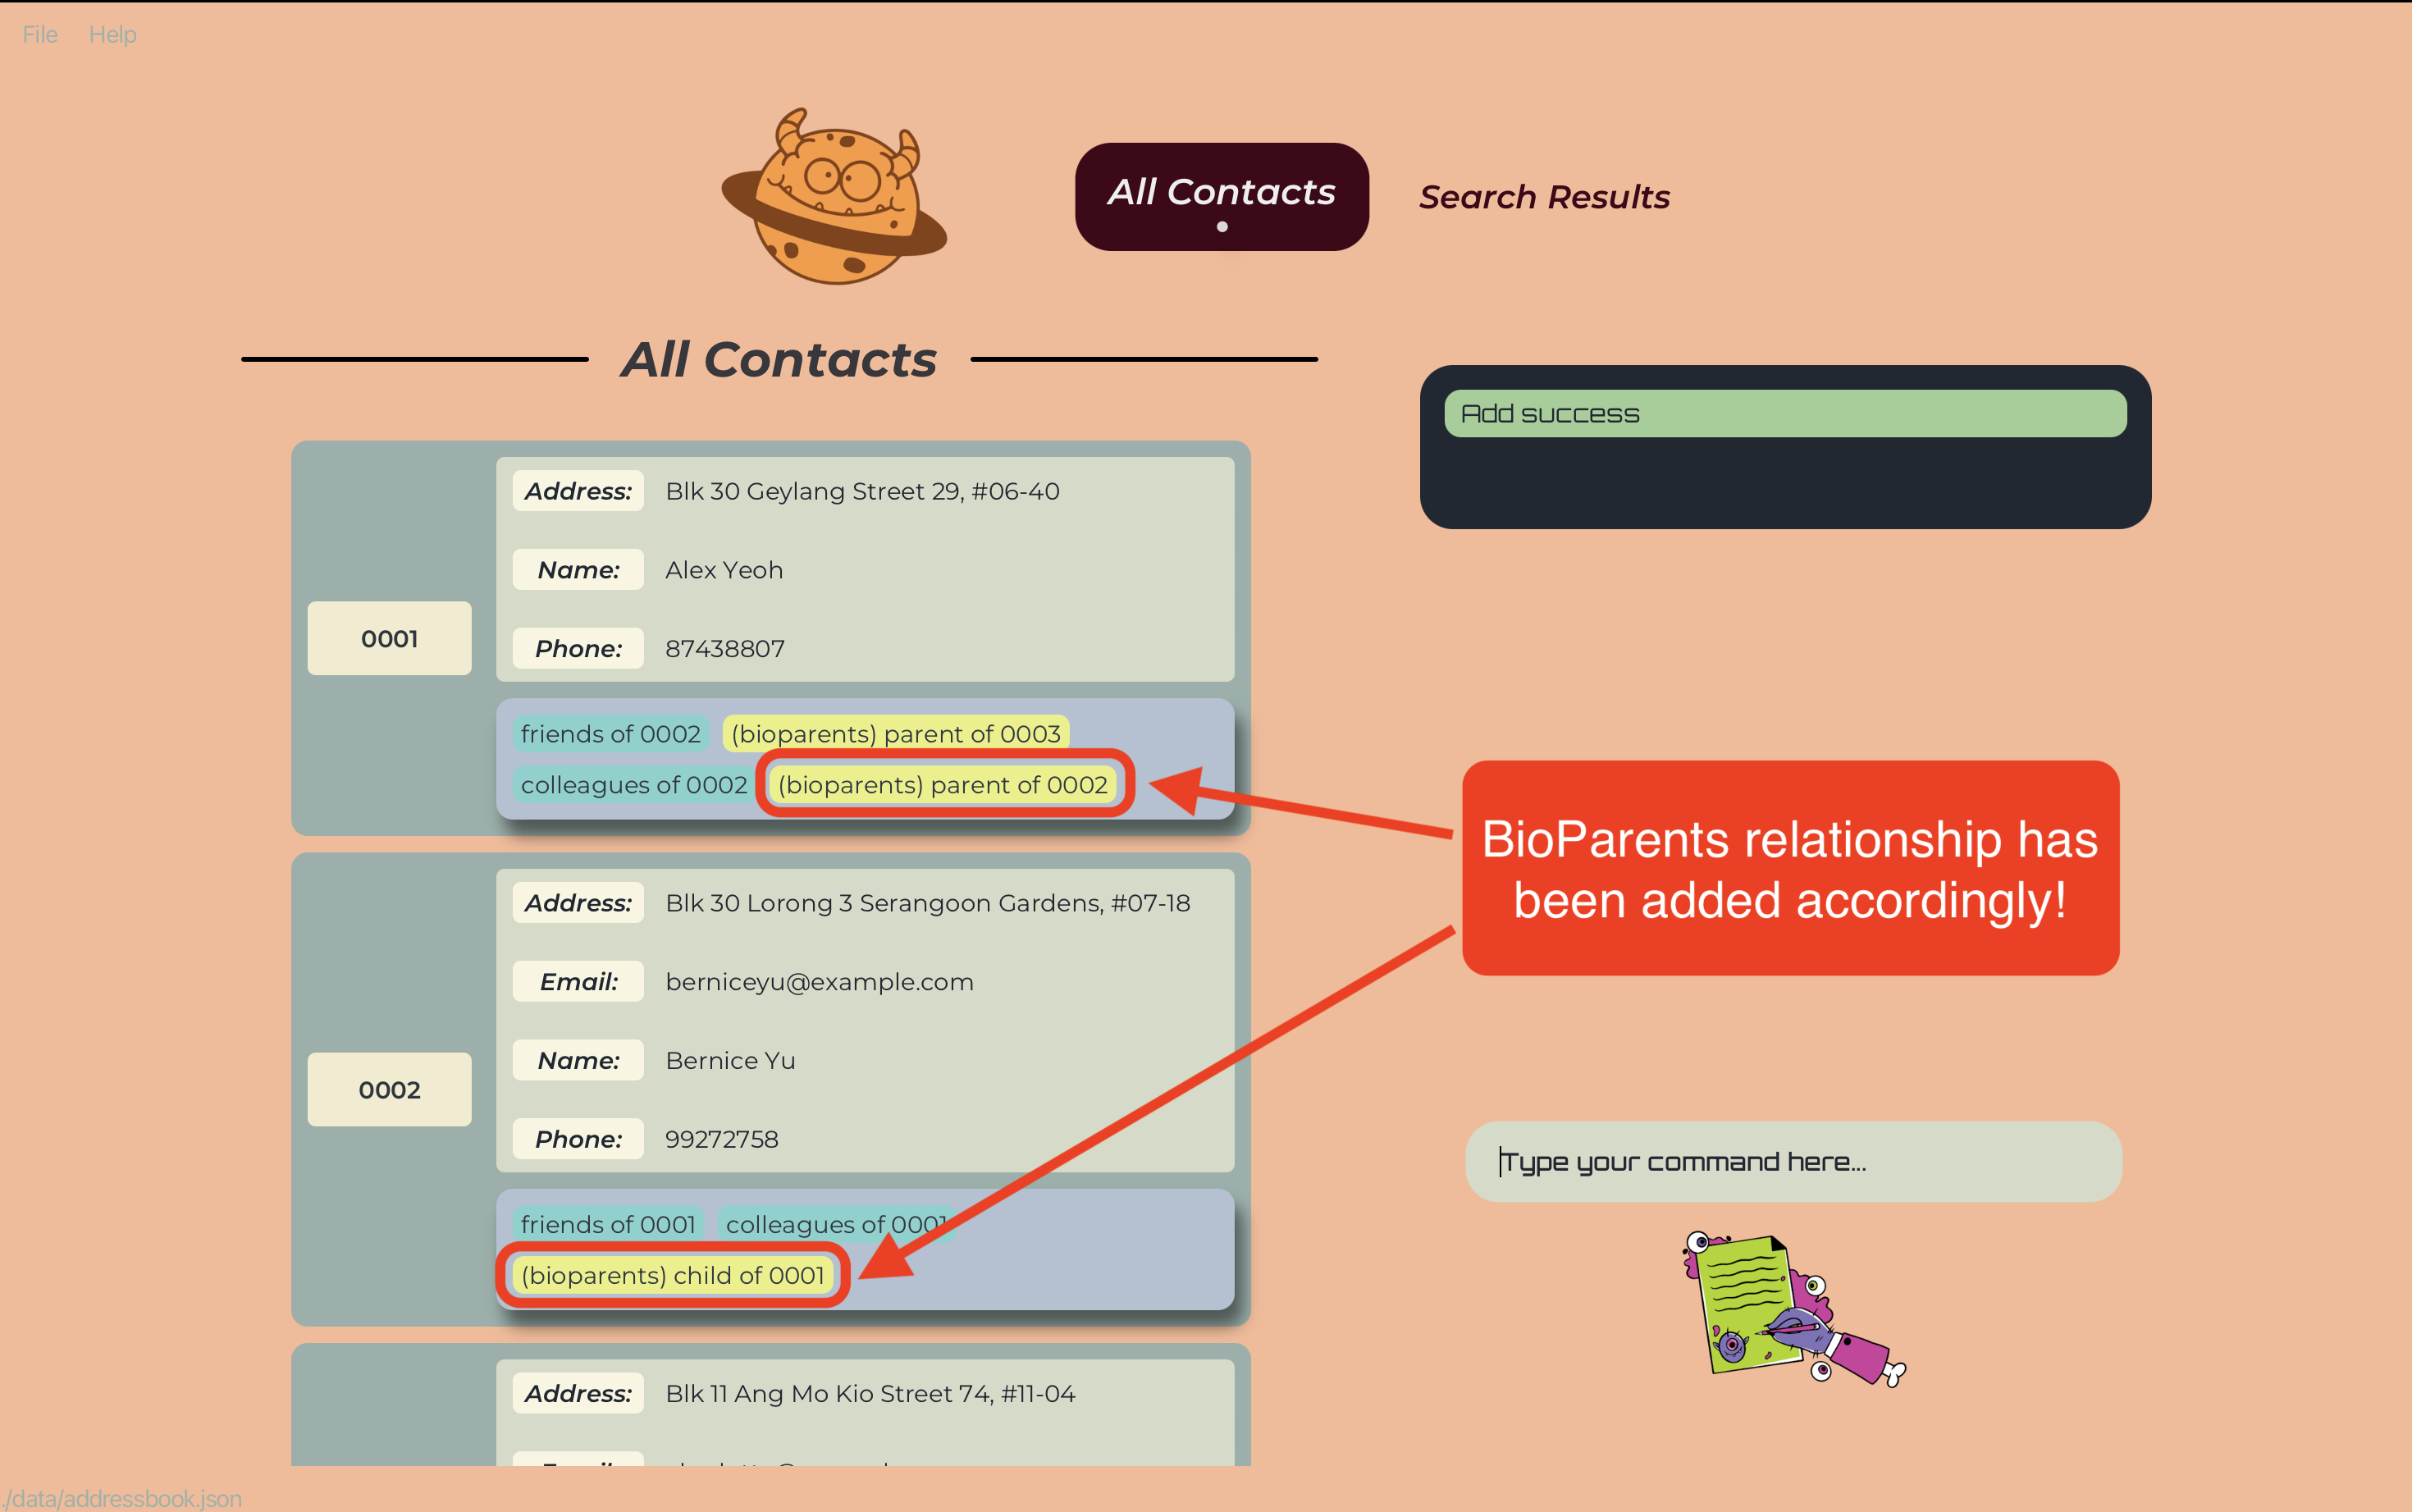
Since you have settled the details for you and your friend’s profiles Gene-nie, let us add the relationship between the two of you! We will use the addRelation command to add this relationship! You can add any relationship you wish to add! Make sure that you follow the Relationship format when adding the relationship!
Type this command addRelation /UUID1 /UUID2 RelationshipType to add the relationship between you and your friend!
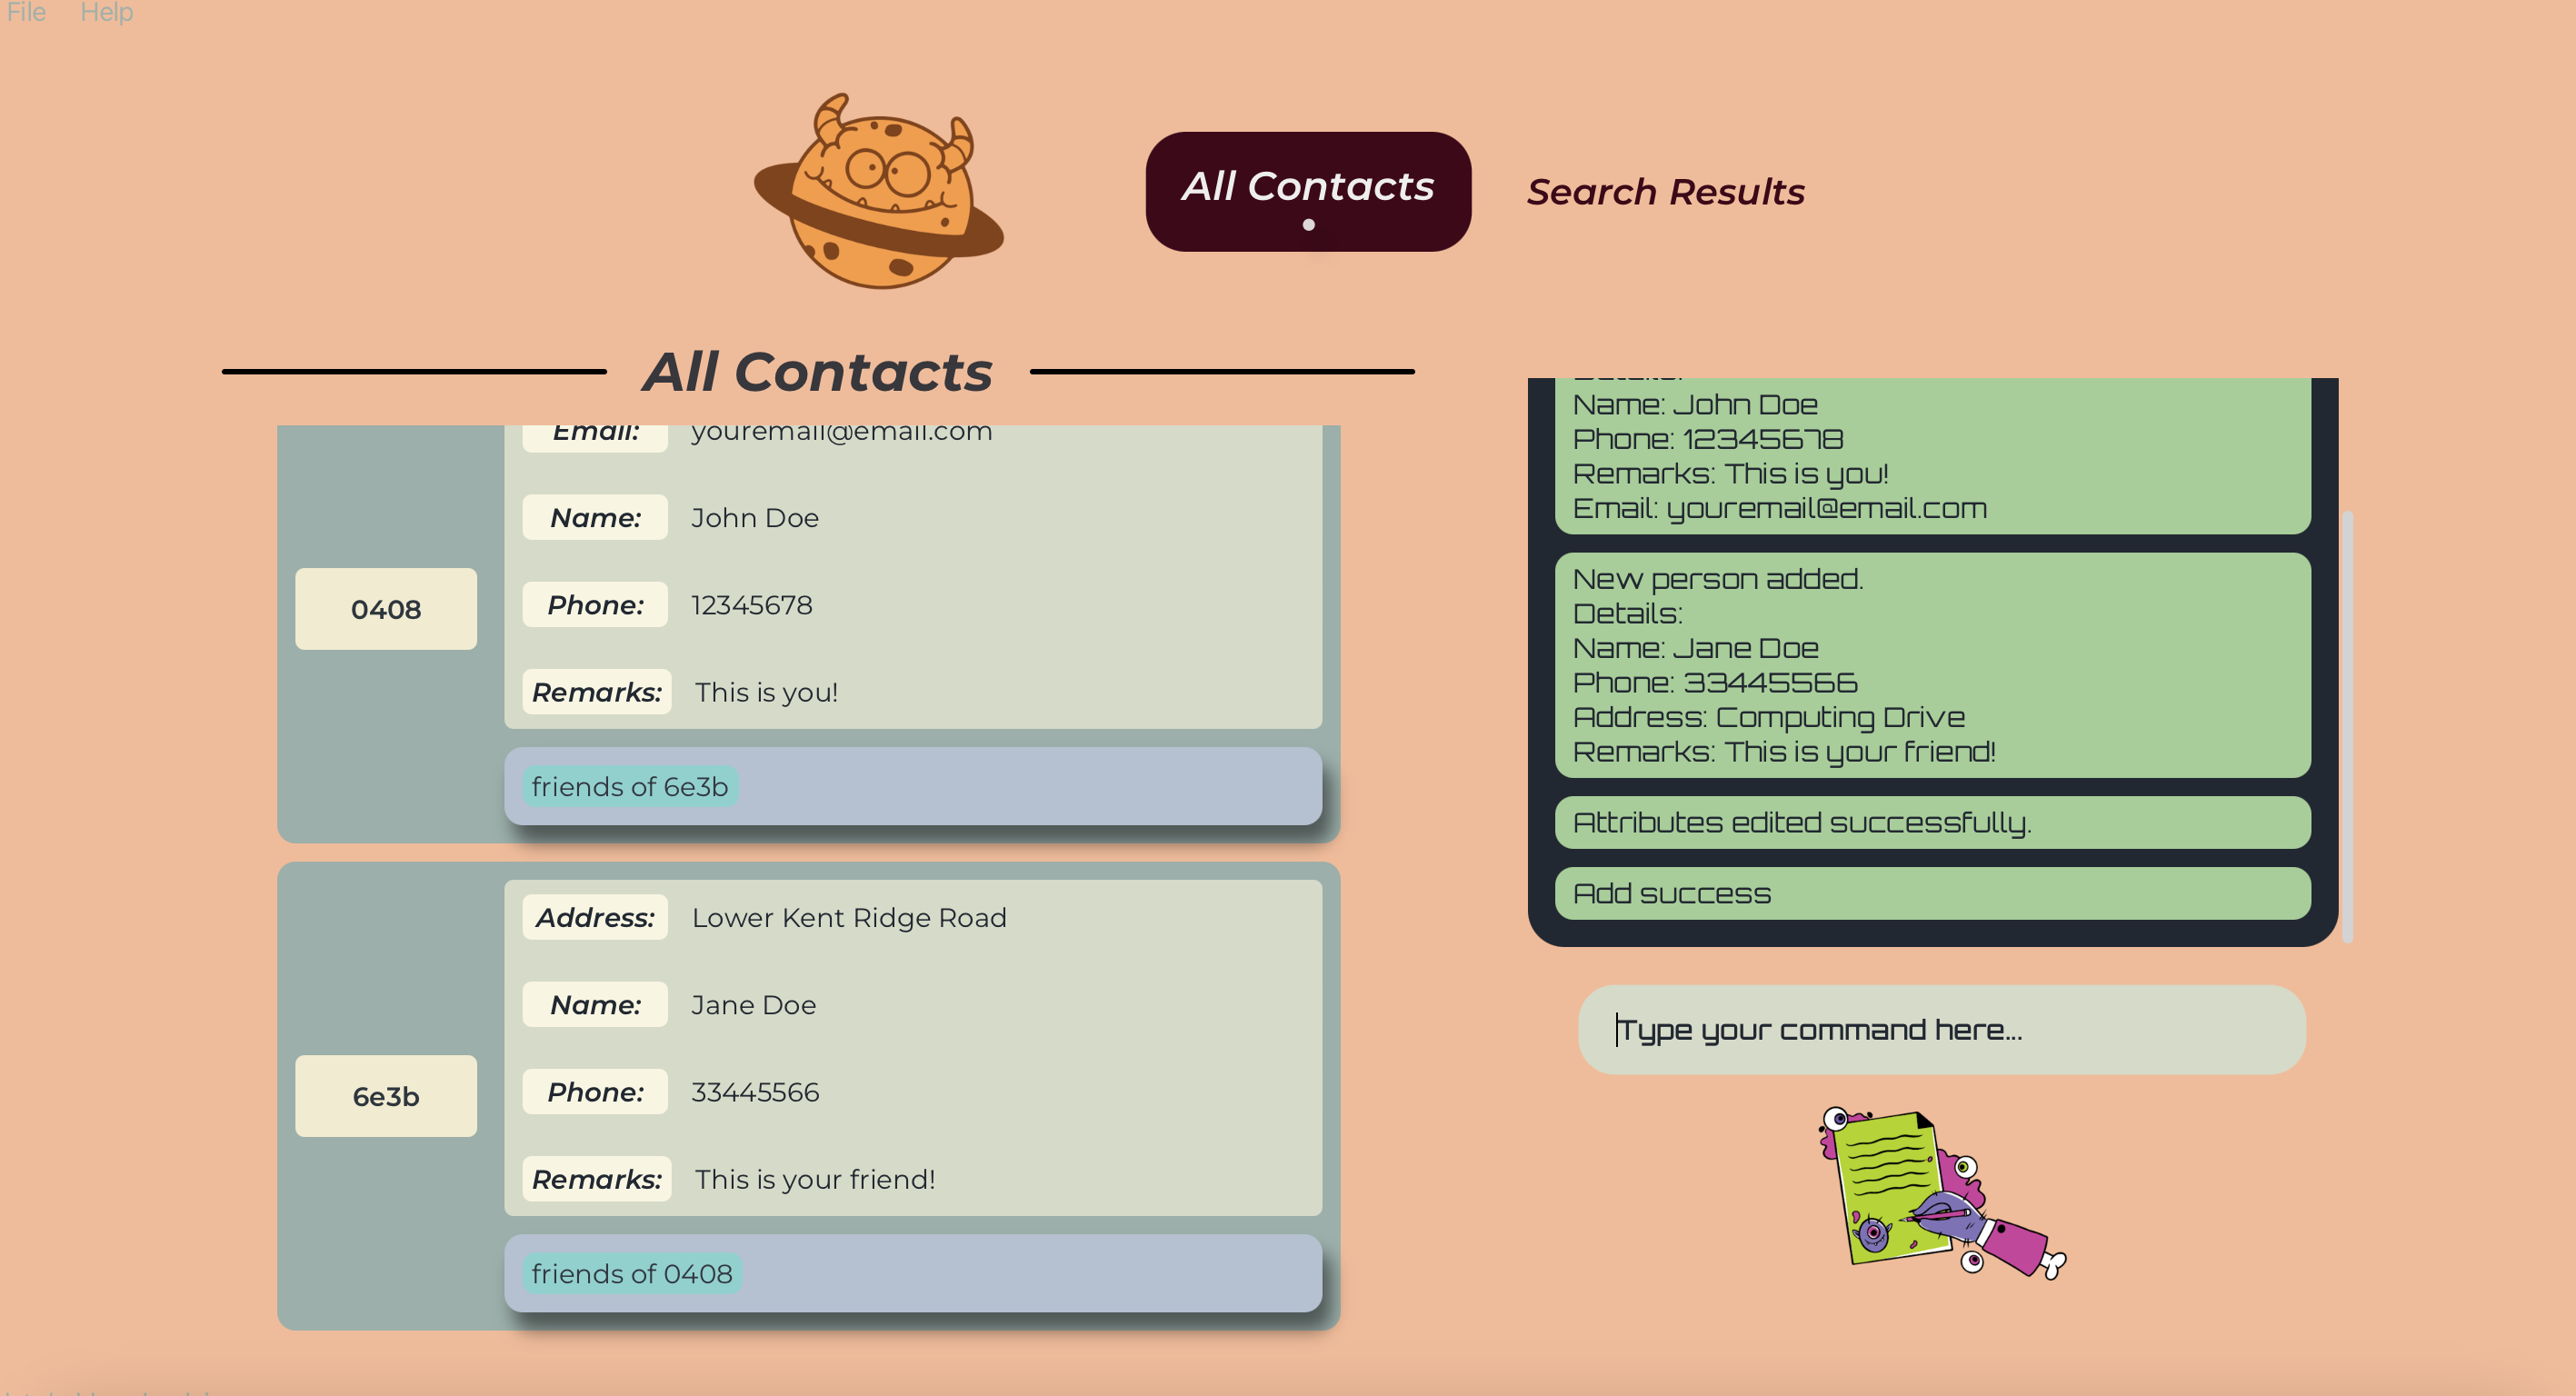
Wow! Wasn’t that easy? You have successfully added the relationship between you and your friend! You can also add any other relationships you wish to add as long as they are valid!
HA HA HA…Congratulations! I never doubted you. You have successfully mastered how to use me! You are now ready to start your magical genealogy journey with me! That wasn’t so hard, was it?
Now that you are a master of Gene-nie, let us bring you through the features of Gene-nie!
Ah, you wish to know more about me! Let me show you the magical features I use to help you manage your contacts and relationships!
Gene-nie has 3 main features:
- Managing Persons
- Managing Attributes of Persons
- Managing Person Relationships
Let us dive into the magical world of Gene-nie!
It seems like you are trying to remember specific details of your friends and family… Let me magic away this issue for you!
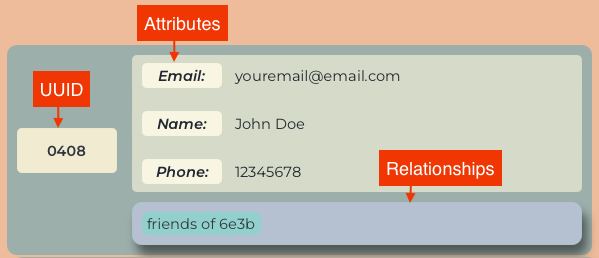
In the world of Gene-nie, we believe that every contact is unique and special! Every friend or family you store in Gene-nie is considered a Person.
A person’s profile in Gene-nie is made up of three pieces of information:
- A unique identifier (UUID)
- Each person has a unique UUID that is used to identify them
- You may view the UUID of a person on the left of their details on each person card, shown in the “All Contacts” and “Search Results” panels
- UUID are 4-characters long
- UUID are case-sensitive
- A set of attributes
- A set of relationships To learn more about attributes and relationships, find their descriptions in Relationships.
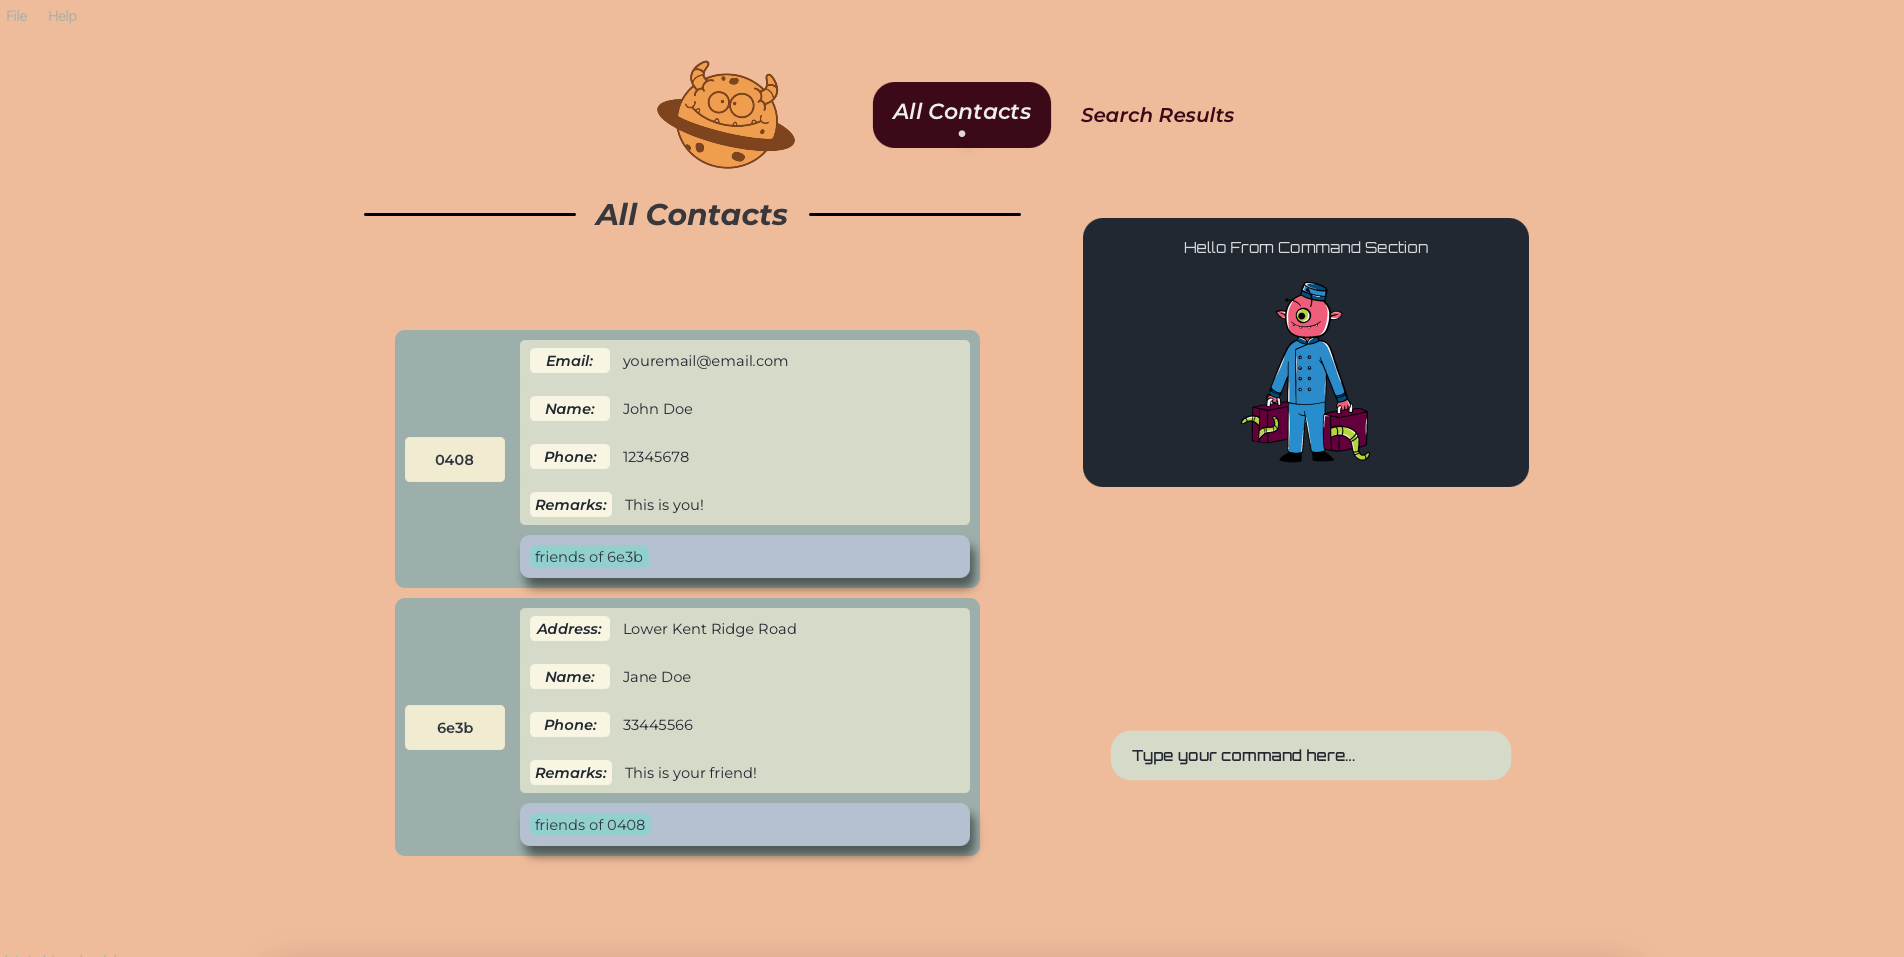
In Gene-nie, a person’s profile is defined as a person card. Have a look at this sample person card. Can you spot where each detail is located?
Ah… It seems you’re trying to remember specific details of your friends and family… Let me help!
Gene-nie believes that every person is unique and special! To help you remember the details of each person, Gene-nie remembers stored information about each person in the form of Attributes.
Attributes are what you use to store any information about a particular person! It is one of three types of information in a person’s profile, with the other 2 being the UUID and relationships.
Each attribute possesses a name and a value. They can be added, edited or deleted. You have the power to craft any attribute with your own name and value, limited only by the constraints of the specified attributes and your imagination. Generally, the value of attributes are not policed, as we open our arms to welcome people who have family members with exotic details, like symbols in names (subject to limitations due to command format, see below)! However, tread carefully, for duplicate attribute values are checked and will not be added to the same person.
- Attribute names are case-insensitive and will be converted to a consistent case. However, we do not restrict the length of your names. So with great power comes great responsibility! Having too long a name will cause the UI to be ugly so do choose wisely! We recommend keeping it short and sweet!
- Attribute Values are case-sensitive and will be stored as is.
- You will be able to define your own Attribute Names! and the value for it. But be warned, other than the predefined attributes listed below, attribute values must be a string!
For your convenience, Gene-nie has some predefined attributes that you can use, with stricter checks when creating or editing them. These are:
-
Nameattribute with String value, and can be any string supported by the command format (see attribute commands below)- It is a predefined attribute for the purposes of future features.
-
Phoneattribute with Integer value, limited to 9 numeric digits (no spaces or symbols), for we keep our magic pure and precise. -
Birthdayattribute with Date value, with the formatyyyy-mm-dd, for example2024-01-01- Our application supports a wide range of date inputs to accommodate various historical and genealogical data. You can enter dates using the following format: YYYY-MM-DD.
- Year (YYYY): The year can range from -9999 to today’s date! This lets you represent of historical dates and more easily track your family history! This range is dictated by the limits of the DateTime object used in our application. Negative years are used to denote years BCE (Before the Common Era).
- While our application supports a wide range of years, the input still requires valid months and days corresponding to the Gregorian calendar. For example,
2023-02-29is invalid because2023is not a leap year.
-
Sexattribute with String value, limited toMaleorFemale(not case-sensitive)- This attribute is used to check whether the relationship is valid or not. For example, a person cannot be a
bioparentsof a person with the sameSexattribute. - The valid inputs for
Maleattributes aremaleandm. The inputs are not case-sensitive. - The valid inputs for
Femaleattributes arefemaleandf. The inputs are not case-sensitive.
- This attribute is used to check whether the relationship is valid or not. For example, a person cannot be a
![]() Caution:
Caution:
Attribute names:
- are case-insensitive
- will automatically be converted to a consistent case
- This case is first letter capitalised, lowercase thereafter. e.g.
/pEtwill be stored asPet
- This case is first letter capitalised, lowercase thereafter. e.g.
- cannot be empty
- cannot contain
/or ` ` (space)- if the attribute name contains a space, the portion after the space will erroneously be treated as part of the attribute value and throw the relevant error
- if you forget to add the space to the attribute name, the attribute name will be stored as the whole string without spaces
Attribute values:
- are case-sensitive
- cannot be empty
- cannot contain
/ - will be of type String, other than the predefined attributes listed above
- cannot be converted to another type. e.g. if the attribute is of type Integer, the edit command must be used with an integer value
You wish to know more about the relationships between your friends and family… Let me show you the way!
In this magical world of Gene-nie, we cherish each and every connection that exist between individuals! To help you remember the relationships between each person, Gene-nie remembers stored information about each person in the form of Relationships.
Relationships are what you use to store information about the relationship between 2 persons. It is one of three types of information in a person’s profile, with the other 2 being the UUID and attributes.
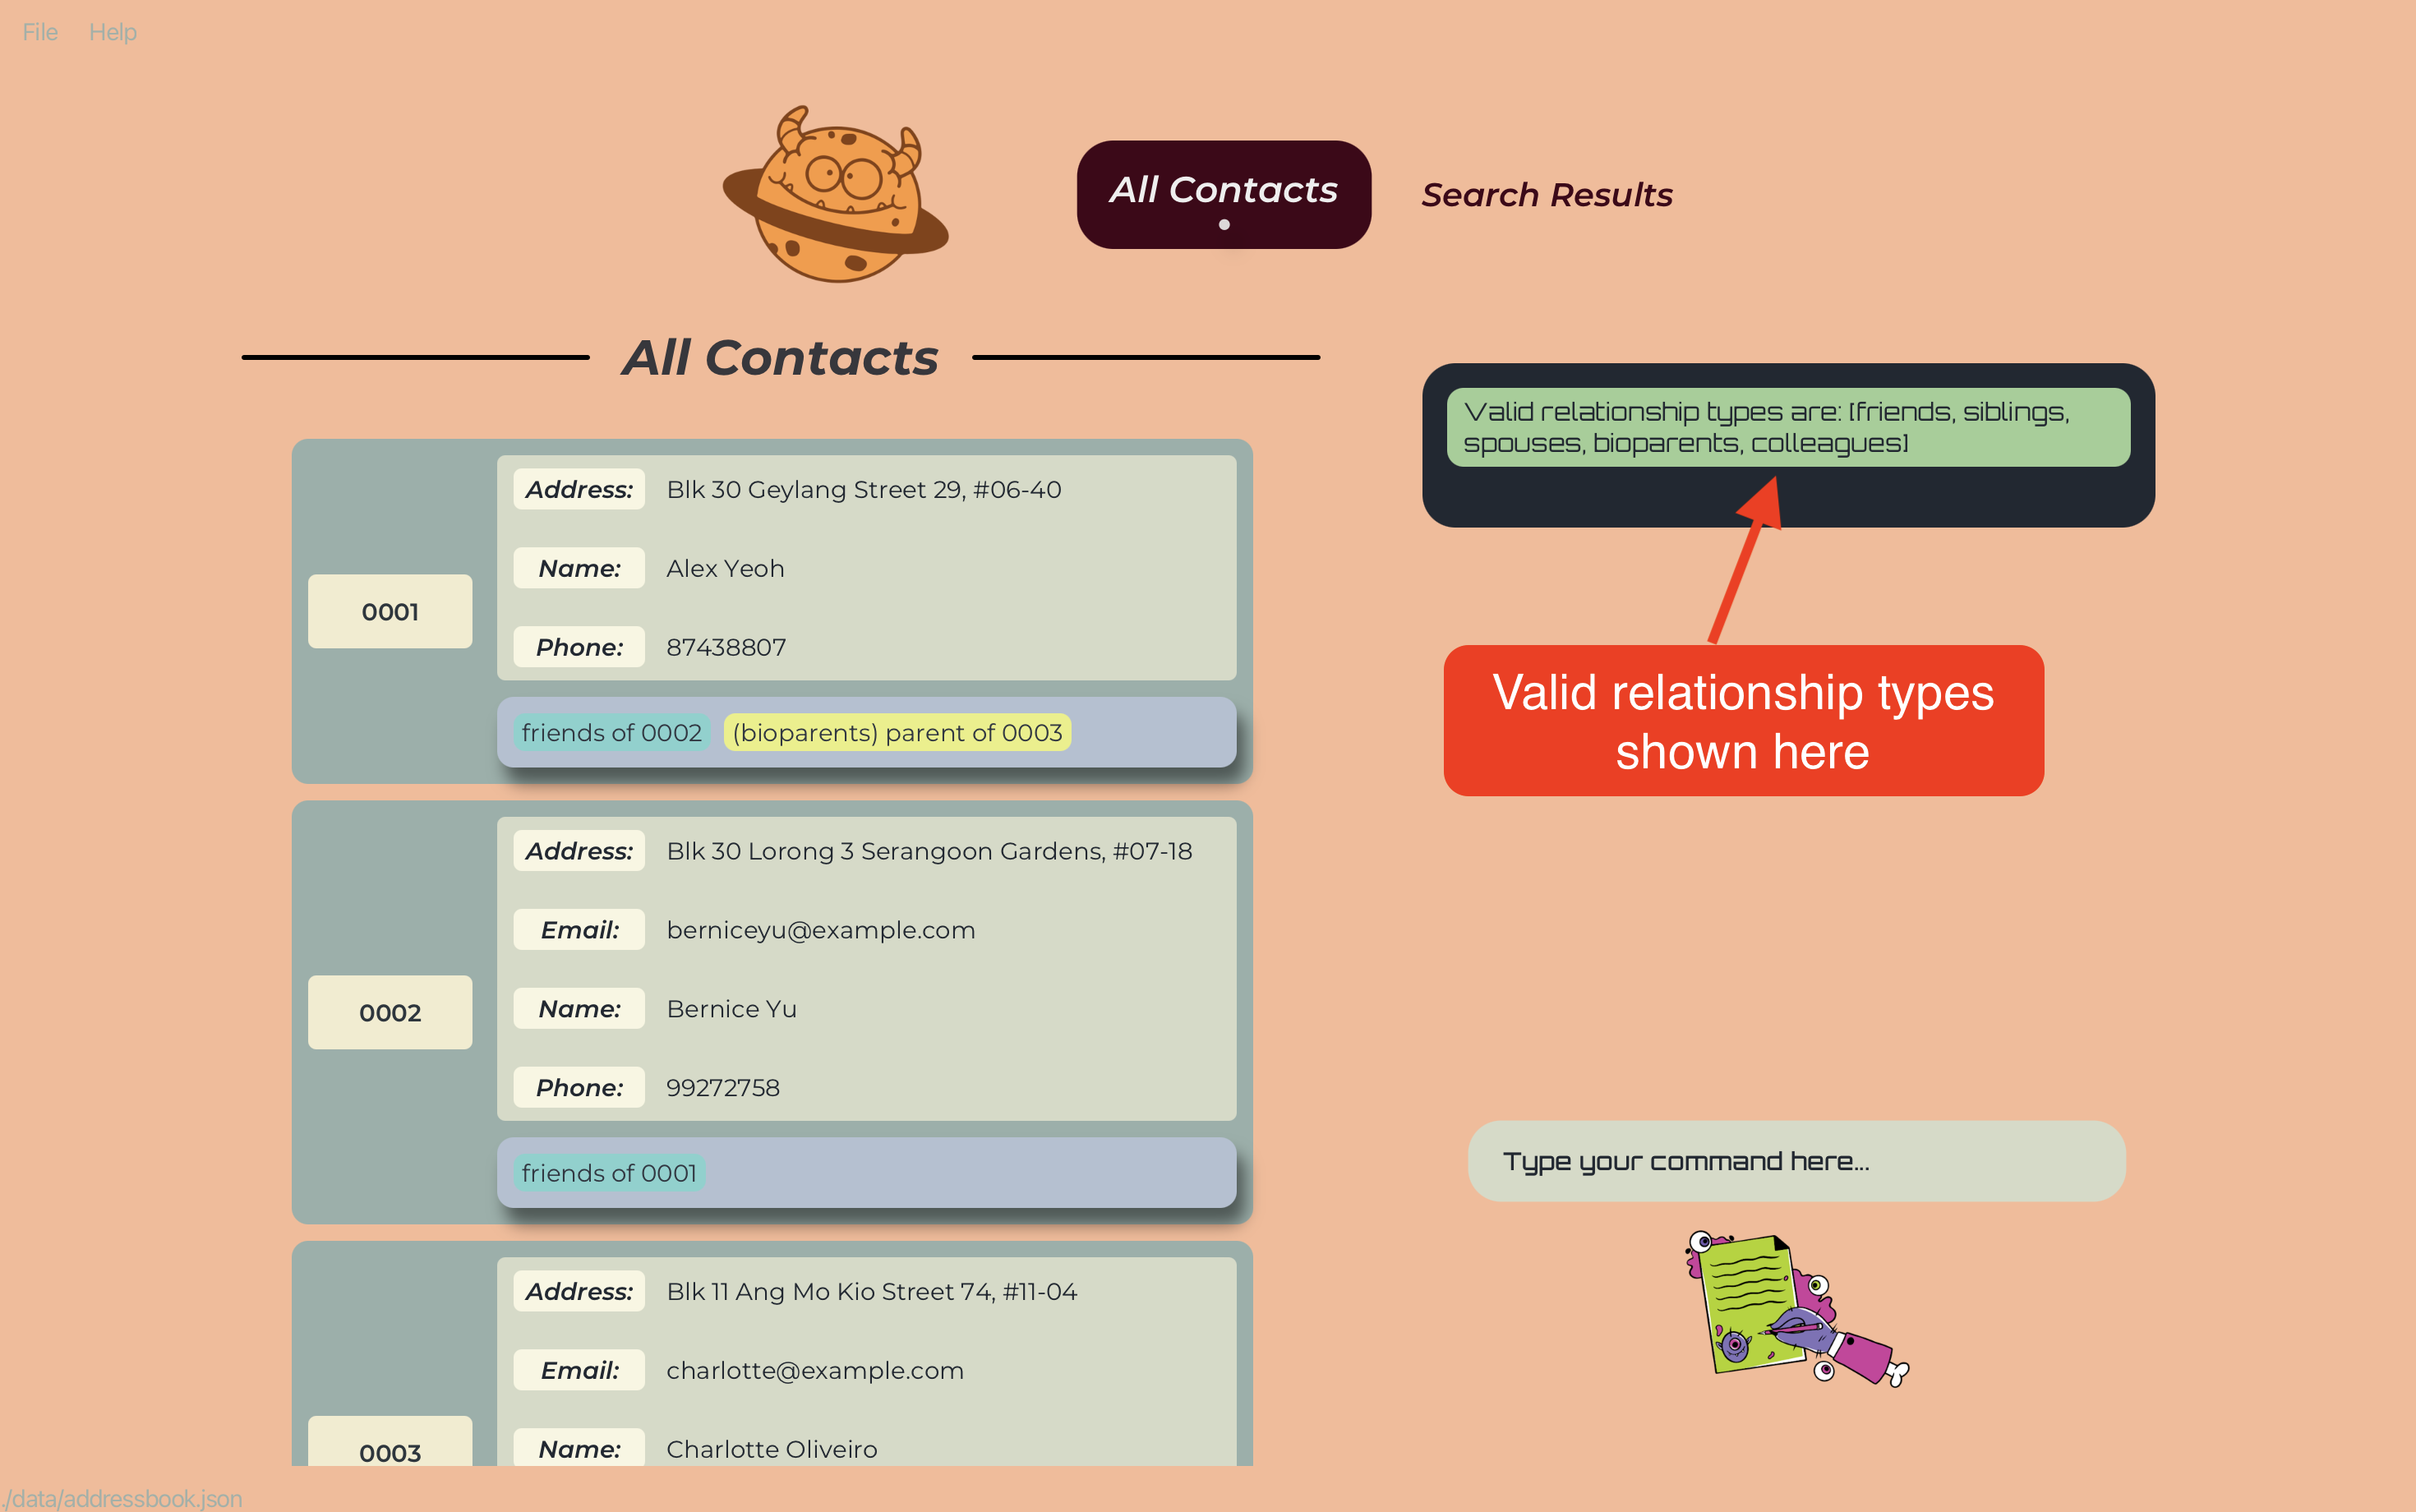
Each relationship possesses a relationship type. They can be added, edited or deleted. Relationships come in two delightful varieties: roleless or role-based. Oh, but fear not about duplicates! Our magical system checks for existing relationships and any duplicate relationships will not be added to the same two people.
- Relation types and Roles will be accepted heedless of case-sensitivity, but will be transformed into lower case strings!
- Embrace your creativity! Define any roles (for role-based relationships) and any relation types (with some limitations of course - details [at the bottom]!(#features—managing-person-relationships)). Do be warned, this only applies to roles and relation types other than the predefined relation types listed below!
- Relation types and Roles must take the form of strings, and no special characters or numbers are allowed. While roles must be a single word, relationship types have the freedom to as many words as you’d like! Although we grant you freedom in the length per word, remember to wield this power wisely! Having too long a relation type will look ugly, so do choose wisely! We recommend keeping it short and sweet!
For your convenience, Gene-nie has some predefined attributes that you can use, with stricter checks when creating or editing them. These are:
-
bioparentsrole-based relationship type- This relationship type is used to denote a biological parent-child relationship.
- The roles for this relationship type are
parentandchild.
-
siblingsrole-based relationship type- This relationship type is used to denote a sibling relationship.
- The roles for this relationship type are
brotherandsister.
-
spousesroleless relationship type- This relationship type is used to denote a marital relationship.
- The roles for this relationship type are
husbandandwife.
-
friendsroleless relationship type- This relationship type is used to denote a friendship relationship.
Custom relations:
- There is a possibility that similar family relation types can be added as custom relation types, even though they are part of the pre-defined relation types. For example, you can add
parentas a custom relation type even though a pre-defined relation typebioparentsexists. - This may cause unexpected issues when adding these custom relation types as roleless relations. Hence, we have included checks to ensure that certain custom relation types cannot be added as roleless relations.
- Please refer to the table below for the complete list of banned roleless relation types.
| No | Relation type |
|---|---|
| 1 | parent |
| 2 | father |
| 3 | mother |
| 4 | dad |
| 5 | mom |
| 6 | mum |
| 7 | son |
| 8 | daughter |
| 9 | child |
| 10 | offspring |
| 11 | kin |
| 12 | kid |
| 13 | bro |
| 14 | sis |
| 15 | husband |
| 16 | wife |
![]() Caution:
Be careful with custom relation types and roles! Your defined relations might cause the application to not work as you expect, other than the constraints we have defined below. Alas, we cannot wave our wands to fix these just yet. Remember:
Caution:
Be careful with custom relation types and roles! Your defined relations might cause the application to not work as you expect, other than the constraints we have defined below. Alas, we cannot wave our wands to fix these just yet. Remember:
- Adding predefined relation types without an ‘s’ still counts as a custom relation type (eg. sibling instead of the predefined relation type siblings)!
- Any relation types that do not match the banned relation types mentioned above exactly are also considered custom relation types (eg. sis instead of the banned relatino type ‘sister’)!
To harness the power of our predefined relation types mentioned above, be sure to match the characters exactly.
![]() Caution:
Caution:
Relation types:
- are case-insensitive
- will automatically be converted to lower case
- e.g.
/HouSemAteswill be stored as/housemates
- e.g.
- cannot be empty
- cannot contain any special characters or numbers
- can be more than one word
- cannot be converted to a role-based relationship type if it has been defined as a roleless, and vice-versa (see more details below)
Roles:
- are case-insensitive
- will automatically be converted to lower case
- e.g.
SISterwill be stored assister
- e.g.
- can be empty for roleless relationships, must not be empty for role-based relationships
- cannot contain any special characters or numbers
- cannot be more than one word
Listing all Persons : list or l
Format: list or l

Adding a Person : add or a
Format: add [/ATTRIBUTENAME ATTRIBUTEVALUE]… or a [/ATTRIBUTENAME ATTRIBUTEVALUE]…
- Adds a person to the address book with the specified attributes or none at all!
- You can add multiple attributes in one command, how enchanting!
- The order of the attributes does not matter.
![]() Tip:
A person can have any number of attributes (yes, even zero)!
Tip:
A person can have any number of attributes (yes, even zero)!
Sometimes, you may stumble upon a person in your family tree, but their details are shrouded in mystery.
Gene-nie comes to the rescue by allowing you to create empty persons with no attributes!
This way, you can still add them to relationships, and fill in their details later.
Examples:
add /Name John Doe /Phone 98765432 /Email johnd@example.com /Address John street, block 123, #01-01add /Name Betsy Crowe /Email betsycrowe@example.com /Address Newgate Prison /Phone 1234567 /Occupation criminal
Finding persons by details : find or f
Format: find /PHRASE [/MORE_PHRASES] ... or f /PHRASE [/MORE_PHRASES] ...
- Between phrases,
- Persons with details matching at least one phrase will be returned (i.e.
ORsearch) - The search will also work if user wants to find a person using a specified UUID
- Furthermore, the search will return all persons whose “details” “contain” the phrase and does not need to be exclusively only phrases or UUID
- e.g.
/Hans /Bowill returnHans Gruber,Bo Yang - e.g.
/0001will return the person with UUID0001 - e.g.
/0001 /Hanswill return the person with UUID0001andHans Gruber
- e.g.
- The order of the phrases do not matter — Gene-nie’s magic works its wonders regardless.
- e.g.
find /Hans /Bowill return the same results asfind /Bo /Hans
- e.g.
- Persons with details matching at least one phrase will be returned (i.e.
- Within a phrase,
- Gene-nie’s search spans far and wide, returning all persons whose “details” “contains” the phrase.
- “Details” means UUID or any attribute values
- “Contains” means that the entire phrase is a substring of a detail of a person
- e.g.
/ans Grubwill return any person withHans Gruberin their details
- e.g.
- The search is case-insensitive. e.g.
hanswill matchHans
Examples:
-
find /Johnreturns anyone withjohnandJohn Doein their details -
find /alex davidreturns only someone withAlex Davidas a substring of their details
-
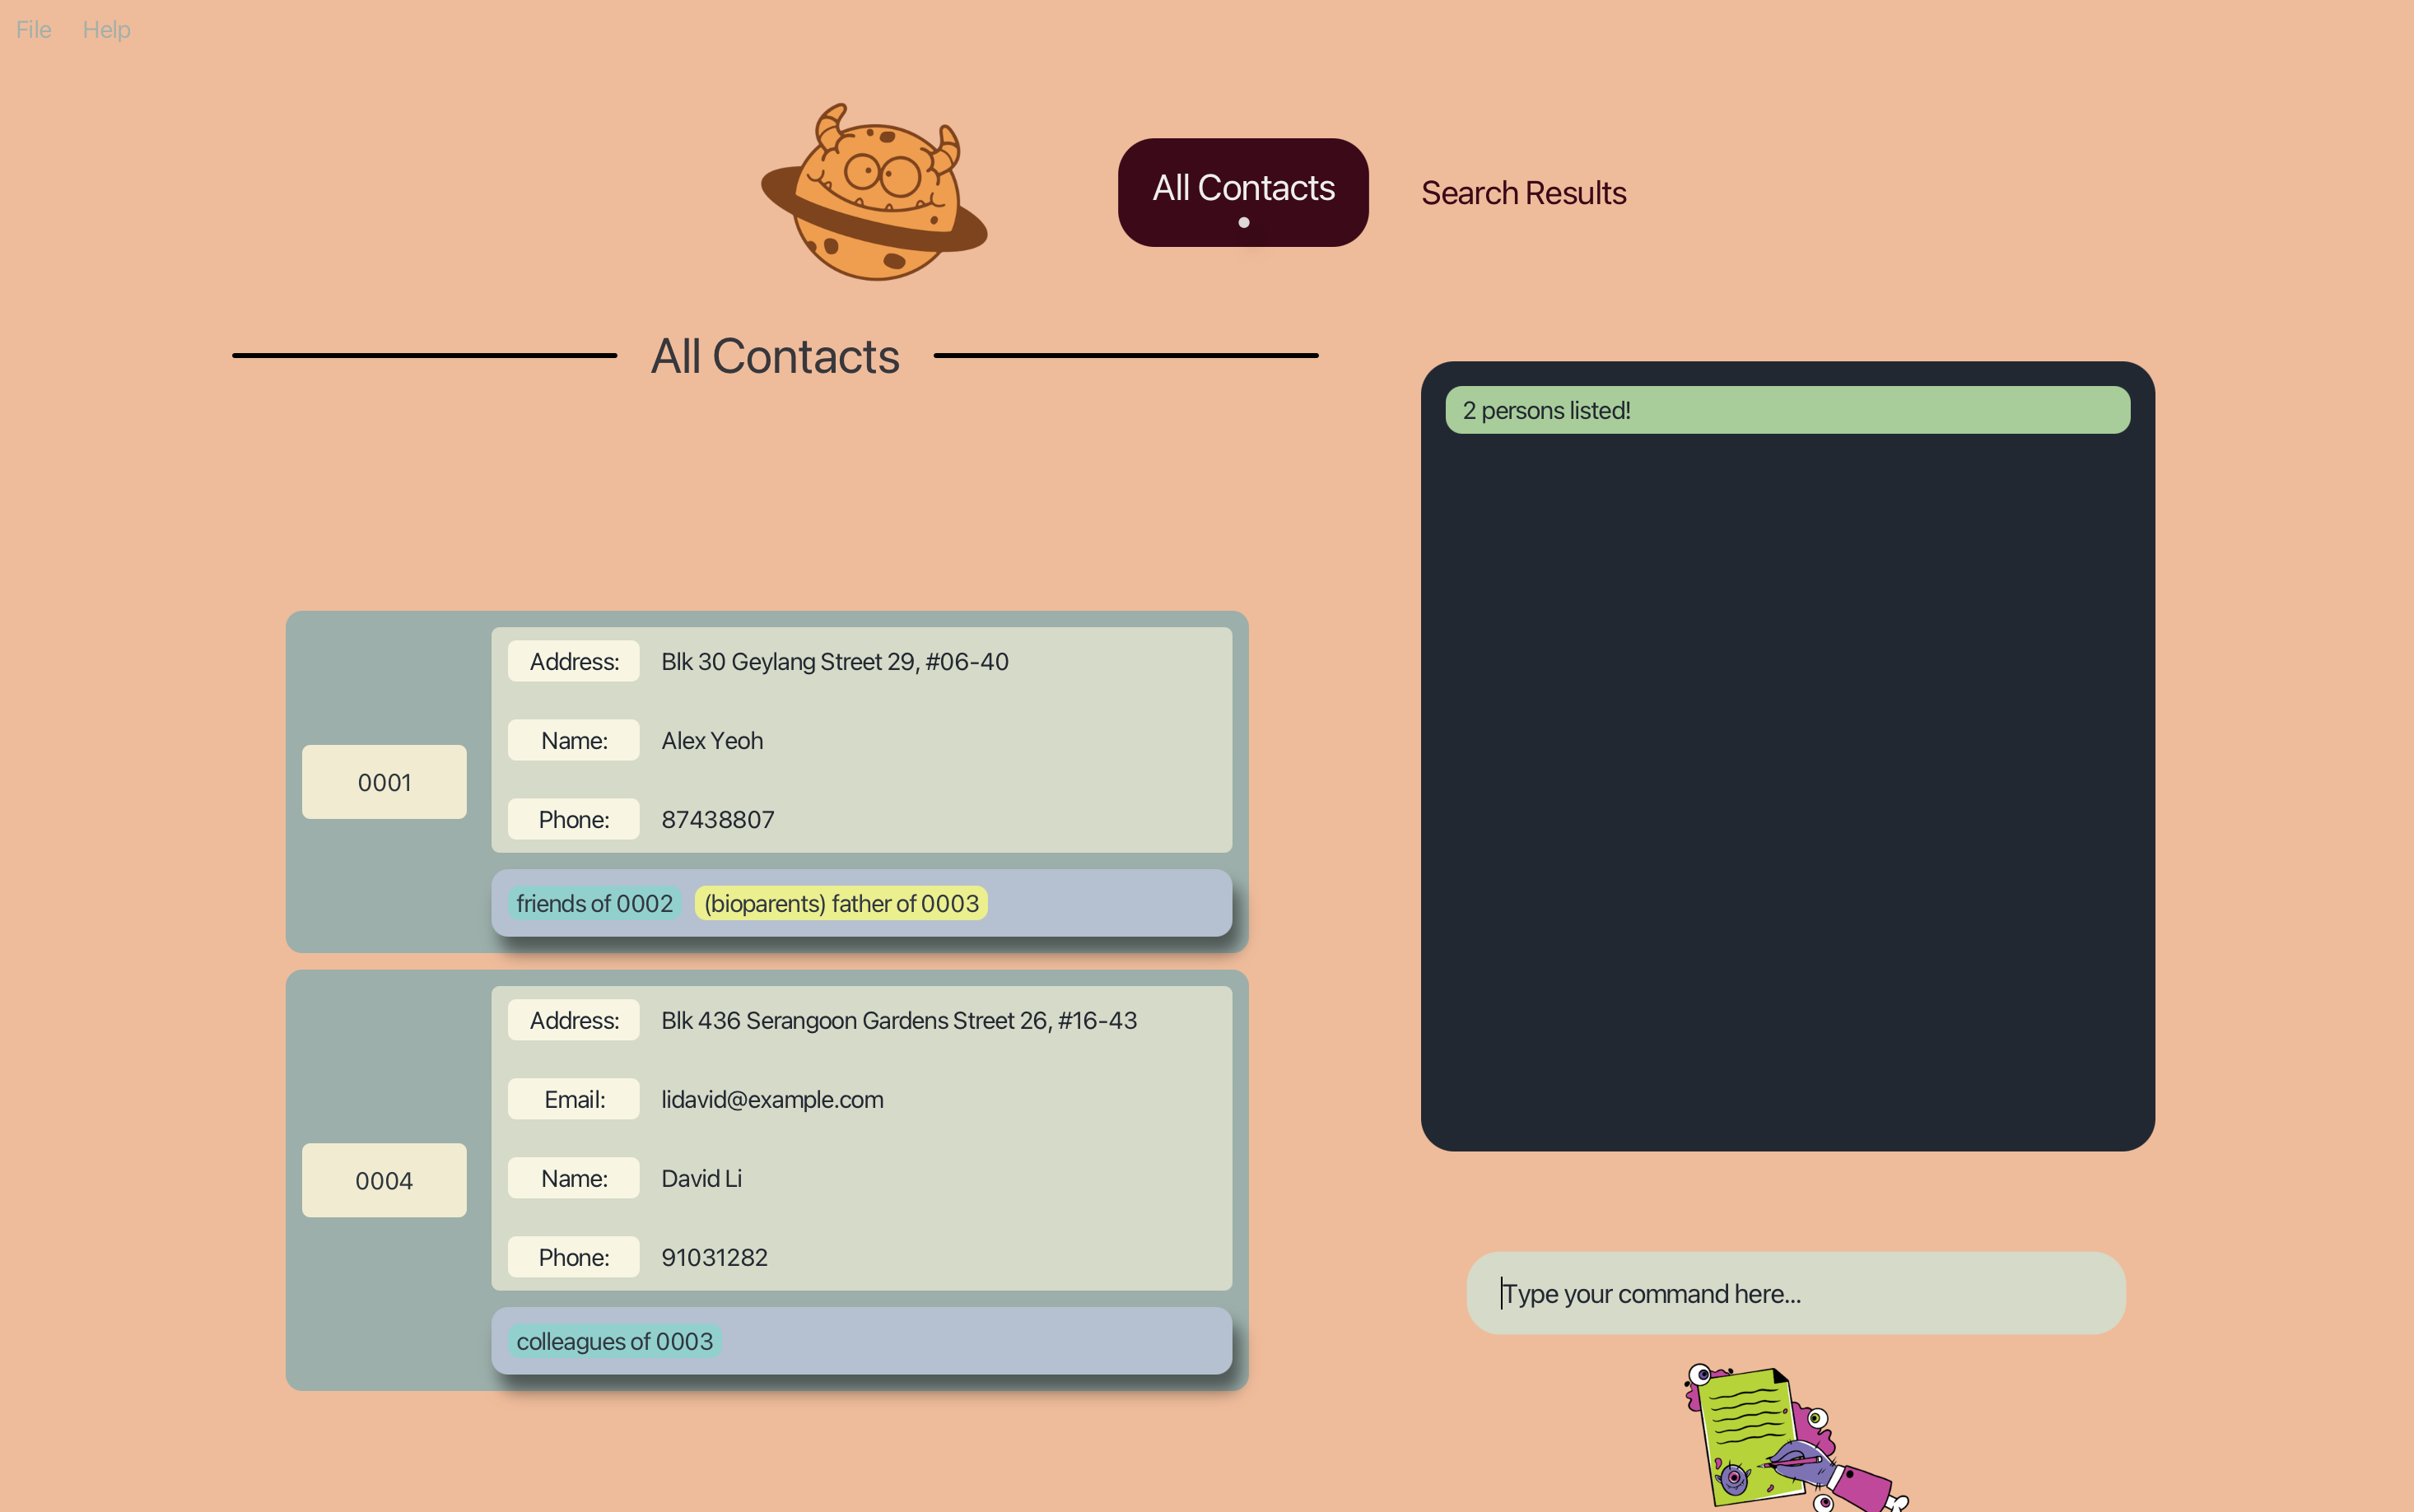
find /alex /davidreturnsAlex Yeoh,David Li(see image below)
find /alex /davidlist to restore your list of contacts. Entering any other commands will cause the application to not function as the user expects (see more below).
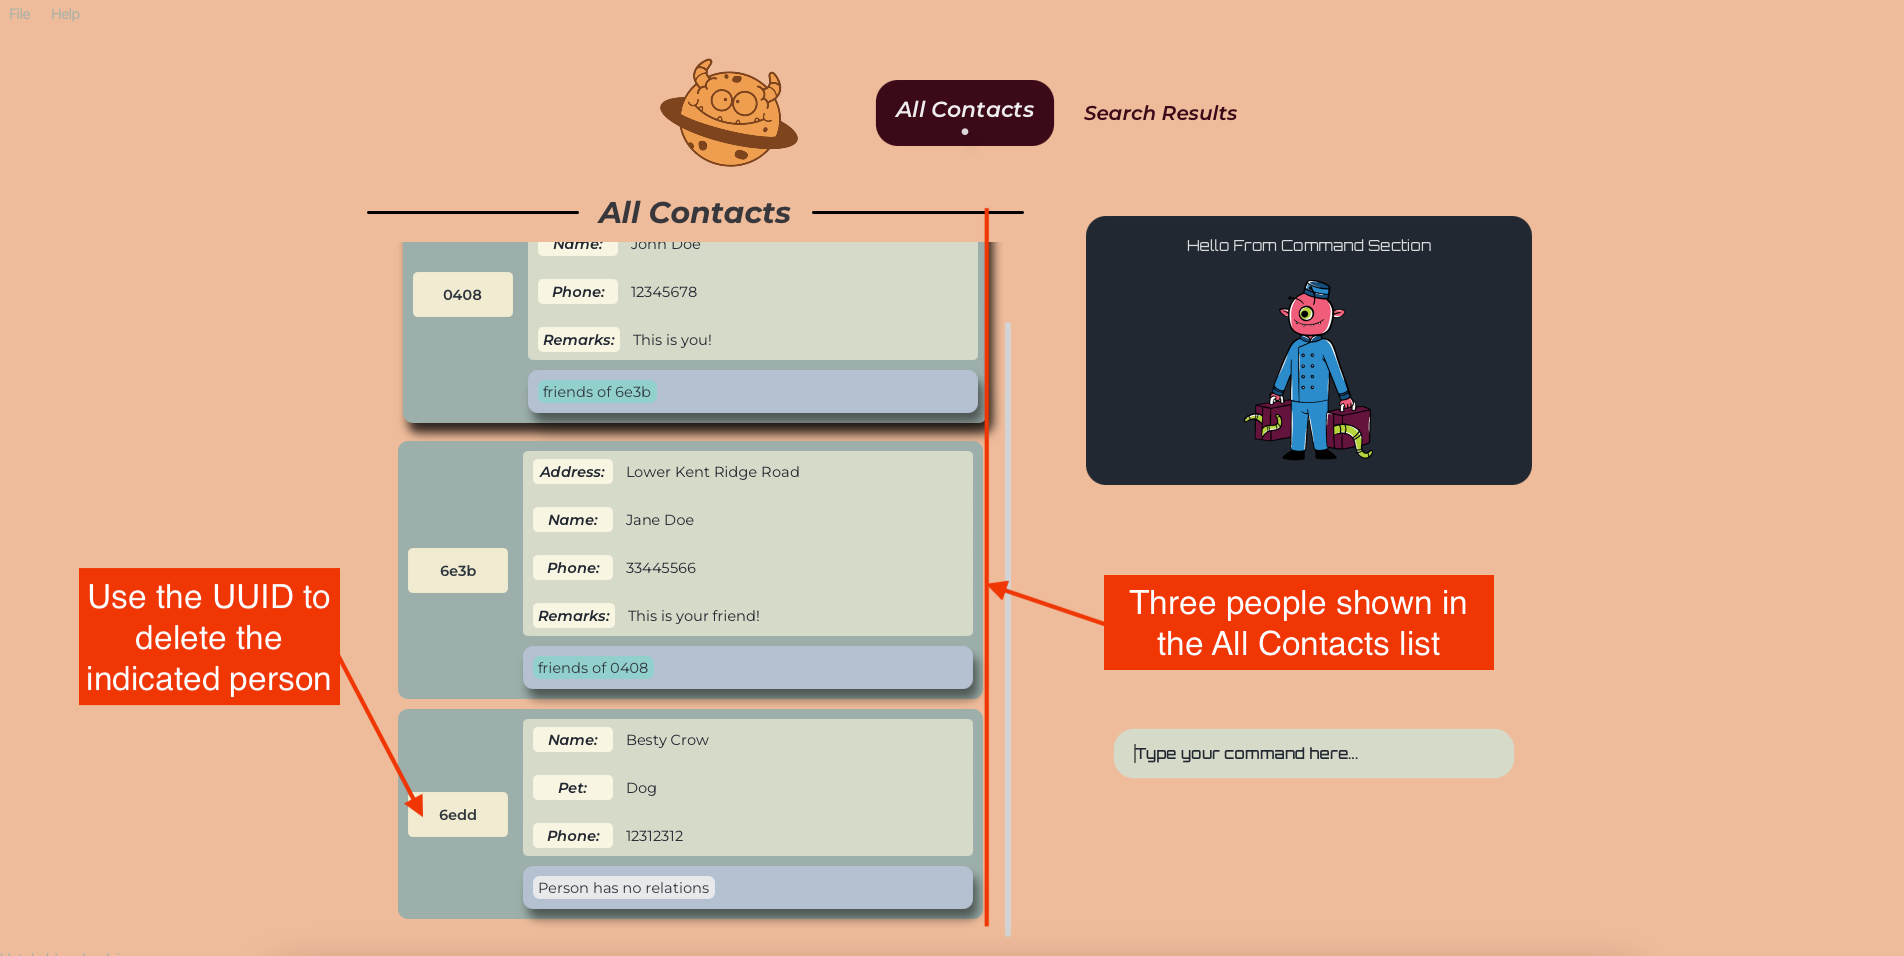
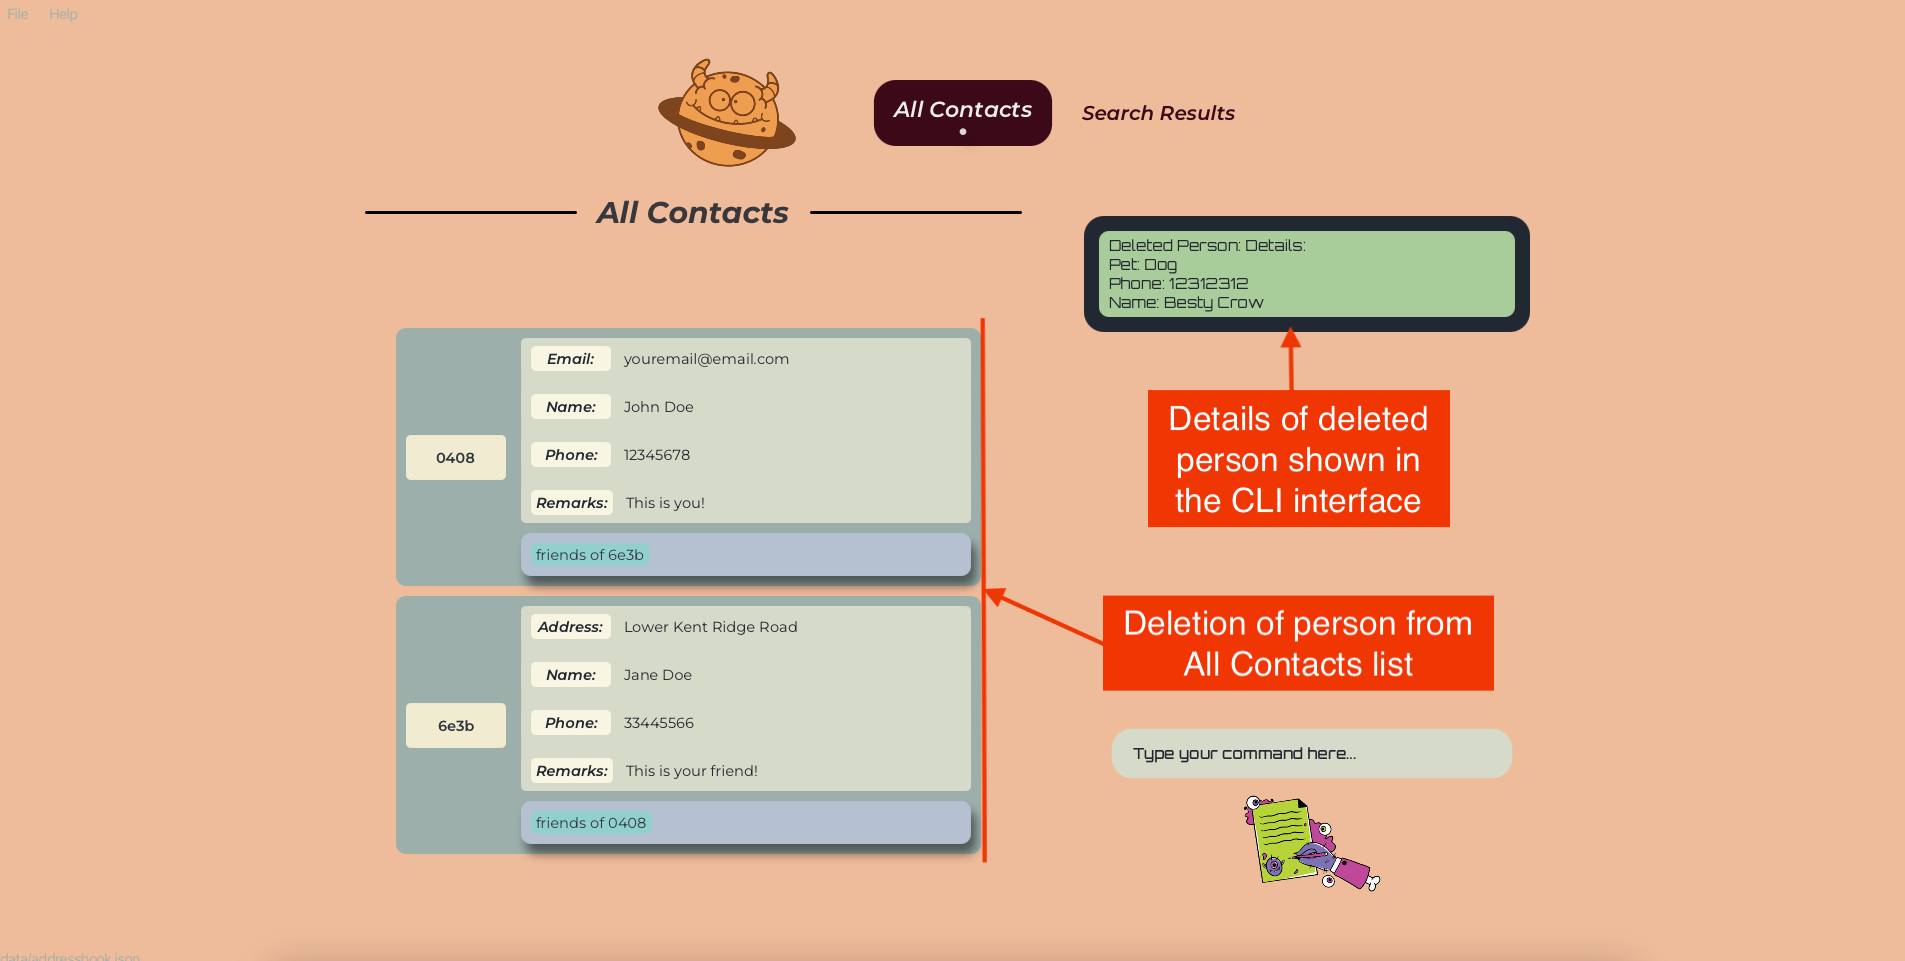
Deleting a Person : delete or d
Format: delete /UUID
- Deletes the person with the specified
UUID - The
UUIDrefers to the unique identifier of the person shown in the displayed person list - The
UUIDmust be a valid UUID, or the magic won’t work - If the
UUIDdoes not exist, fear not, the command will not have any effect
Examples:
-
delete /0001deletes the person with theUUID“0001” -
delete /1does not delete the person with theUUID“5964” as theUUIDis not valid
AHHHHH… It seems that you are now trying to manage the attributes of your contacts! Let me guide you through the magical world of managing attributes of persons in Gene-nie!
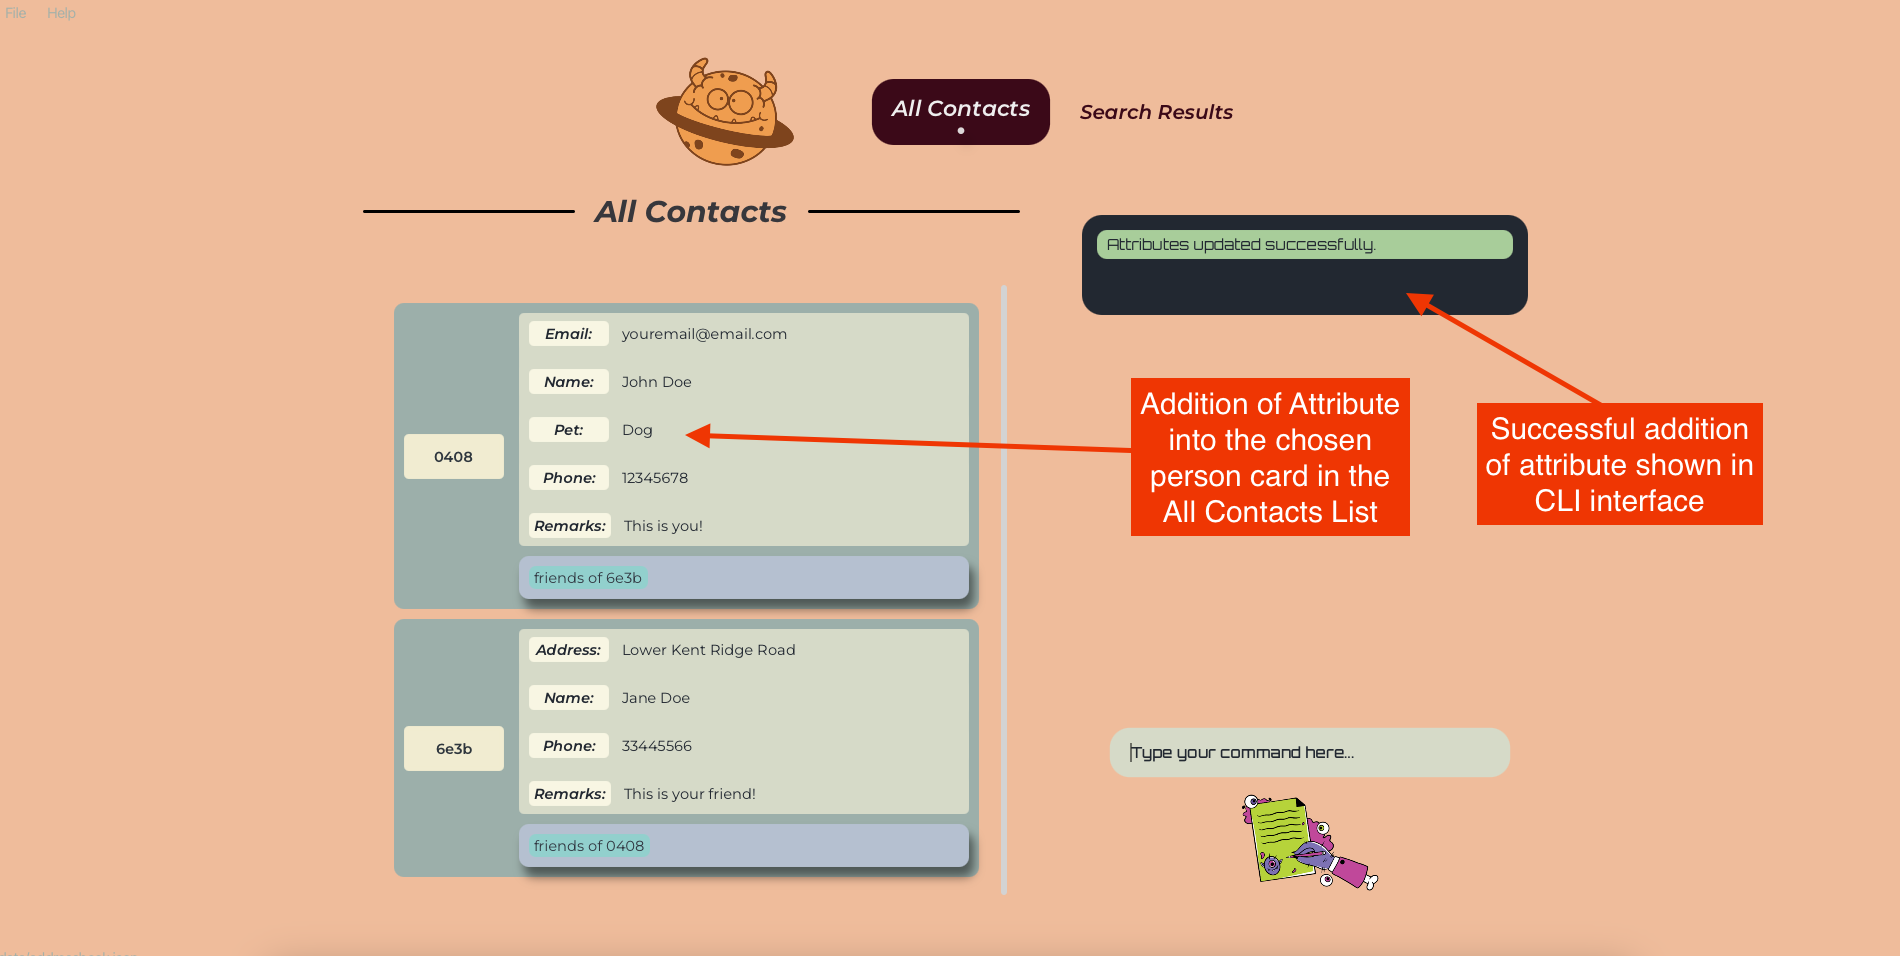
Adding Attributes to a Person: addAttribute or aa
Format: addAttribute /UUID /ATTRIBUTE_NAME ATTRIBUTE_VALUE [/ATTRIBUTENAME ATTRIBUTEVALUE]… or aa /UUID /ATTRIBUTE_NAME ATTRIBUTE_VALUE [/ATTRIBUTENAME ATTRIBUTEVALUE]…
- Adds the attribute with the specified
ATTRIBUTE_NAMEandATTRIBUTE_VALUEto the person with the specifiedUUID - Prepared to be dazzled as you can add multiple attributes in one command!
- Duplicate attribute names are checked and will not be allowed for the command to be parsed
- The
UUIDrefers to the unique identifier of the person shown in the displayed person list - The
UUIDmust be a valid UUID (case-sensitive) - The first space after the attribute name is marks the start of the attribute value
- See the Attributes section for more information on what are valid attribute names and values, and how they are processed
Examples:
-
addAttribute /0001 /Pet Dog /Nickname Klienadds the attribute Pet with the value Dog and the attribute Nickname with the value Klien to the person with the UUID 0001 -
addAttribute /0001 /Pet Cat /Pet Dogdoes not add the attribute to the person with UUID 0001 as the attribute name is duplicated and instead throws an error -
addAttribute /0001 /pet Dogadds the attribute pet with the value Dog to the person with the UUID 0001 -
addAttribute /0001 /Pet dogadds the attribute Pet with the value dog to the person with the UUID 0001
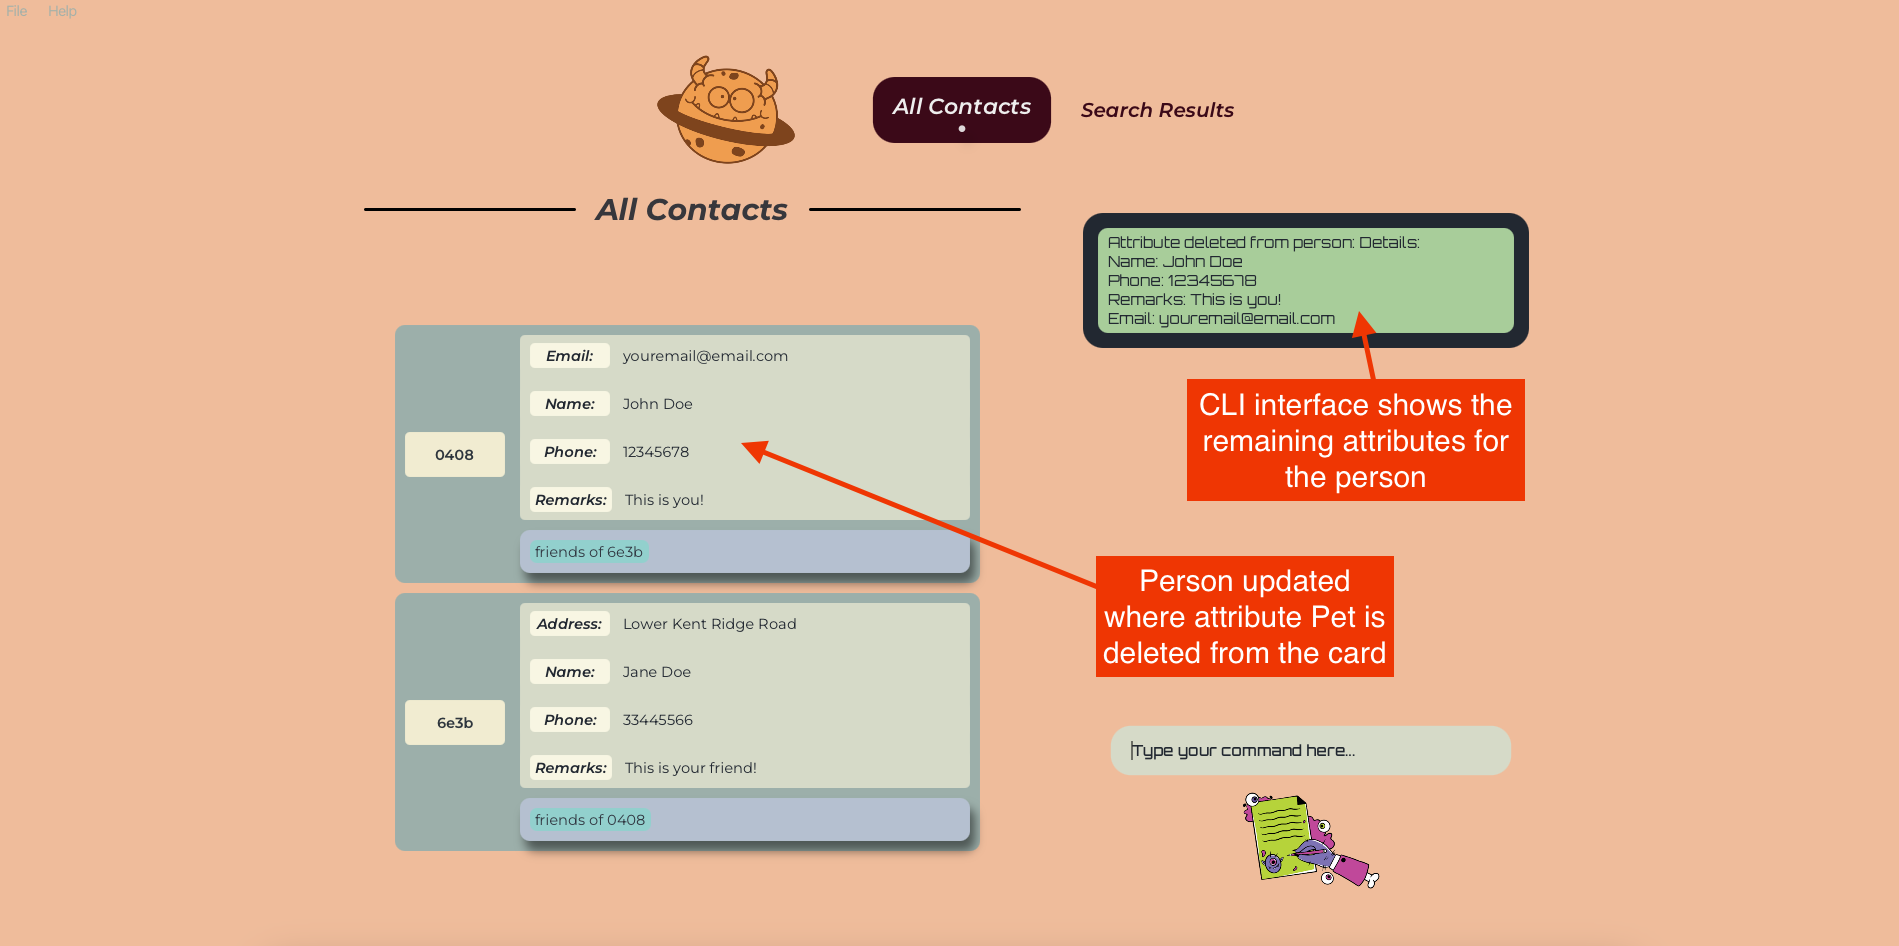
Deleting an attribute from a Person: deleteAttribute or da
Format: deleteAttribute /UUID /ATTRIBUTE_NAME [/ATTRIBUTENAME]… or da /UUID /ATTRIBUTE_NAME [/ATTRIBUTENAME]…
- Deletes the attribute with the specified
ATTRIBUTE_NAMEfrom the person with the specifiedUUID - You have the delightful privilege of deleting multiple attributes in one command
- However, duplicate attribute names are checked and will not be allowed for the command to be parsed
- The
UUIDrefers to the unique identifier of the person shown in the displayed person list - The
UUIDmust be a valid UUID (case-sensitive) - If the person does not have the specified attribute, the command will not have any effect
- If the person does not exist, the command will not have any effect
- If the attribute does not exist, the command will not have any effect
- See the Attributes section for more information on what are valid attribute names and values, and how they are processed
Examples:
-
deleteAttribute /0001 /Pet /Nicknamedeletes the attribute Pet and Nickname from the person with the UUID 0001 -
deleteAttribute /0001 /petdoes not delete the attribute Pet from the person with the UUID 0001 but will delete the attribute pet -
deleteAttribute /0001 /Pet /Petdoes not delete the attribute Pet from the person with the UUID 0001 as the attribute name is duplicated and instead throws an error
Editing an Attribute of a Person: editAttribute or ea
Format: editAttribute /UUID /ATTRIBUTE_NAME NEW_ATTRIBUTE_VALUE [/ATTRIBUTENAME ATTRIBUTEVALUE]… or ea /UUID /ATTRIBUTE_NAME NEW_ATTRIBUTE_VALUE [/ATTRIBUTENAME ATTRIBUTEVALUE]…
- Edits the attribute with the specified
ATTRIBUTE_NAMEto have theNEW_ATTRIBUTE_VALUEfor the person with the specifiedUUID - Multiple attributes are allowed to be edited simultaneously in one command
- Duplicate attribute names are checked and will not be allowed for the command to be parsed
- The
UUIDrefers to the unique identifier of the person shown in the displayed person list - The
UUIDmust be a valid UUID (case-sensitive) - If the person does not have the specified attribute, the command will not have any effect and will throw an error
- If you have used an incorrect attribute name, and wish to edit the attribute name, you must delete the attribute (using the ‘incorrect’ name) and add a new one instead
- If the person does not exist, the command will not have any effect and will throw an error
- If the attribute is of a different type, the command will fail and throw an error. E.g. if the attribute is of type Date, and the new value is a String, the command will fail
- However, if the attribute is of type String, and the new value is intended to be another type, the command will succeed and the attribute value will be converted to a String
- The first space after the attribute name is marks the start of the attribute value
- See the Attributes section for more information on what are valid attribute names and values, and how they are processed
Examples:
-
editAttribute /0001 /Pet Catedits the attribute Pet to have the value Cat for the person with the UUID 0001 -
editAttribute /0001 /Pet Cat /Nickname Elvisedits the attribute Pet to have the value Cat and the attribute Nickname to have the value Elvis for the person with the UUID 0001

Listing all relationship types : listRelations or lr
- Pre-defined relationships (bioparents, spouses, siblings)
- User-defined relationships
Format: listRelations or lr
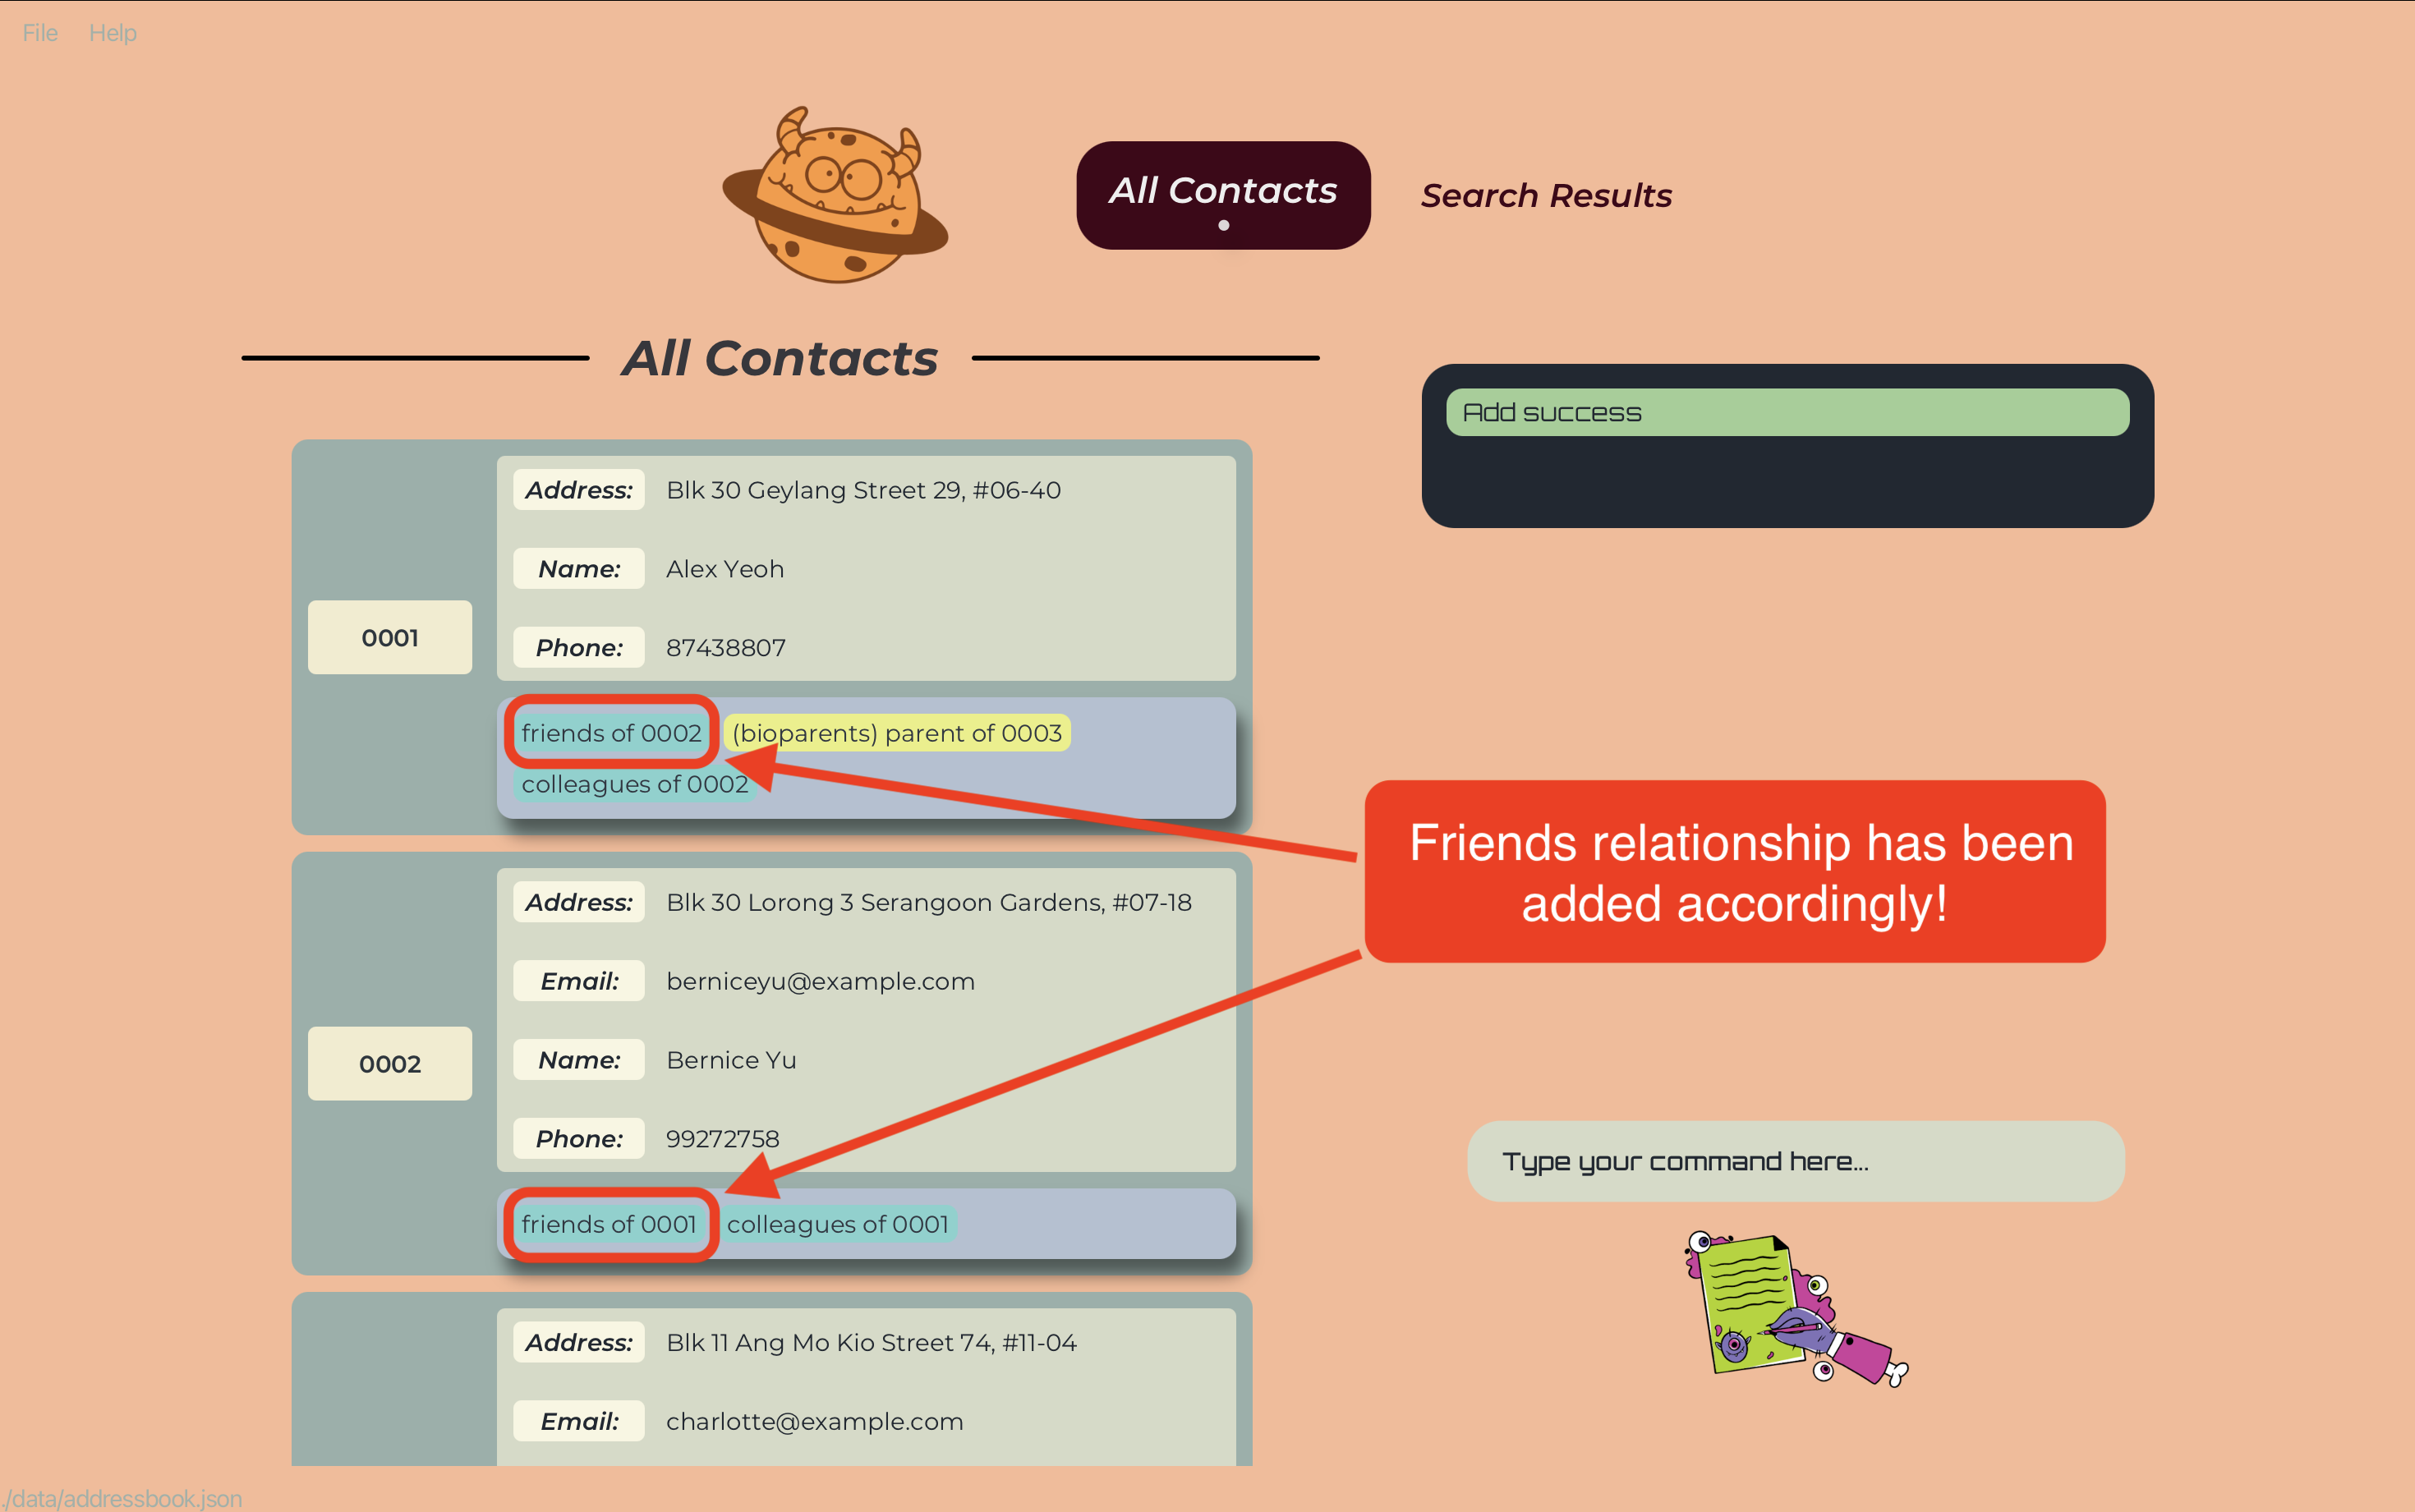
Adding a relationship : addRelation or ar
Adds a roleless relationship between two people in the address book.
Format: addRelation /UUID1 /UUID2 /RELATIONSHIP_TYPE or ar /UUID1 /UUID2 /RELATIONSHIP_TYPE
- The command word and
RELATIONSHIP_TYPEare not case-sensitive. - Adds the roleless relationship between the person with the specified
UUID1and the person with the specifiedUUID2. - The
UUID1andUUID2refer to the unique identifiers of the persons shown in the displayed person list. - The
UUID1andUUID2must be valid UUIDs (case-sensitive). - The
RELATIONSHIP_TYPEmust be a String but can be more than one word. - If the relationship already exists, the command will not have any effect.
- If either persons do not exist, the command will not have any effect.
- If the
RELATIONSHIP_TYPEdoes not exist and is valid, it will be added to the existing list of relationTypes.
Examples:
-
addRelation /0001 /0002 /colleaguesadds the relation colleagues between the person with theUUID“0001” and the person with theUUID“0002”.

![]() Caution:
Caution:
- Once you add a roleless relationship, you are then unable to add a role-based relationship with the same
RELATIONSHIP_TYPE. you must first delete all relationships with theRELATIONSHIP_TYPE.
- Next, even if no relationships are using the
RELATIONSHIP_TYPE, it will still be stored in the database. Hence, you will have to delete it from the database usingdeleteRelation /RELATIONSHIP_TYPEbefore you can add a new relationship for it with roles.
- Note that some relation types are banned from being used as roleless relationships. To use these relation types, you must add them as role-based relationships.
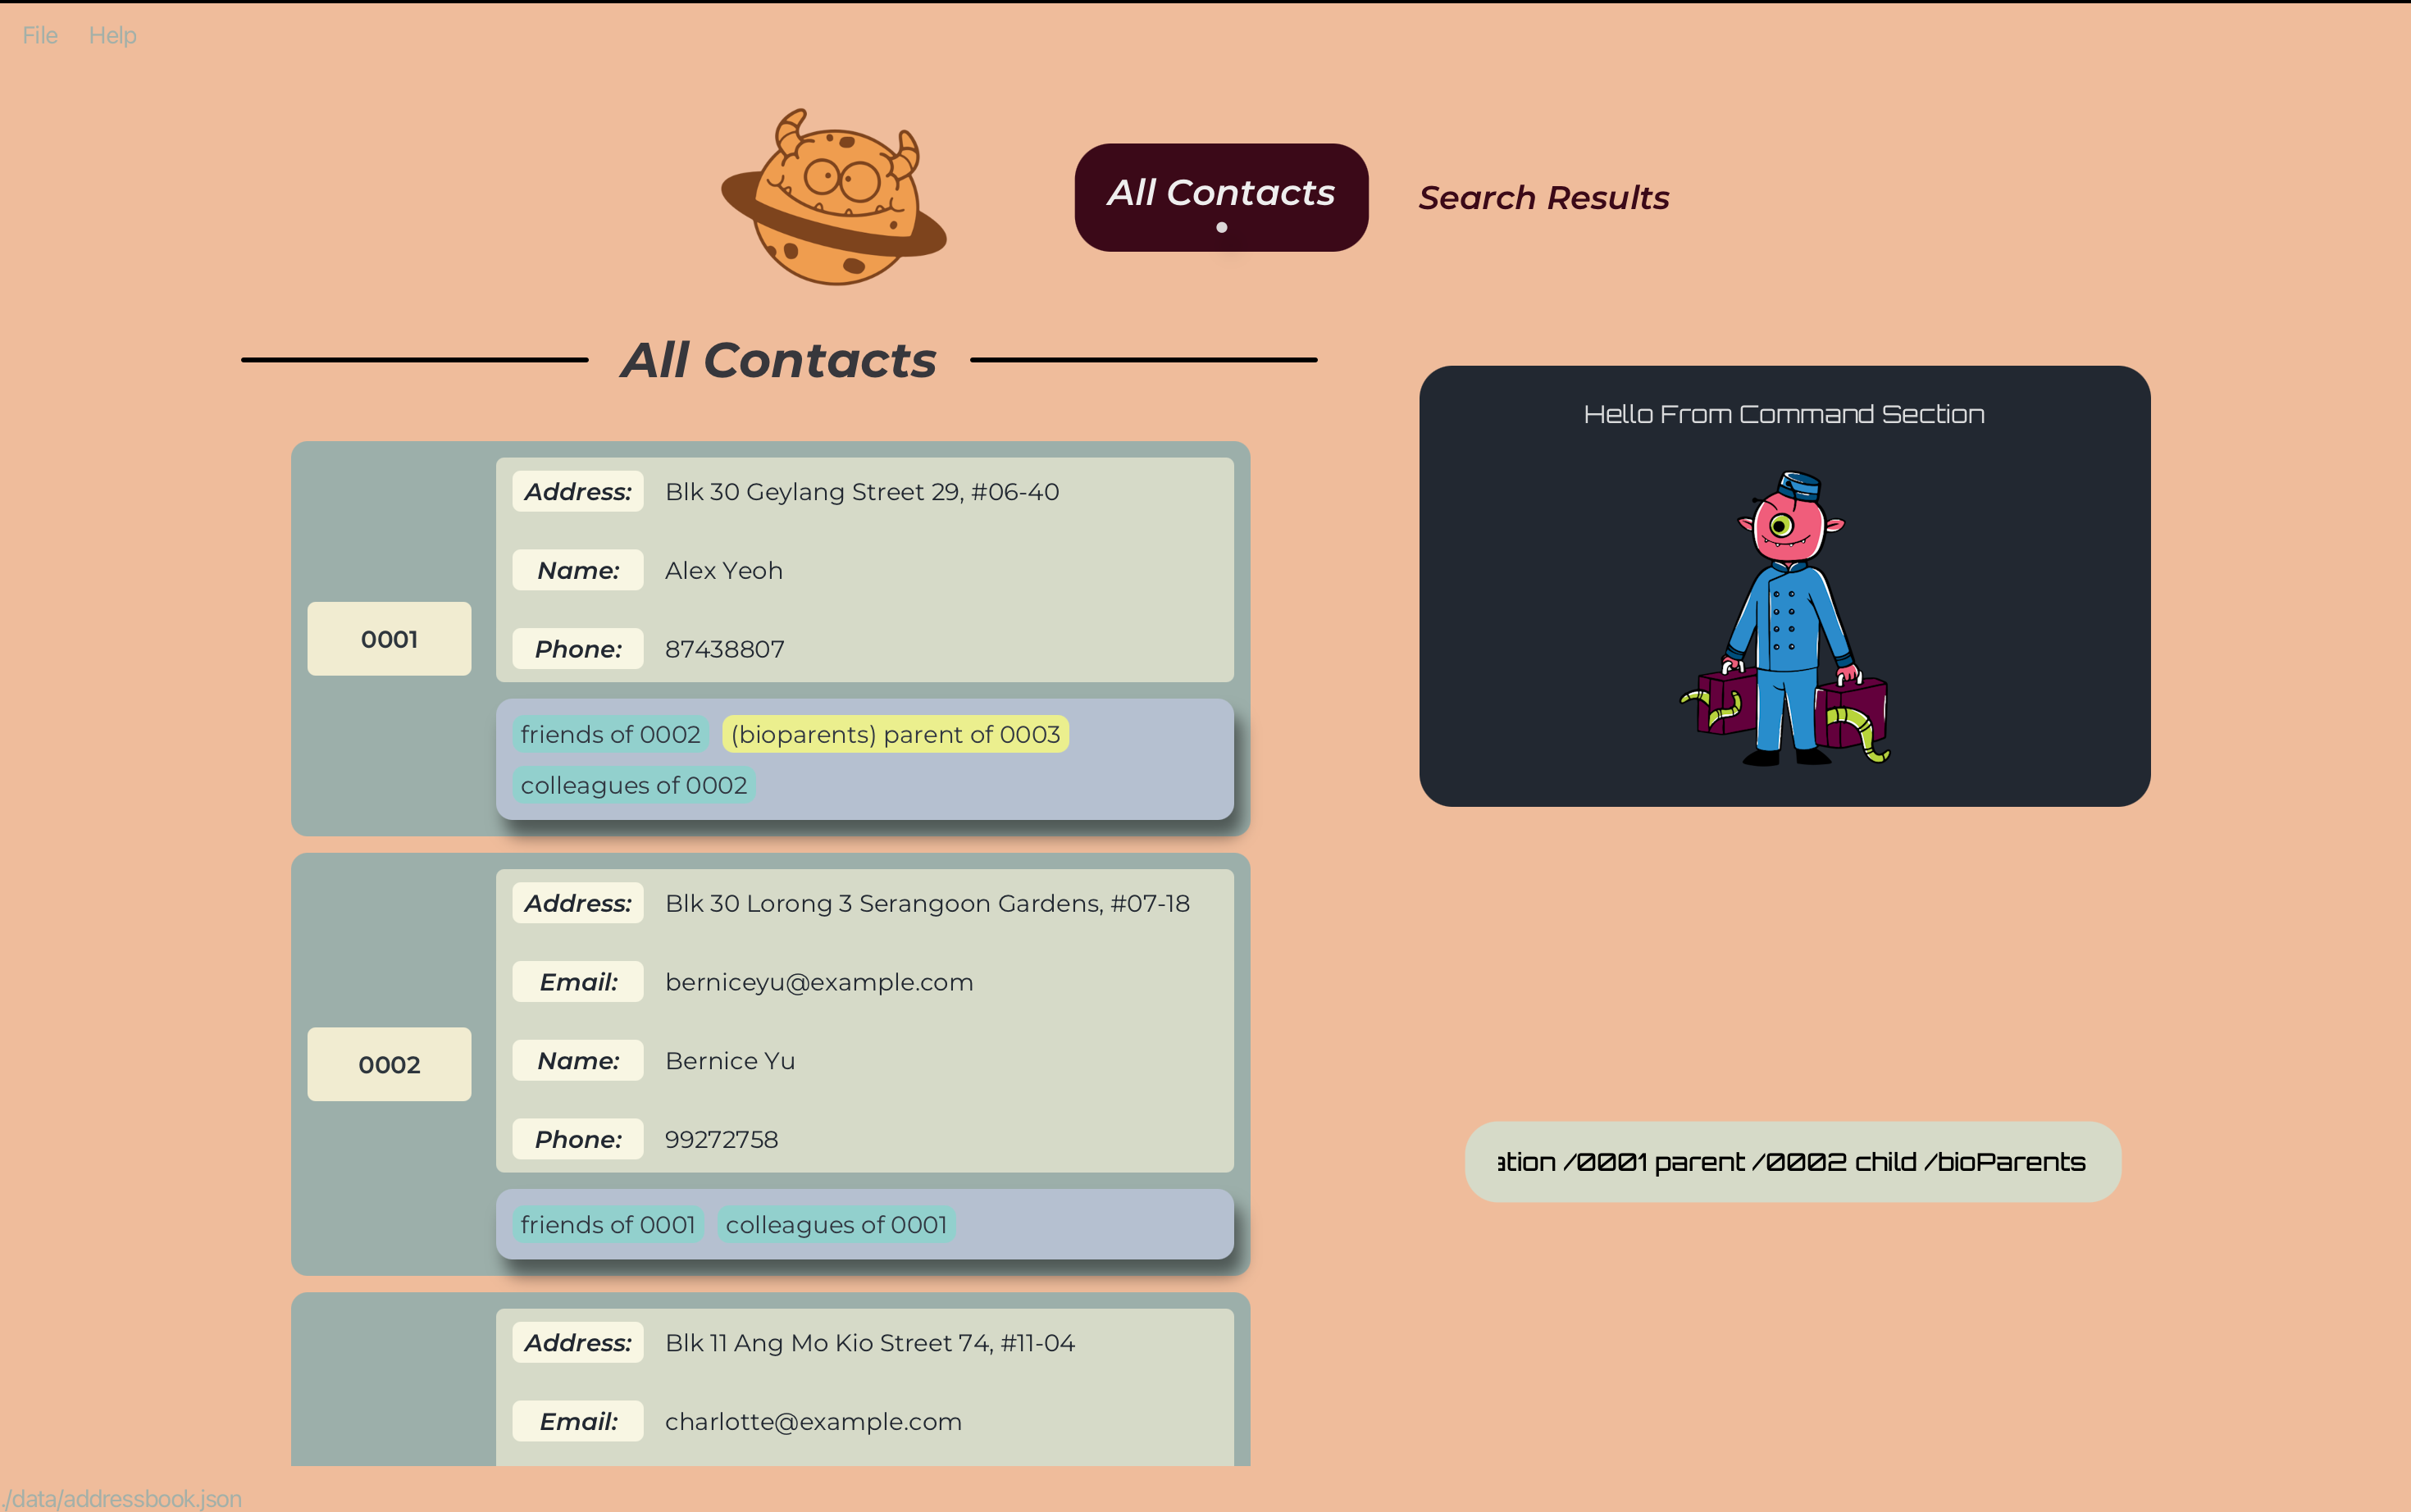
Adds a role-based relationship between two people in the address book.
Format: addRelation /UUID1 ROLE1 /UUID2 ROLE2 /RELATIONSHIP_TYPE or ar /UUID1 ROLE1 /UUID2 ROLE2 /RELATIONSHIP_TYPE
- The command word,
RELATIONSHIP_TYPE,ROLE1andROLE2are not case-sensitive. - Adds the role-based relationship between the person with the specified
UUID1and the person with the specifiedUUID2with rolesROLE1andROLE2respectively. - The
UUID1andUUID2refer to the unique identifiers of the persons shown in the displayed person list. - The
UUID1andUUID2must be valid UUIDs (case-sensitive). - The
RELATIONSHIP_TYPE,ROLE1andROLE2must be Strings. - The
RELATIONSHIP_TYPEcan be more than one word. - The
ROLE1andROLE2can only be one word. - The
ROLE1andROLE2must be different. (except for the predefined relationTypessiblings(where both roles can bebrother/sister) andspouses(where both roles can behusband/wife)) - If the relationship already exists, the command will not have any effect.
- If either persons do not exist, the command will not have any effect.
- If the
ROLE1orROLE2does not exist for theRELATIONSHIP_TYPE, the command will not have any effect. - If the
RELATIONSHIP_TYPEdoes not exist, it will be added to the existing list of relationTypes.
Examples:
-
addRelation /0001 parent /0002 child /bioparentsadds the relation bioparents between the person with theUUID“0001” and the person with theUUID“0002” with the roles parent and child respectively.
![]() Caution:
Caution:
- The
RELATIONSHIP_TYPE“family” is not allowed. The address book will throw an error asking the user to be more specific about the family relation.
- The correct way to do this is to enter the exact family relation type (bioparents, siblings or spouses) as the
RELATIONSHIP_TYPE.
- When adding a pre-defined familial relation (bioparents, siblings or spouses), the roles entered must be the ones predefined for them (e.g. adding a bioParents relationship with
fatheras one of the roles will result in an error as the predefined roles areparentandchild).
- If you are adding a
siblingsor aspousesrelationship, the gender of the specified person’s role in the relationship must match the gender of the person’sSexattribute. It’s all about keeping the mystical balance in our enchanted world of GENE-NIE! - Adding more than 2 bioParents relationships with the role
childto a Person is not allowed. One person can only have a maximum of 2 bioParents relationships with the rolechild.
- Once you add a custom role-based
RELATIONSHIP_TYPEwith the defined roles, you cannot add another relationship with the sameRELATIONSHIP_TYPEbut different roles. To do this, you must first delete all relationships with theRELATIONSHIP_TYPE.
- Next, even if no relationships are using the
RELATIONSHIP_TYPE, it will still be stored in the database with the defined roles. Hence, you will have to delete it from the database usingdeleteRelation /RELATIONSHIP_TYPEbefore you can add a new relationship for it with new roles.
- Once you add a role-based relationship, you are then unable to add a roleless relationship with the same
RELATIONSHIP_TYPE. To do this, you must follow the same steps above to remove theRELATIONSHIP_TYPEand all relationships associated with it from the database.
Editing a relationship : editRelation or er
Edits the relationship between two people in the address book to a roleless relationship.
Format: editRelation /UUID1 /UUID2 /OLD_RELATIONSHIP_TYPE /NEW_RELATIONSHIP_TYPE or er /UUID1 /UUID2 /OLD_RELATIONSHIP_TYPE /NEW_RELATIONSHIP_TYPE
- The command word,
OLD_RELATIONSHIP_TYPEandNEW_RELATIONSHIP_TYPEare not case-sensitive. - Edits the relationship between the person with the specified
UUID1and the person with the specifiedUUID2to the new relationship type. - The
UUID1andUUID2refer to the unique identifiers of the persons shown in the displayed person list. - The
UUID1andUUID2must be valid UUIDs (case-sensitive). - The
OLD_RELATIONSHIP_TYPEandNEW_RELATIONSHIP_TYPEmust be Strings, but can be more than one word. - If the relationship to be edited from does not exist, the command will not have any effect.
- If the relationship to be edited to already exists, the command will not have any effect.
- If either persons do not exist, the command will not have any effect.
- If either relationship types do not exist, the command will not have any effect.
- If the
NEW_RELATIONSHIP_TYPEdoes not exist, it will be added to the existing list of relationTypes.
Examples:
-
editRelation /0001 /0002 /friends /colleaguesedits the relation between the person with theUUID“0001” and the person with theUUID“0002” from friends to colleagues.

![]() Caution:
Caution:
- Editing a roleless relationship to a different one works like deleting the old relationship and adding a new one. Hence, the same constraints apply for adding a new roleless relationship will apply here. For your convenience, the constraints will be emphasized again below.
- Once you add a roleless relationship, you are then unable to add a role-based relationship with the same
RELATIONSHIP_TYPE. you must first delete all relationships with theRELATIONSHIP_TYPE.
- Next, even if no relationships are using the
RELATIONSHIP_TYPE, it will still be stored in the database. Hence, you will have to delete it from the database usingdeleteRelation /RELATIONSHIP_TYPEbefore you can add a new relationship for it without roles.
- Note that some relation types are banned from being used as roleless relationships. To use these relation types, you must add them as role-based relationships.
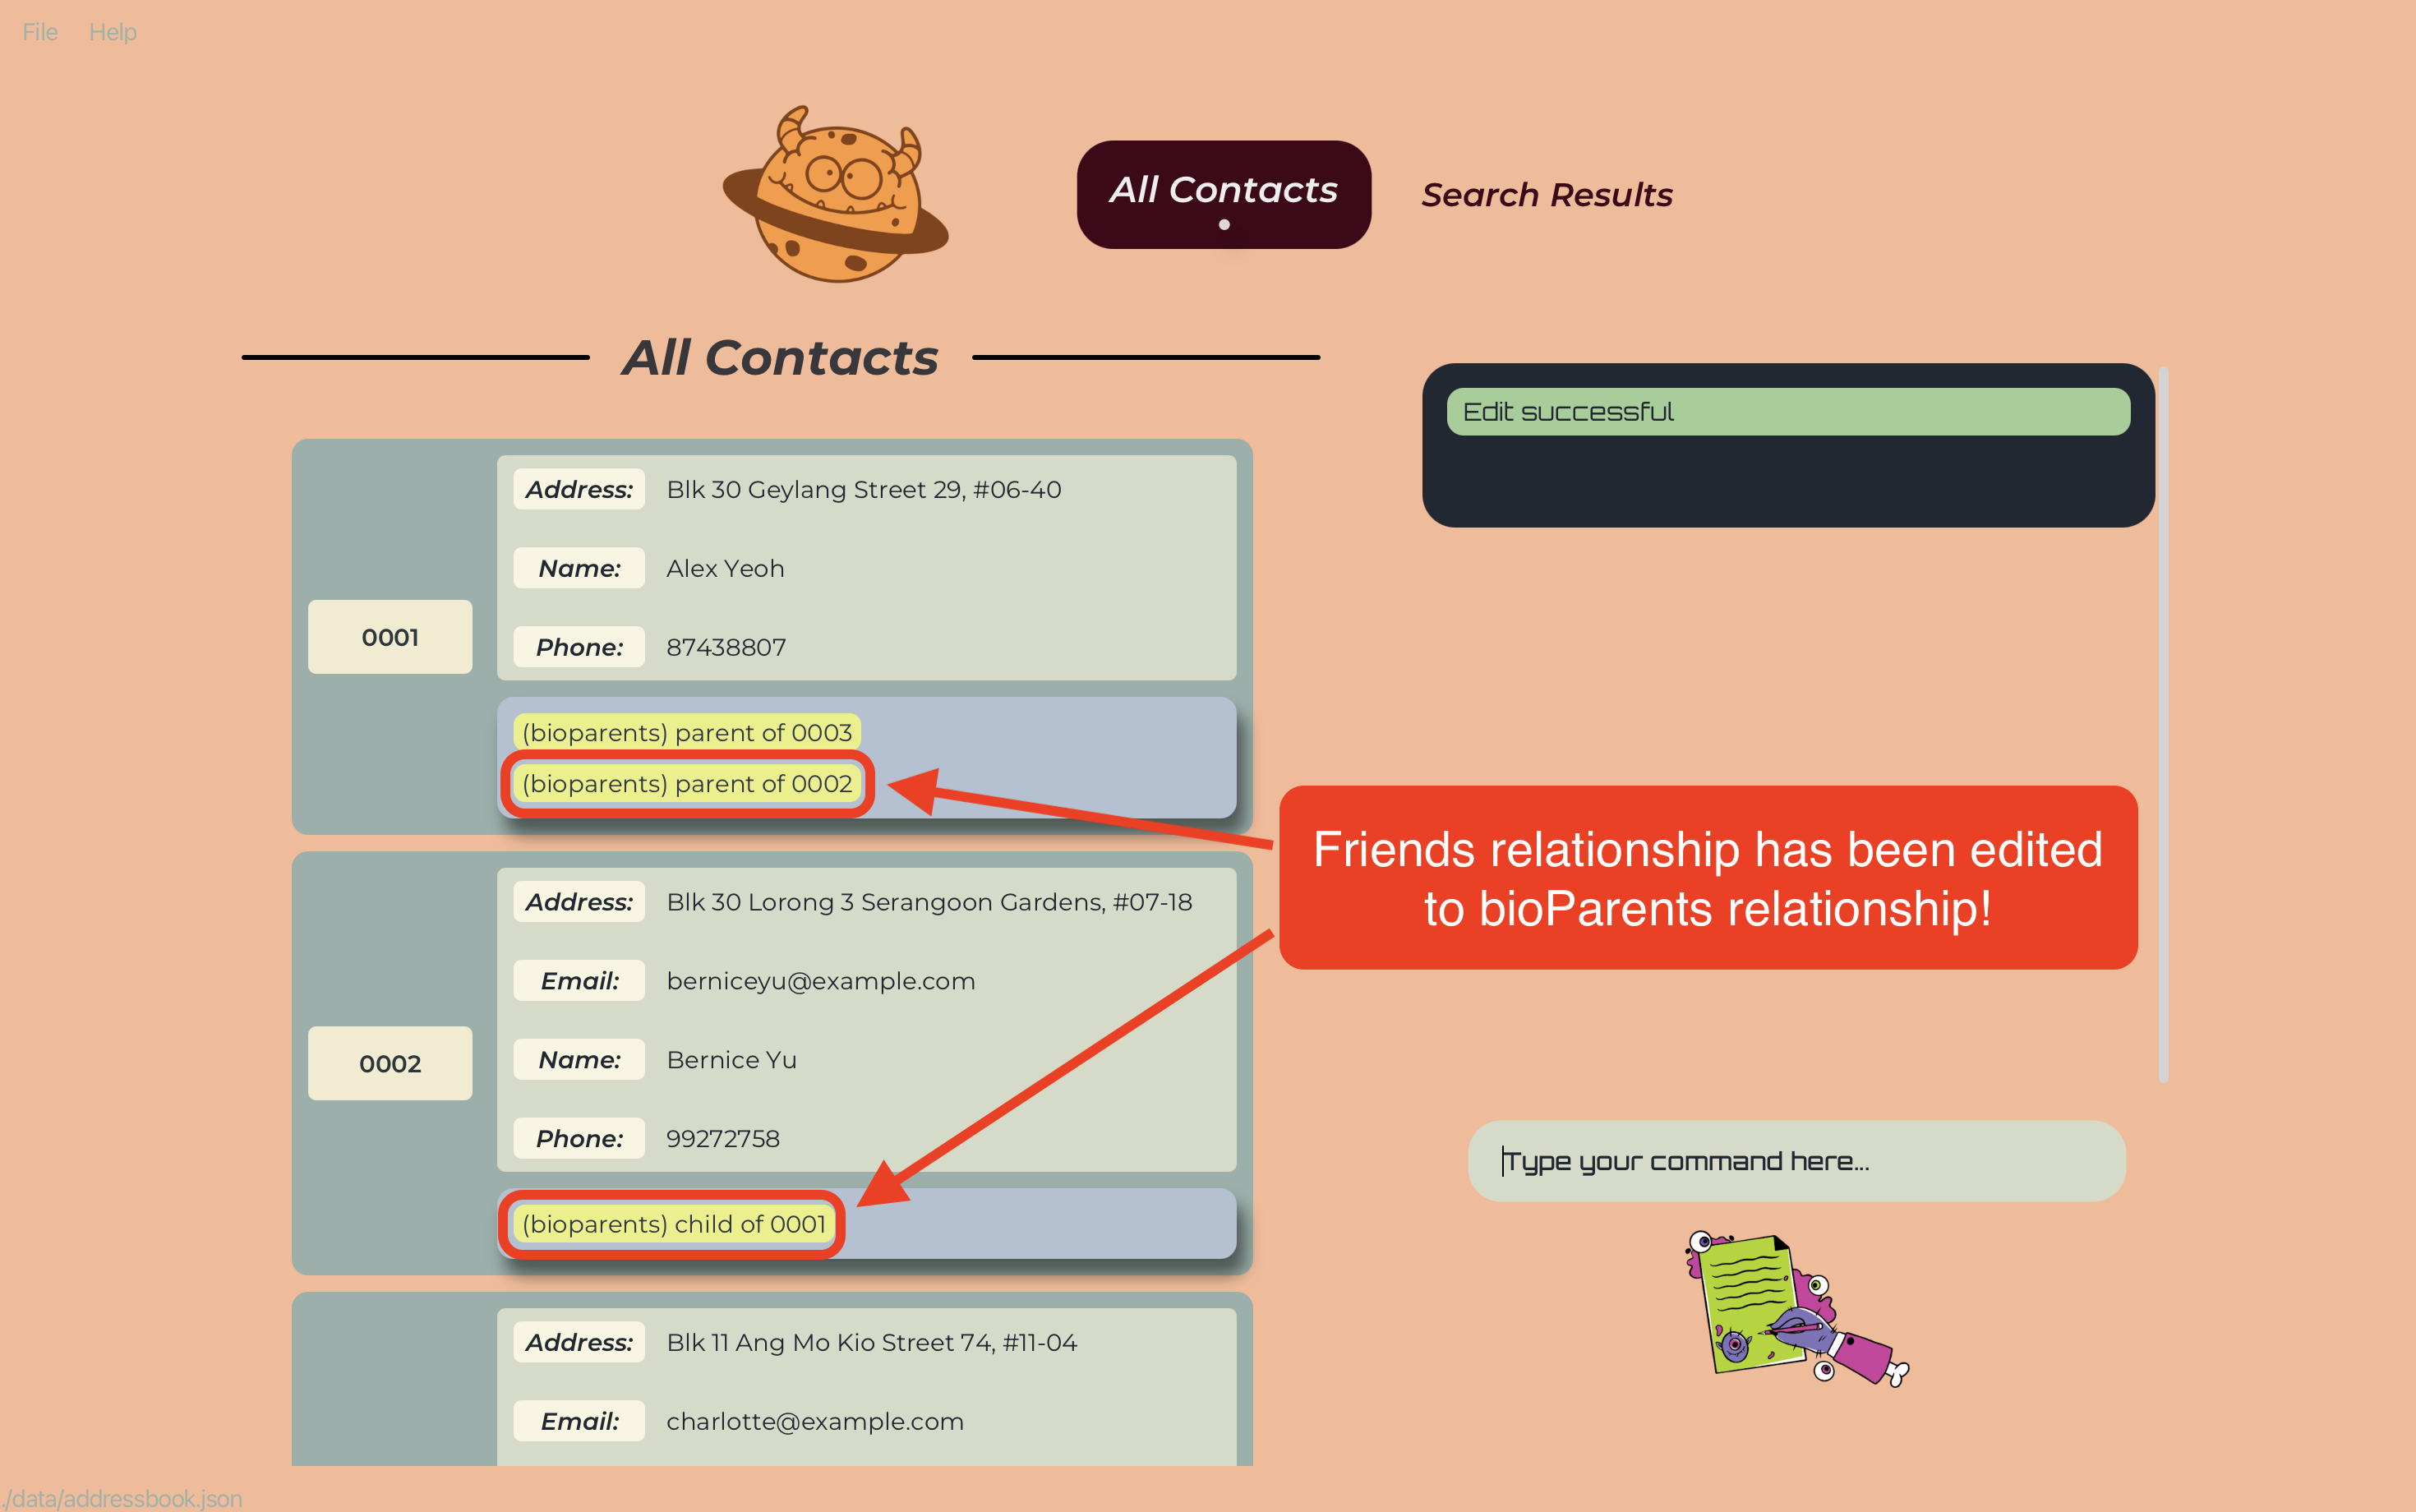
Edits the relationship between two people in the address book to a role-based relationship.
Format: editRelation /UUID1 ROLE1 /UUID2 ROLE2 /OLD_RELATIONSHIP_TYPE /NEW_RELATIONSHIP_TYPE or er /UUID1 ROLE1 /UUID2 ROLE2 /OLD_RELATIONSHIP_TYPE /NEW_RELATIONSHIP_TYPE
- The command word,
OLD_RELATIONSHIP_TYPE,NEW_RELATIONSHIP_TYPE,ROLE1andROLE2are not case-sensitive. - Edits the relationship between the person with the specified
UUID1and the person with the specifiedUUID2. - The
UUID1andUUID2refer to the unique identifiers of the persons shown in the displayed person list. - The
UUID1andUUID2must be valid UUIDs (case-sensitive). - The
OLD_RELATIONSHIP_TYPE,NEW_RELATIONSHIP_TYPE,ROLE1andROLE2must be Strings. - The
OLD_RELATIONSHIP_TYPEandNEW_RELATIONSHIP_TYPEcan be more than one word. - The
ROLE1andROLE2can only be one word. - The
ROLE1andROLE2must be different. (except for the predefined relationTypessiblings(where both roles can bebrother/sister) andspouses(where both roles can behusband/wife)) - If the relationship to be edited from does not exist, the command will not have any effect.
- If the relationship to be edited to already exists, the command will not have any effect.
- If either persons do not exist, the command will not have any effect.
- If either relationship types do not exist, the command will not have any effect.
- If the
NEW_RELATIONSHIP_TYPEdoes not exist, it will be added to the existing list of relationTypes.
Examples:
-
editRelation /0001 parent /0002 child /friends /bioparentsedits the relation between the person with theUUID“0001” and the person with theUUID“0002” from friends to bioparents with the roles parent and child respectively.

![]() Caution:
Caution:
- Editing a role-based relationship to a different one works like deleting the old relationship and adding a new one. Hence, the same constraints apply for adding a new role-based relationship will apply here. For your convenience, the constraints will be emphasized again below.
- The
RELATIONSHIP_TYPE“family” is not allowed. The address book will throw an error asking the user to be more specific about the family relation.
- The correct way to do this is to enter the exact family relation (bioparents, siblings or spouses) as the
RELATIONSHIP_TYPE.
- When adding a pre-defined familial relation (bioparents, siblings or spouses), the roles entered must be the ones predefined for them (e.g. adding a bioParents relationship with
fatheras one of the roles will result in an error as the predefined roles areparentandchild).
- If you are adding a
siblingsor aspousesrelationship, the gender of the specified person’s role in the relationship must match the gender of the person’sSexattribute. It’s all about keeping the mystical balance in our enchanted world of GENE-NIE!
- Adding more than 2 bioParents relationships with the role
childto a Person is not allowed. One person can only have a maximum of 2 bioParents relationships with the rolechild.
- Once you add a custom role-based
RELATIONSHIP_TYPEwith the defined roles, you cannot add another relationship with the sameRELATIONSHIP_TYPEbut different roles. To do this, you must first delete all relationships with theRELATIONSHIP_TYPE.
- Next, even if no relationships are using the
RELATIONSHIP_TYPE, it will still be stored in the database with the defined roles. Hence, you will have to delete it from the database usingdeleteRelation /RELATIONSHIP_TYPEbefore you can add a new relationship for it with new roles.
- Once you add a role-based relationship, you are then unable to add a roleless relationship with the same
RELATIONSHIP_TYPE. To do this, you must follow the same steps above to remove theRELATIONSHIP_TYPEand all relationships associated with it from the database.
![]() Tip:
Tip:
- With a wave of Gene-nie’s magical wand, you can perform any kind of enchanting edits to your relationships! Here are the amazing possibilities:
- Edit a roleless relationship to another roleless relationship
- Edit a roleless relationship to a role-based relationship
- Edit a role-based relationship to another role-based relationship
- Edit a role-based relationship to a roleless relationship
- Edit a roleless relationship to another roleless relationship
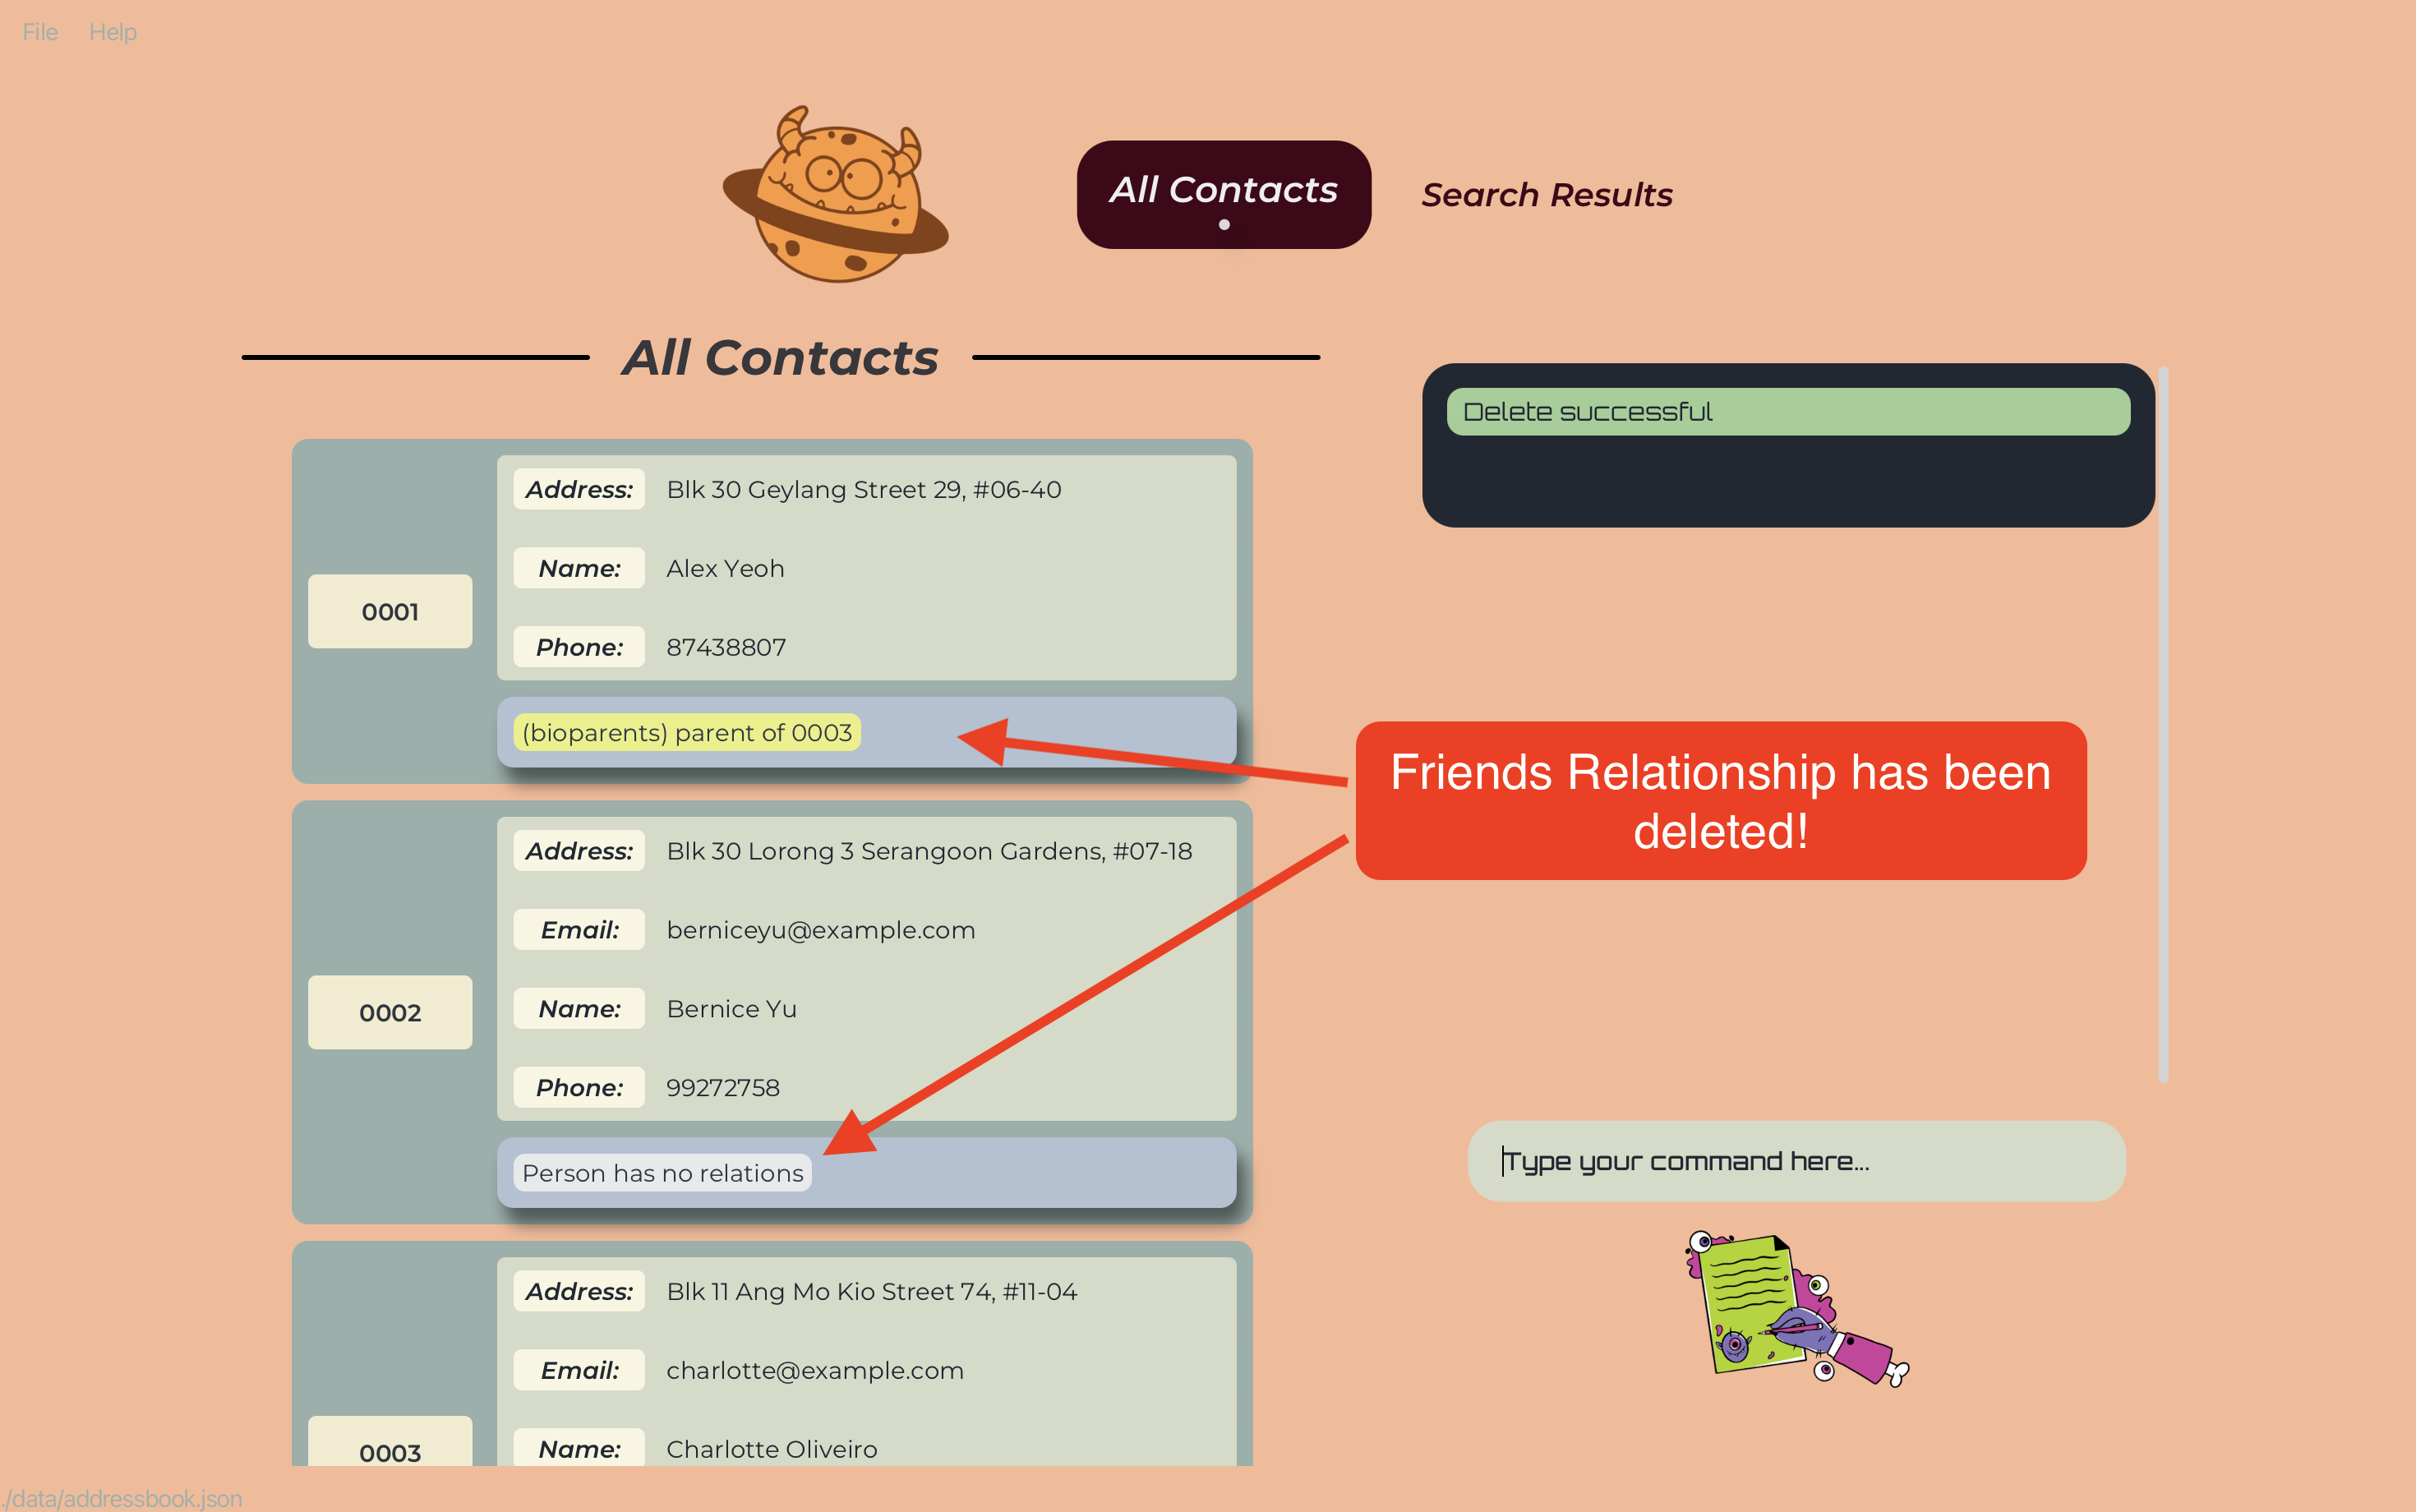
Deleting a relationship : deleteRelation or dr
Deletes the relationship between two people in the address book.
Format: deleteRelation /UUID1 /UUID2 /RELATIONSHIP_TYPE or dr /UUID1 /UUID2 /RELATIONSHIP_TYPE
- The command word and
RELATIONSHIP_TYPEare not case-sensitive. - Deletes the relationship between the person with the specified
UUID1and the person with the specifiedUUID2. - The
UUID1andUUID2refer to the unique identifiers of the persons shown in the displayed person list. - The
UUID1andUUID2must be valid UUIDs (case-sensitive). - The
RELATIONSHIP_TYPEmust be a String, but can be more than one word. - If the specified relationship to be deleted does not exist, the command will not have any effect.
- If either persons do not exist, the command will not have any effect.
Examples:
-
deleteRelation /0001 /0002 friendsdeletes the relation friends between the person with theUUID“0001” and the person with theUUID“0002”.

Deletes the relationType from the list of existing relationTypes.
Format: deleteRelation /RELATIONSHIP_TYPE or dr /RELATIONSHIP_TYPE
- Deletes the specific
RELATIONSHIP_TYPEfrom the list of existing relationTypes. - The
RELATIONSHIP_TYPEmust be a String, but can be more than one word. - If the specified
RELATIONSHIP_TYPEdoes not exist, the command will not have any effect. - If an existing relationship uses the specified
RELATIONSHIP_TYPE, the command will not have any effect.
Examples:
-
deleteRelation /workmatesdeletes the relationType workmates from the list of existing relationTypes.
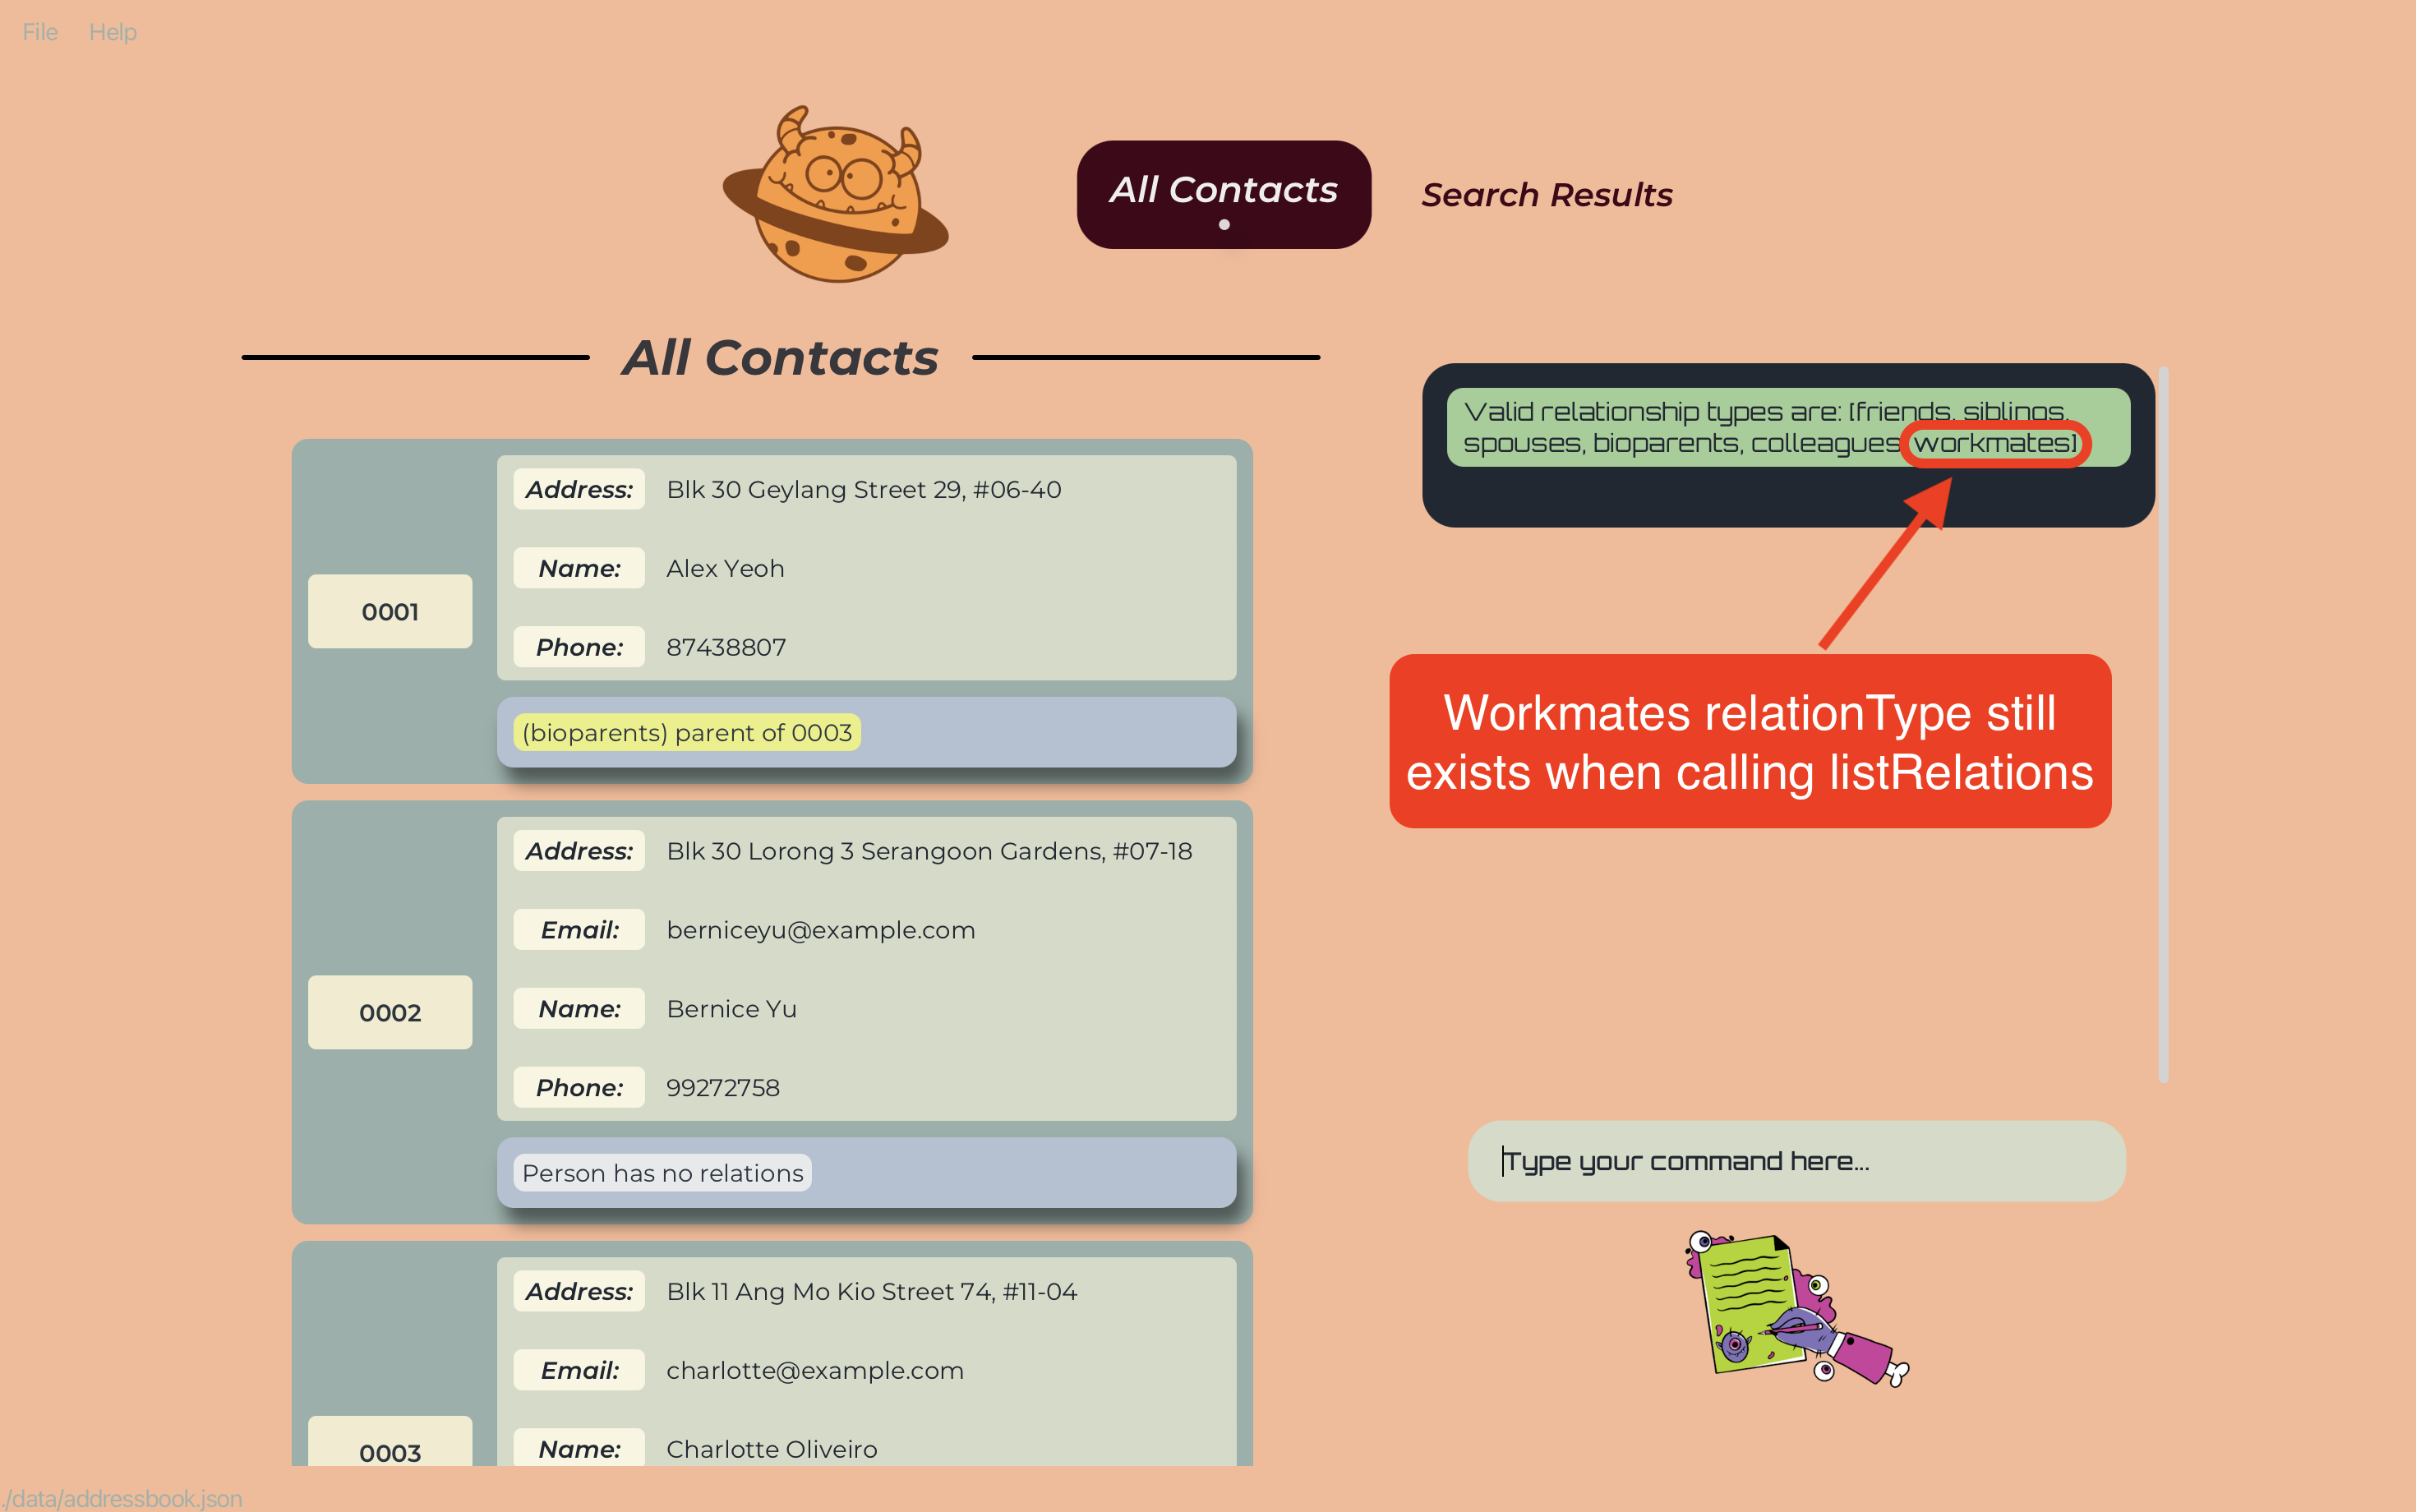
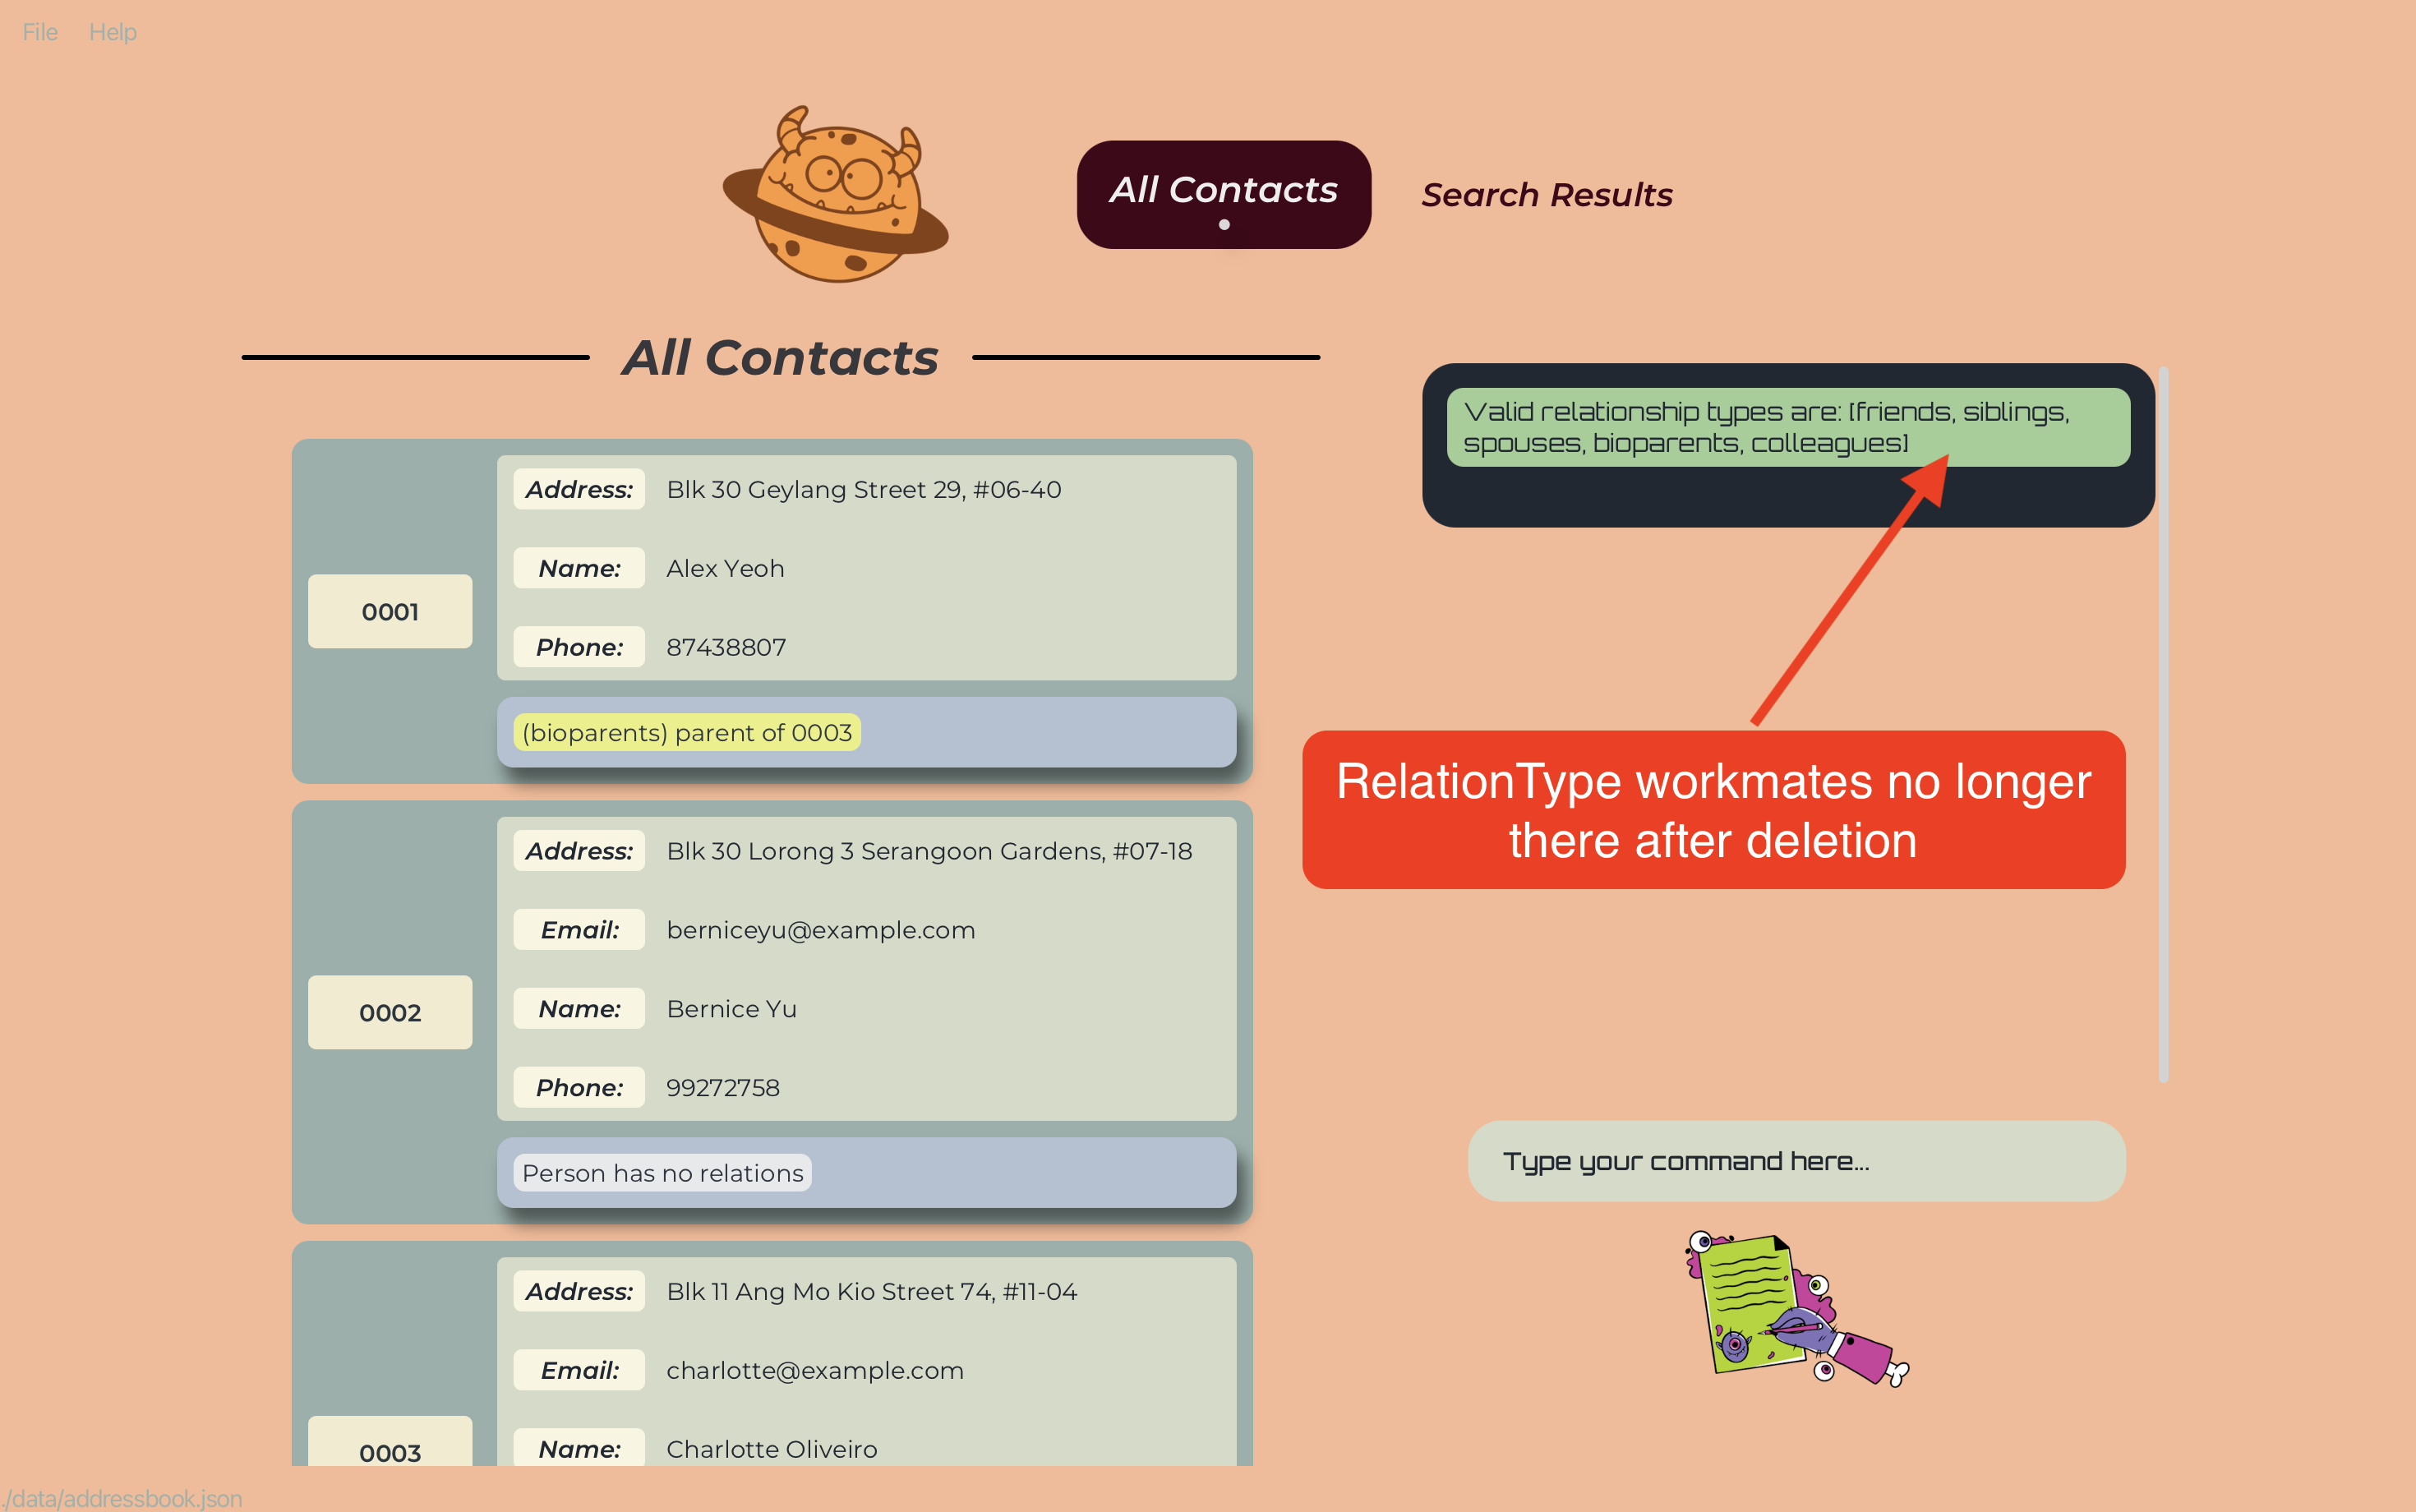
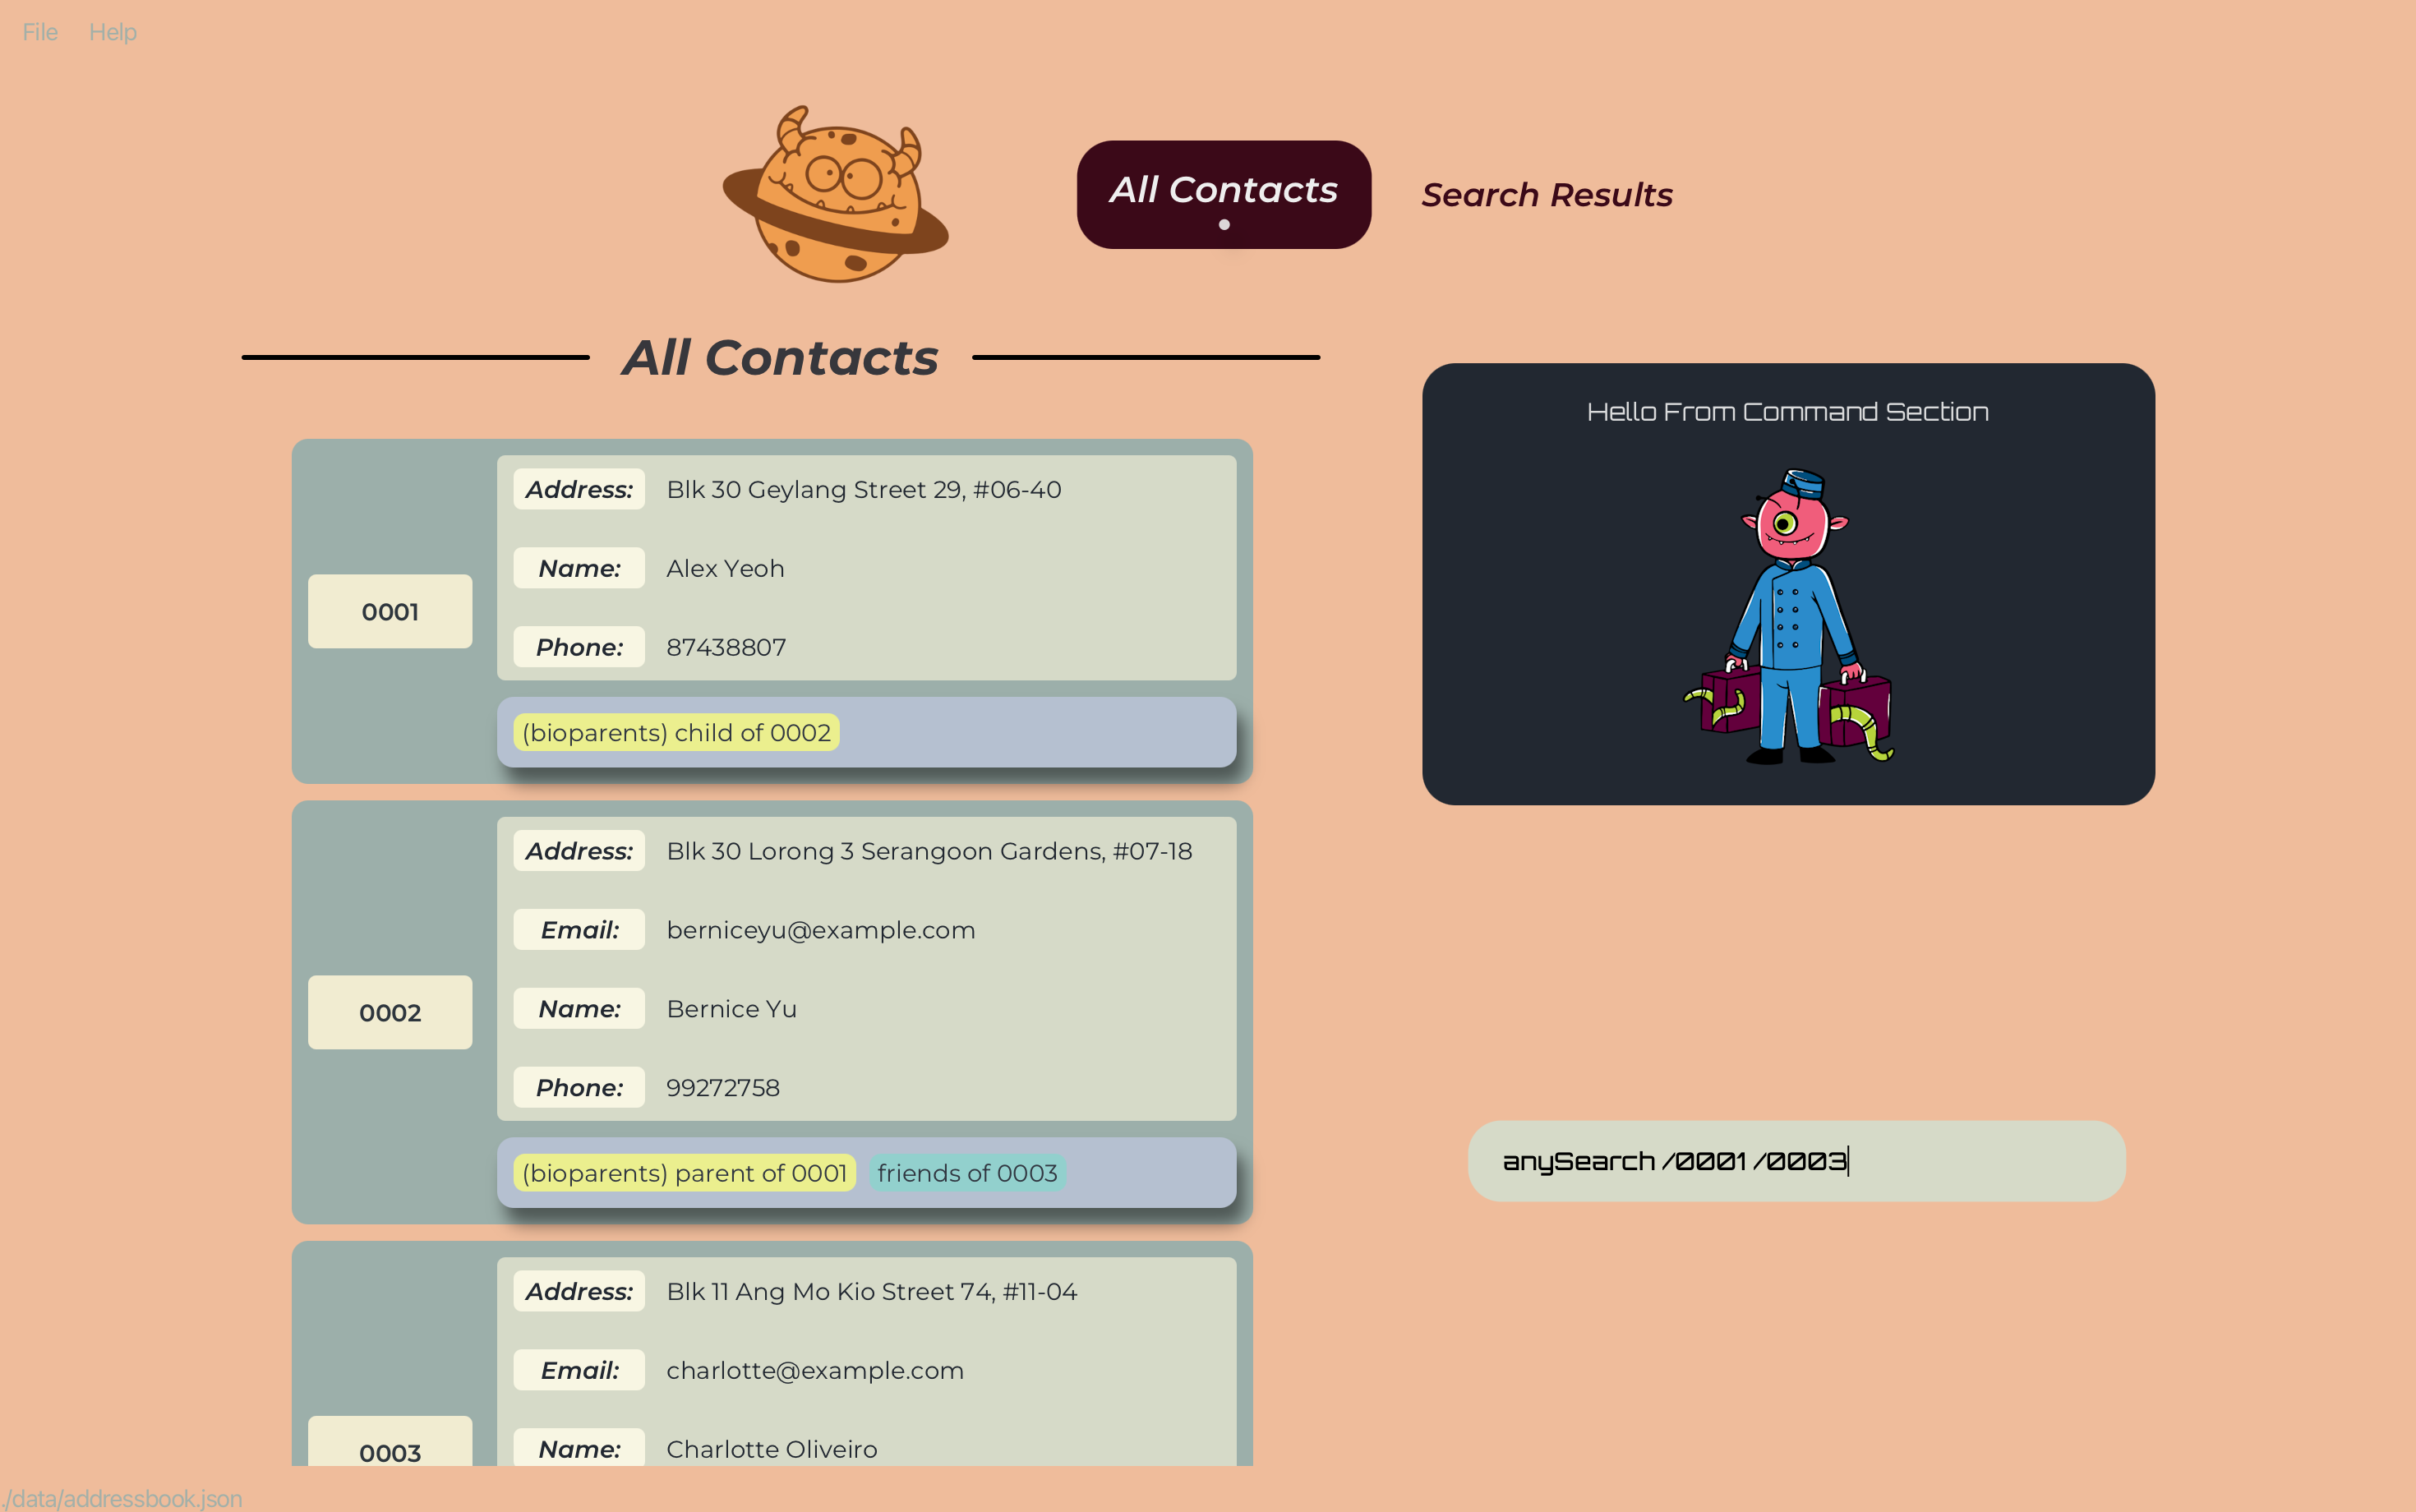
RELATIONSHIP_TYPE from the database, you need to make sure that there are no relationships using the RELATIONSHIP_TYPE. If there are, you must first delete all of these relationships before you can successfully delete the RELATIONSHIP_TYPE. Finding All Relationships between Entities: anySearch or as
Finds the relationship pathway between 2 input entities.
Format: anySearch /ORIGINUUID /TARGETUUID or as /ORIGINUUID /TARGETUUID
- The search is case-sensitive, ‘10cb’ and ‘10CB’ are considered different UUID.
- If there exists at least one relationship between
ORIGINUUIDandTARGETUUIDthe relationship pathway will be returned, elseNo Relationship Pathway Foundwill be returned.
Examples:
- Example:
anySearch /0001 /0003suppose 0003 is the friend of 0001 parent,anySearchwill then return the descriptor0001 -> (bioParents) child of --> 0002 --> friends of --> 0003.

Examples:
-
anySearch /0001 /0004suppose 0004 is not related to 0001 at all, thenanySearchreturnsNo Relationship Pathway Found - The command is order-sensitive:
anySearch /0001 /0003can potentially return a different result fromanySearch /0003 /0001 -
anySearch /0001 /0003suppose the search above returns0001 -> (bioParents) child of --> 0002 --> friends of --> 0003thenanySearch /0003 /0001returns0003 -> friends of --> 0002 --> (bioParents) parent of --> 0001since relationships are bidirectional
list to restore your list of contacts. Entering any other commands will cause the application to not function as the user expects (see more below).
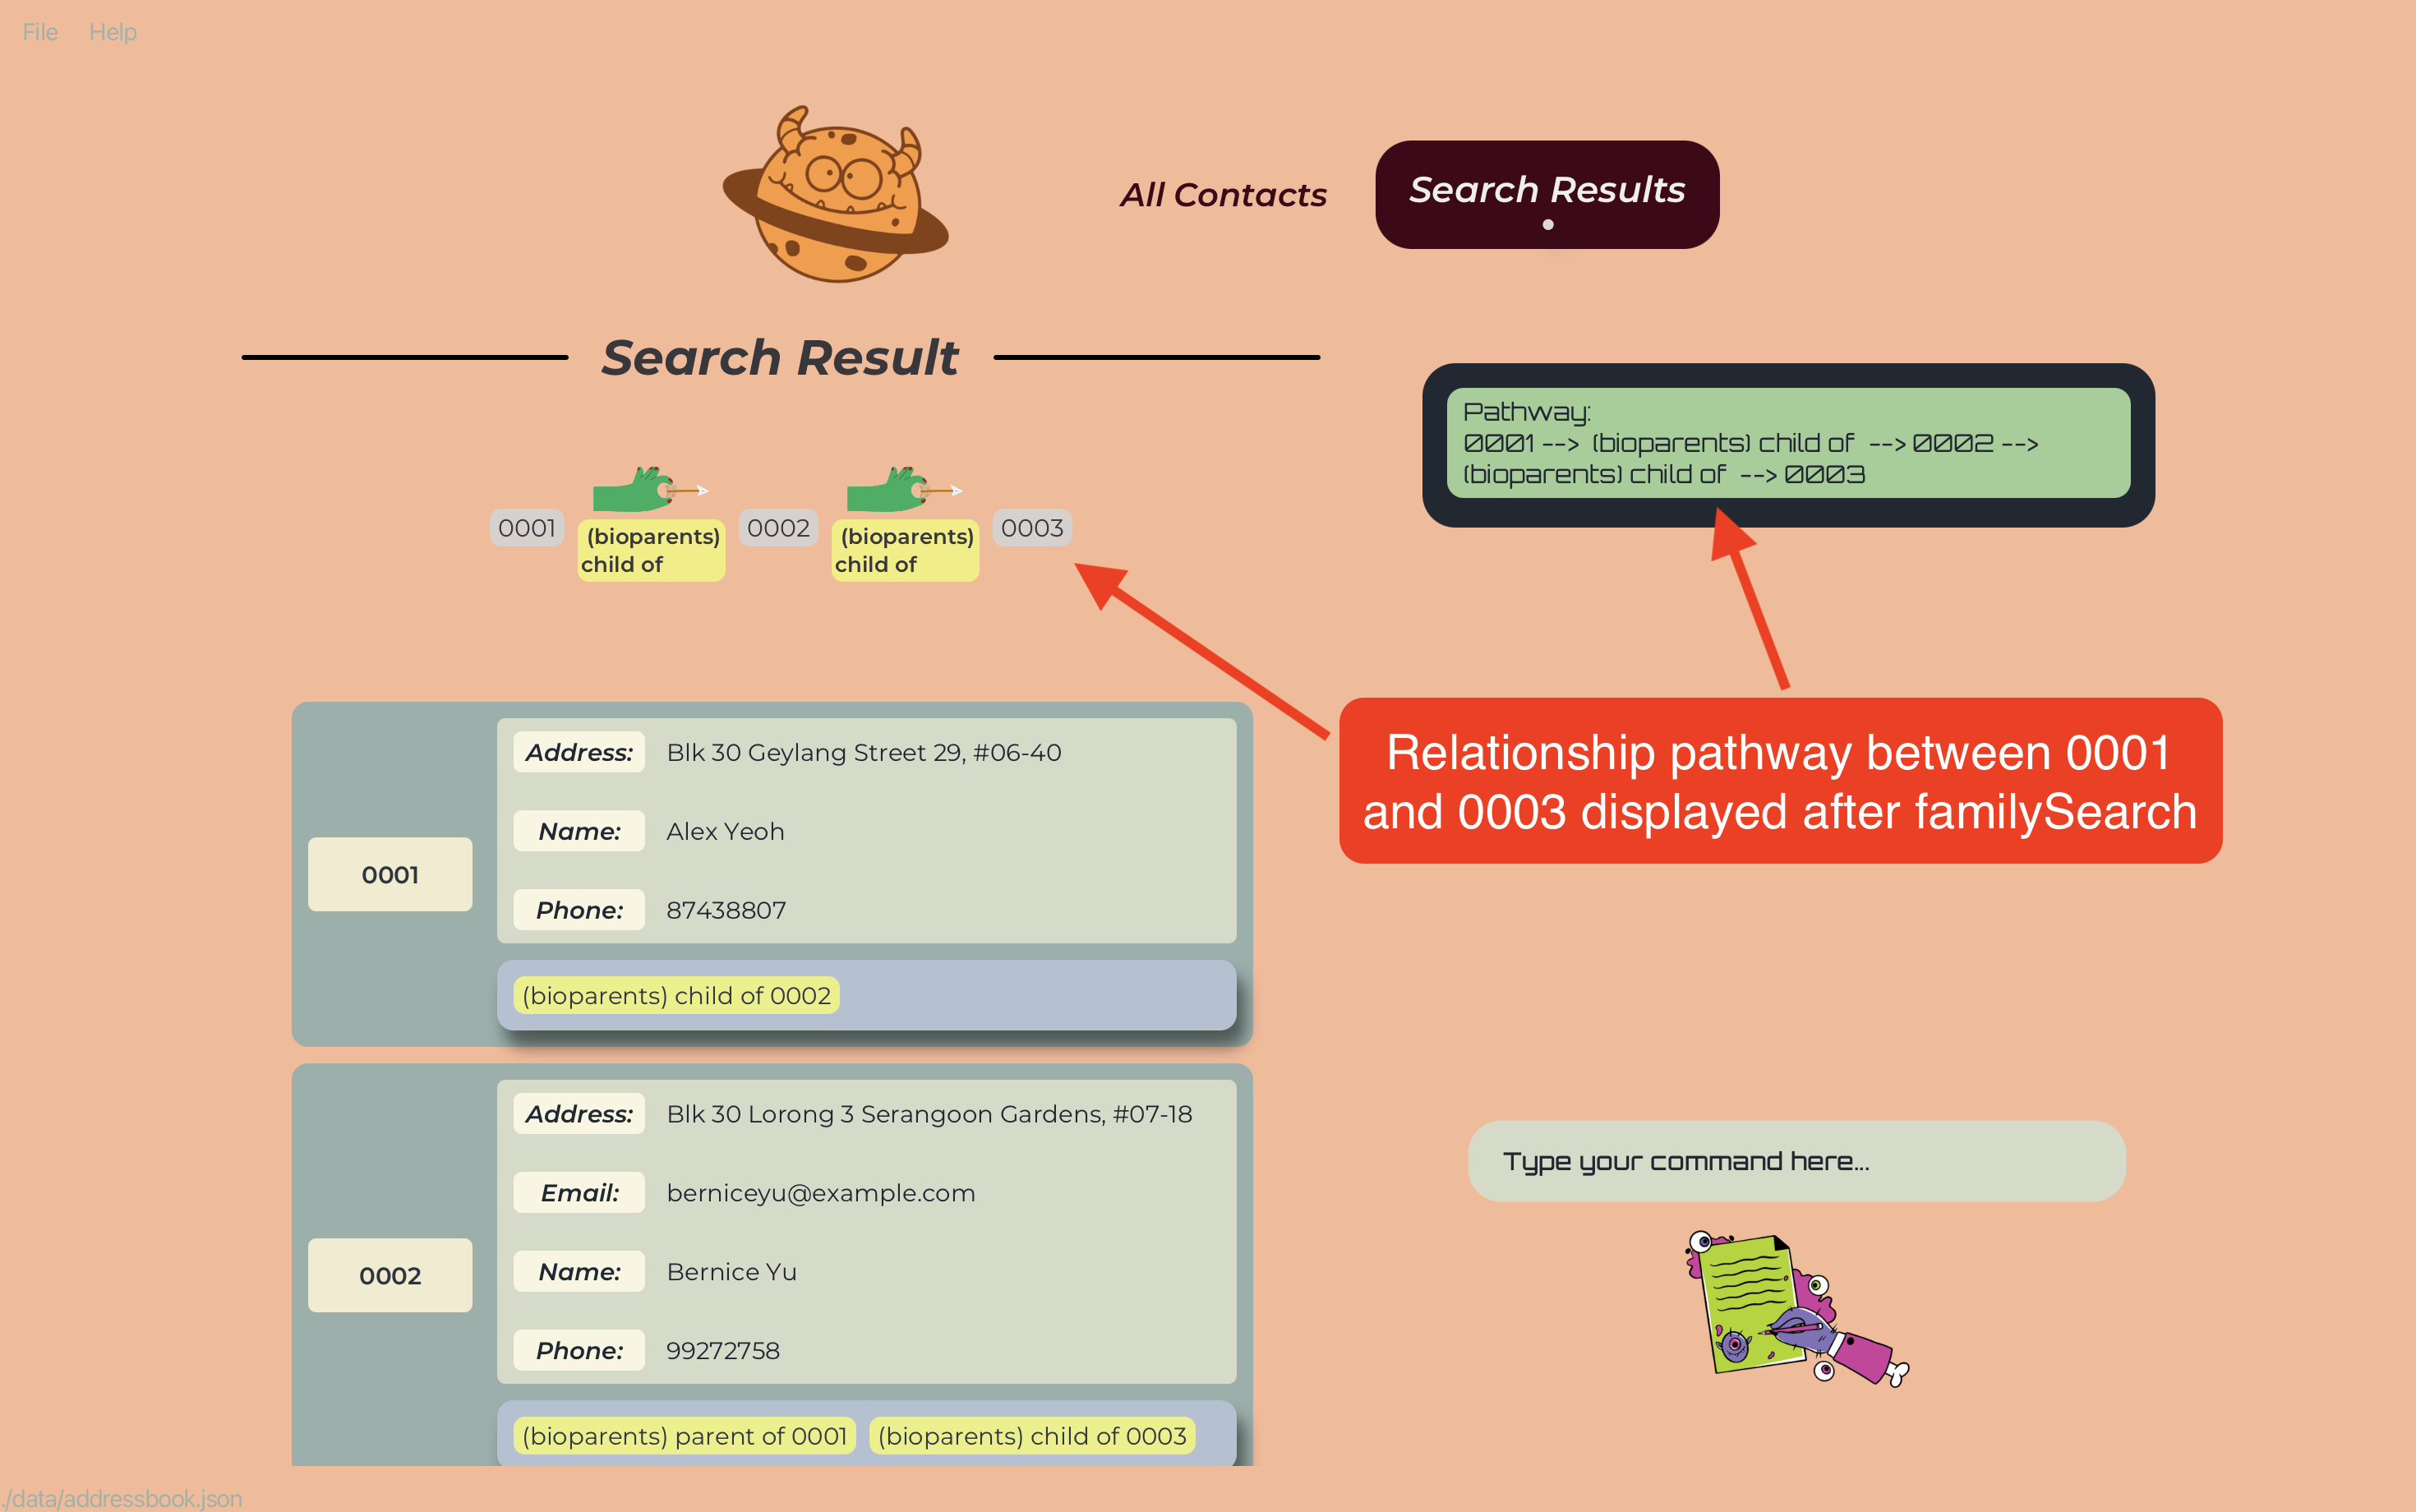
Finding Family Relationships between Entities: familySearch or fs
Finds the family relationship pathway between 2 input entities.
Format: familySearch /ORIGINUUID /TARGETUUID or fs /ORIGINUUID /TARGETUUID
- Unlike
anySearch,familySearchonly recognises family relationships, which arebioparents,siblingsandspouses - The search is case-sensitive, ‘10cb’ and ‘10CB’ are considered different UUID
- If there exists a family relationship between
ORIGINUUIDandTARGETUUIDthe relationship descriptor will be returned, elseNo Relationship Pathway Foundwill be returned.
Examples:
-
familySearch /0001 /0003suppose 0003 is the grandparent of 0001,familySearchwill then return the descriptor0001 -> (bioParents) child of --> 0002 --> (bioParents) child of --> 0003.

-
familySearch /0001 /0004suppose 0004 has no family relation to 0001, thenfamilySearchreturnsNo Relationship Pathway Found - The command is order-sensitive
familySearch /0001 /0003can potentially return a different result fromfamilySearch /0003 /0001
Examples:
-
familySearch /0001 /0003suppose the search above returns0001 -> (bioParents) child of --> 0002 --> (bioParents) child of --> 0003thenfamilySearch /0003 /0001returns0003 -> (bioParents) parent of --> 0002 --> (bioParents) parent of --> 0001since relationships are bidirectional.
bioparents, siblings and spouses). If you have added a custom familial relation(e.g. cousins), familySearch will not be able to take that into account when finding the family relationship path.
list to restore your list of contacts. Entering any other commands will cause the application to not function as the user expects (see more below).
Viewing help : help or h
Shows a message explaning how to access the help page.
Format: help

Clearing all entries : deleteAllPersons or dap
Clears all entries from the address book. This includes all Persons along with their Attributes, Relationships and created RelationTypes.
Format: deleteAllPersons
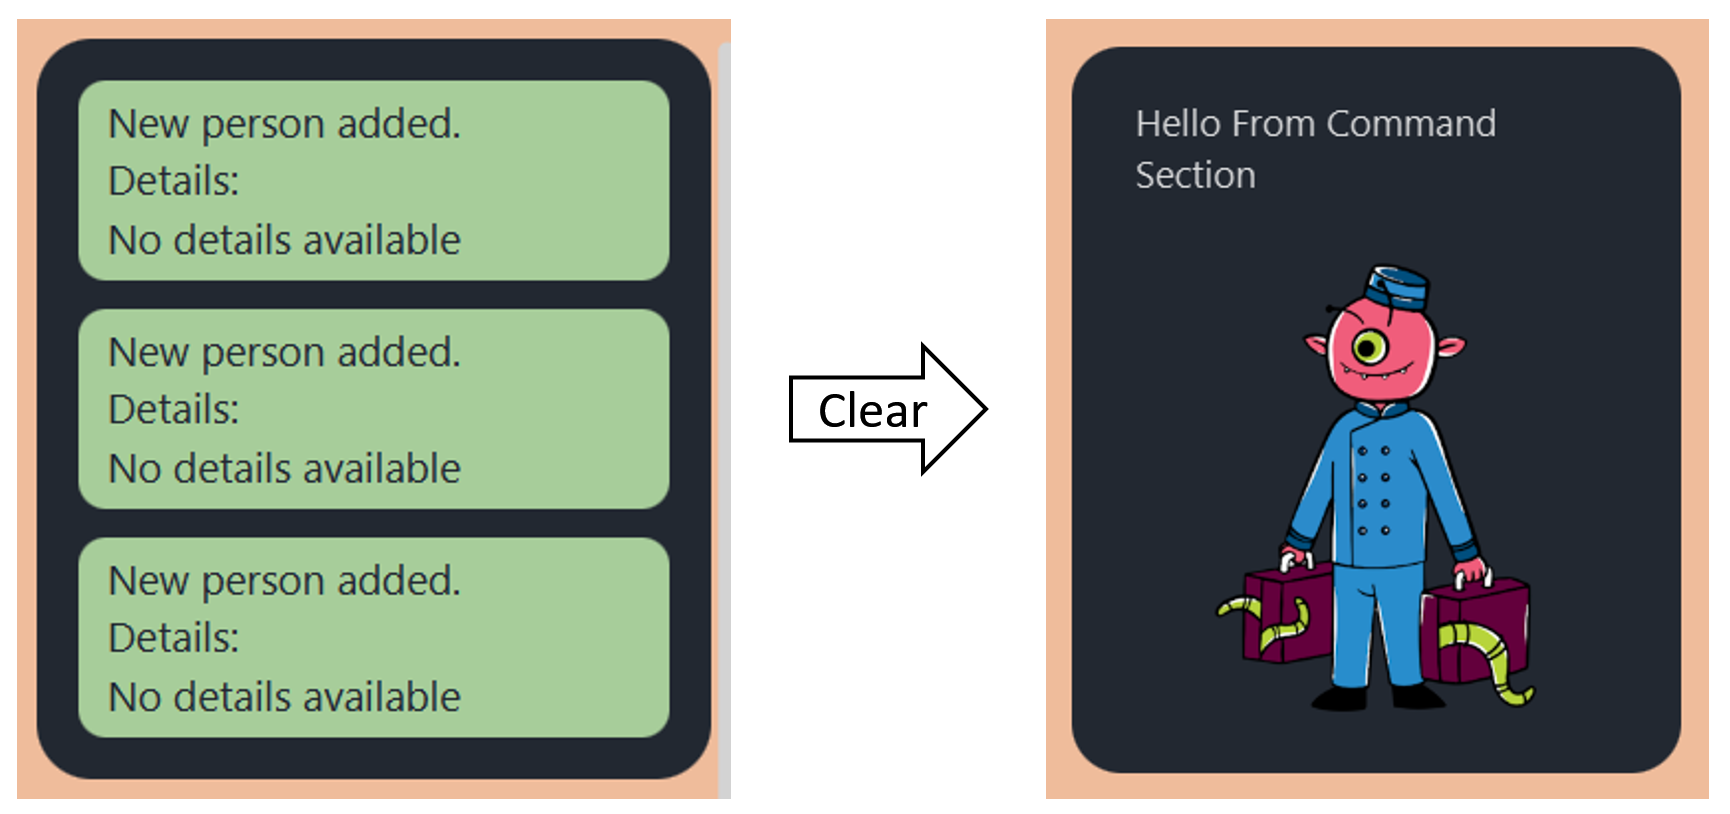
Clearing command section of past responses : clear or c
Clears all of Gene-nie's previous responses from the command section. Gene-nie keeps track of your previous commands and Gene-nie's own responses to them, since the last time you launched Gene-nie.This way, you can easily refer to what changes you have made! However, if you want to clear all previous responses, simply use this command!
Format: clear
Exiting the program : exit or e
Exits the program.
Format: exit
Saving the data
Gene-nie data is saved in the hard disk automatically after any command that changes the data. There is no need to save manually.
Editing the Data File
Gene-nie data is saved automatically as a JSON file at filepath
[JAR file location]/data/addressbook.json
Advanced users are welcome to update data directly by editing that data file.
Furthermore, certain edits can cause Gene-nie to behave in unexpected ways (e.g., if a value entered is outside the acceptable range). Therefore, edit the data file only if you are confident that you can update it correctly.
Q: How do I install Java 11, the Java version required by Gene-nie?
A: Download Java 11 JRE from here.
Then, use the “Installers” section of the installation guide to install it.
Q: How do I transfer my data to another Computer?
A: Install the app in the other computer and overwrite the empty data file it creates with the file that contains the data of your previous AddressBook home folder.
Q: Do I need an active internet connection to use Gene-nie?
A: You can use Gene-nie offline, but you’ll need an internet connection to download it to your device.
-
When using multiple screens, if you move the application to a secondary screen, and later switch to using only the primary screen, the GUI will open off-screen. The remedy is to delete the
preferences.jsonfile created by the application before running the application again.
-
Display results of find command in “Search Results” panel. Currently, the results of the find command are displayed in the “All Contacts” panel. This may not be intuitive due to the existence of the “Search Results” panel.
-
Extend UUID to have more characters. Currently, the user-facing UUID system is limited to 4 characters. This is expected to be sufficient for most use cases. However, in the future, the UUID system may be extended to have more characters.
-
Utilise the predefined Name attribute. Currently, the Name attribute behaves like any other user-defined attribute. In the future, the Name attribute may be used to provide additional functionality, such as displaying the name of the person in the GUI.
-
Maximise UI elements automatically. Currently, UI elements resize when the user types in the command box. This may distract some users.
-
Improve saving of duplicate relationshipDescriptors. Currently, relationshipDescriptors can be saved multiple times in the same data file. This may lead to inconsistencies in the data. In the future, the application may be updated to prevent the saving of duplicate relationshipDescriptors.
-
Improve error handling of duplicate relationship types. Currently, the application allows for users to add any relationTypes with no limitations unless the exact relationType already exists. This may result in confusion for users. In the future, the application may be updated to improve the checking for similar relationTypes.
-
Improve display results for UUIDs in certain error messages. Currently, when displaying errors for duplicate relationships, the application shows the full UUIDs of the Persons involved in the relationship in the error message. This can be confusing for users as the UUIDs are long and not easily readable. In the future, the application may be updated to display only the first few characters of the UUIDs in such error messages.
-
Add support for extendable roles in relationships. Currently, the application allows for users to add any relationTypes with little limitation in regard to spelling. Thus, users are able to add any roles and relation types that they want to for custom relationships, including roles and relation types that are not valid words (e.g. aaa). In the future, the application may be updated to restrict the roles and relation types that can be added to only valid words.
-
Improve UI handling of filtering commands. Currently, when the user uses a filtering command (e.g.
find,anysearchandfamilysearch) the subsequent results will remain filtered and other commands will not act as expected. In the future, the application may be updated to automatically update the list component after every successfulfind,anysearchandfamilysearchcommands to automatically clear the filter after displaying the results.
| Term | Description |
|---|---|
| UUID | Universally Unique Identifier: A four-digit code used to represent a person. Every person in your contacts list has a unique UUID (case-sensitive). |
| CLI | Command Line Interface (CLI): A text-based interface that allows users to interact with a computer or software by entering text commands. It’s often preferred by power users and developers for its efficiency and scriptability. |
| GUI | Graphical User Interface (GUI): A user interface that utilises graphical elements such as icons, buttons, windows, and menus to allow users to interact with software or applications. GUIs are known for their visual appeal and user-friendliness. |
| Integer | Integer: In computer programming, an integer is a whole number without a fractional or decimal component. Integers are used to represent whole quantities in mathematics and computer science. They can be positive, negative, or zero. |
| JAR | JAR (Java Archive): A file format used for aggregating multiple files (typically Java class files, metadata, and resources) into a single compressed archive. JAR files are commonly used to package and distribute Java applications or libraries. |
| JSON | JSON (JavaScript Object Notation): A lightweight data interchange format that is easy for humans to read and write, and easy for machines to parse and generate. JSON is commonly used for data storage and exchange in web applications. It consists of key-value pairs enclosed in curly braces. |
| Parameters | Parameters: In the context of software, parameters are variables or values that are passed into a function, method, or command. Parameters are used to customise the behavior of the function or command. |
| Action | Shorthand | Format, Examples |
|---|---|---|
| Add Person | a |
add /ATTRIBUTE_NAME ATTRIBUTE_VALUE [/ATTRIBUTE_NAME ATTRIBUTE_VALUE] ... e.g., add /Name Bob /Phone 01010101 /Address 123 Computing Drive
|
| Delete Person | d |
delete /UUIDe.g., delete /3k83
|
| Add Person Attribute | aa |
addAttribute /UUID /ATTRIBUTE_NAME ATTRIBUTE_VALUE [/ATTRIBUTE_NAME ATTRIBUTE_VALUE] ...e.g., addAttribute /0001 /Pet Dog
|
| Delete Person Attribute | da |
deleteAttribute /UUID /ATTRIBUTE_NAME [/ATTRIBUTE_NAME] ...e.g., deleteAttribute /0001 /Pet /Address
|
| Edit Person Attribute | ea |
editAttribute /UUID /ATTRIBUTE_NAME NEW_ATTRIBUTE_VALUE [/ATTRIBUTE_NAME NEW_ATTRIBUTE_VALUE] ...e.g., editAttribute /0001 /Pet Cat
|
| Add Relation | ar |
addRelation /UUID1 /UUID2 /RELATION_TYPEe.g., addRelation /0001 /3dab /friends
|
| Edit Relation | er |
editRelation /UUID1 /UUID2 /OLD_RELATION_TYPE /NEW_RELATION_TYPEe.g., editRelation /0001 /3dab /friends /colleagues
|
| Delete Relation | dr |
deleteRelation /UUID1 /UUID2 /RELATION_TYPEe.g., deleteRelation /0001 /3dab /friends
|
| List current Relation types | lr | listRelations |
| Find Person | f |
find /PHRASE [/MORE_PHRASES] ...e.g., find /James /Jake
|
| List all Persons | l | list |
| anySearch | as |
anySearch /originUUID /targetUUIDe.g., anySearch /10cb /987d
|
| familySearch | fs |
familySearch /originUUID /targetUUIDe.g., familySearch /10cb /987d
|
| Help | h | help |
| Exit App | e | exit |
| Clear Command Responses | c | clear |
| Delete all Persons | dap | deleteAllPersons |