 Gene-nie
GENE-NIE DEVELOPER GUIDE
Table of Contents
- Introduction
- Acknowledgements
- Setting up, getting started
- Design
- Implementation
- Documentation, logging, testing, configuration, dev-ops
- Appendix: Requirements
-
Appendix: Instructions for manual testing
- Launch and shutdown
- Listing all persons
- Help
- Adding a person
- Deleting a person
- Adding attributes to existing persons
- Editing attributes of existing persons
- Deleting attributes of existing persons
- Finding persons
- Listing all valid relationship types
- Adding relationships between persons
- Editing relationships between persons
- Deleting relationships between persons
- Finding the relationship path between two persons
- Deleting all persons
- Clearing command responses
- Issues with saving data
-
Appendix: Planned Enhancements
- Display results of find commands in Search Results tab
- Improve error handling for invalid commands
- Improve saving of valid relationship descriptors
- Improve error handling for duplicate relationship types
- Improve display result for UUIDs in certain error messages
- Add support for extendable roles for relationships
- Improve changing of roles for a specific relationship type
- Improve the checking of valid roles with respect to the relationType
- Improve UI handling of filtering commands
- Improve error message for editrelation and deleterelation
Introduction
This is the developer guide for Gene-nie, a desktop application for managing family members and their relationships. It is optimized for use via a Command Line Interface (CLI) while still having the benefits of a Graphical User Interface (GUI). If you are a developer, this guide will help you understand the architecture of Gene-nie and how to extend its features.
Acknowledgements
Some code generated using GitHub Copilot, where commented as such in the code.
Setting up, getting started
Refer to the guide Setting up and getting started.
Design
.puml files used to create diagrams in this document docs/diagrams folder. Refer to the PlantUML Tutorial at se-edu/guides to learn how to create and edit diagrams.
Architecture
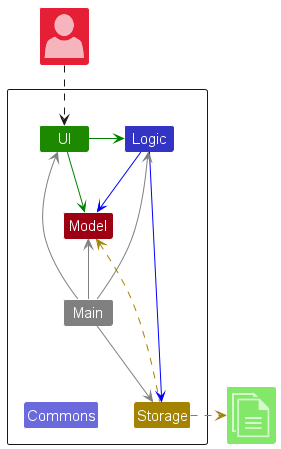
The Architecture Diagram given above explains the high-level design of the App.
Given below is a quick overview of main components and how they interact with each other.
Main components of the architecture
Main (consisting of classes Main and MainApp) is in charge of the app launch and shut down.
- At app launch, it initializes the other components in the correct sequence, and connects them up with each other.
- At shut down, it shuts down the other components and invokes cleanup methods where necessary.
The bulk of the app’s work is done by the following four components:
-
UI: The UI of the App. -
Logic: The command executor. -
Model: Holds the data of the App in memory. -
Storage: Reads data from, and writes data to, the hard disk.
Commons represents a collection of classes used by multiple other components.
How the architecture components interact with each other
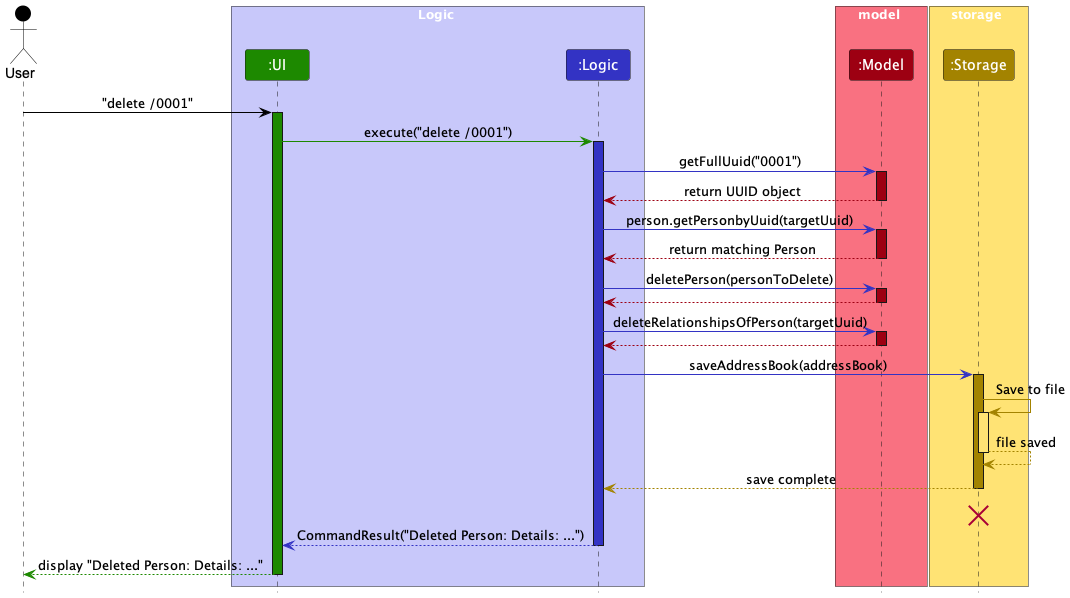
The Sequence Diagram below shows how the components interact with each other for the scenario where the user issues the command delete /0001, assuming that 0001 corresponds to a valid Person UUID.
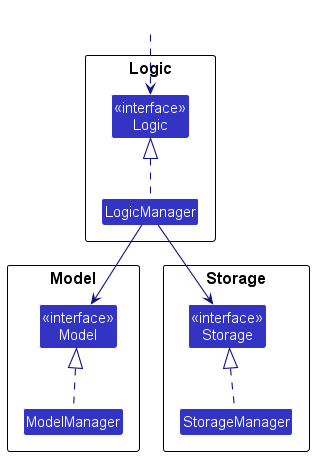
Each of the four main components (also shown in the diagram above),
- defines its API in an
interfacewith the same name as the Component. - implements its functionality using a concrete
{Component Name}Managerclass which follows the corresponding APIinterfacementioned in the previous point.
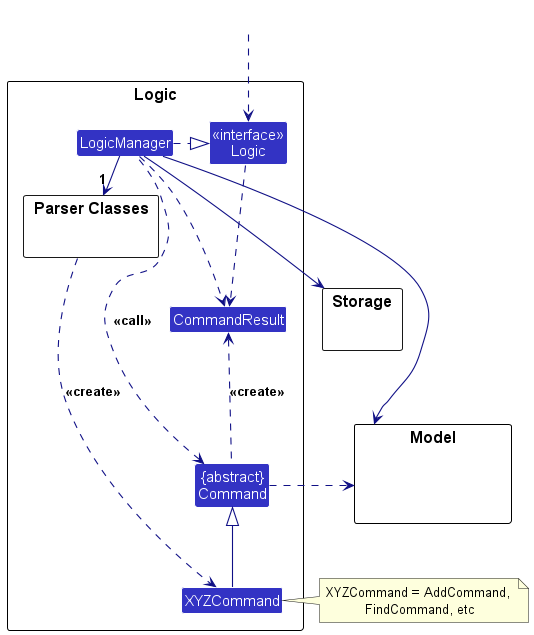
For example, the Logic component defines its API in the Logic.java interface and implements its functionality using the LogicManager.java class which follows the Logic interface. Other components interact with a given component through its interface rather than the concrete class (reason: to prevent outside component’s being coupled to the implementation of a component), as illustrated in the (partial) class diagram below.
The sections below give more details of each component.
UI component
The API of this component is specified in Ui.java
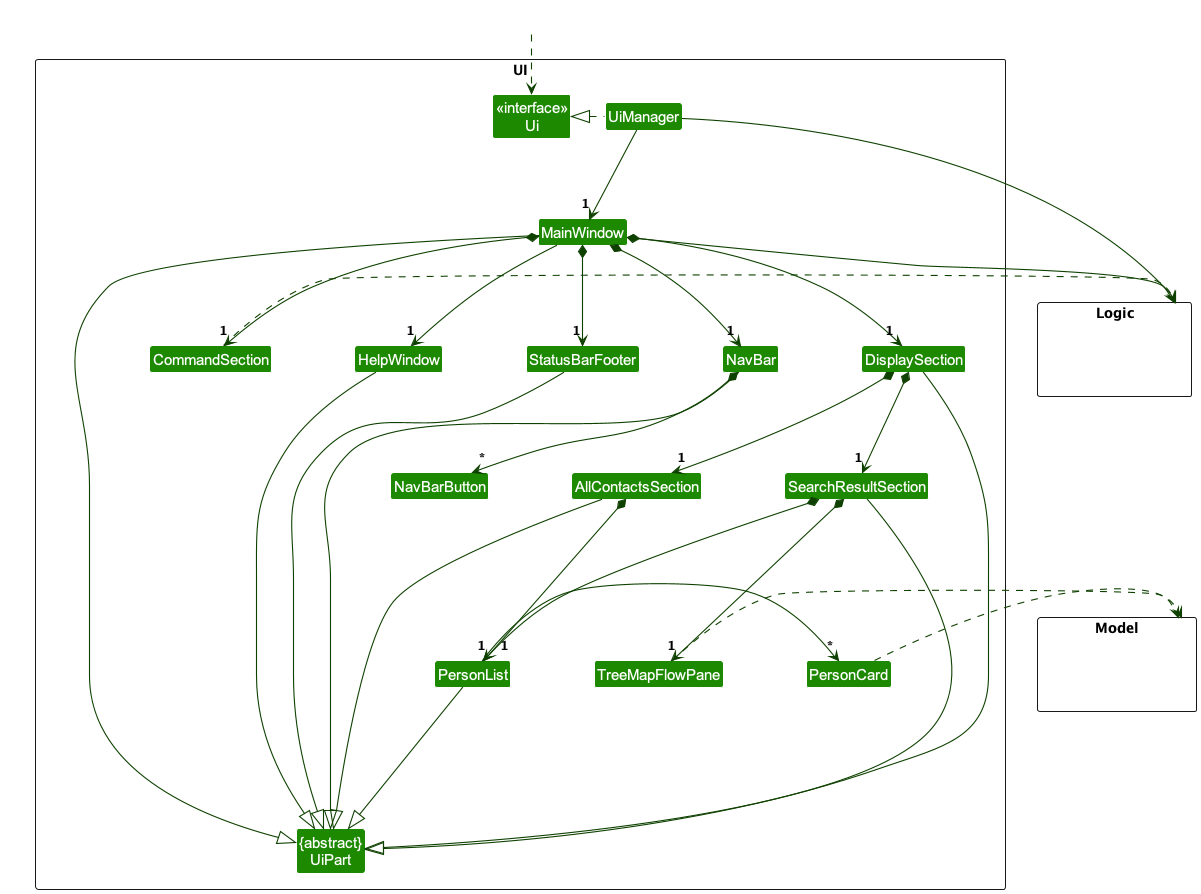
The UI component uses the JavaFx UI framework. The layout of these UI parts are defined in matching .fxml files that
are in the src/main/resources/view folder. For example, the layout of the [MainWindow]
(https://github.com/se-edu/addressbook-level3/tree/master/src/main/java/seedu/address/ui/MainWindow.java) is specified
in MainWindow.fxml
The UI consists of a MainWindow that is made up of parts e.g. CommandSection, StatusBarFooter, HelpWindow, DisplaySection,
NavBar. All these, including the MainWindow, inherit from the abstract UiPart class which
captures the commonalities between classes that represent parts of the visible GUI.
Let’s briefly dive into each component in UI and their respective functions:
- The
CommandSectionreceives user commands and theUIthen executes user commands using theLogiccomponent, explaining the dependency betweenCommandSectionand theLogiccomponents. The string output of the commands will then be displayed on the CommandSection. - For All Person Contacts Information will be displayed in the
AllContactsSectionwhich is composed of aPersonListwhich is in turn composed of 0 or morePersonCardwhere the Person’s information will be rendered explaining the dependency on theModelcomponent. - For SearchResults from
anySearchandfamilySearchcommands will be rendered on theSearchResultSectioncomposed of aPersonListsimilar toAllContactsSectionexplained above, however with the addition of aTreeMapFlowPanewhich renders the relationship pathway between 2 Persons explaing the dependency on theModelcomponent. - Lastly,
NavBaris solely aUIcomponent, does not depend on other components, and it is composed of 0 or moreNavBarButtonswhich serves the sole purpose of navigating between pages on theUI.
Logic component
API : Logic.java
Here’s a (partial) class diagram of the Logic component:
The sequence diagram below illustrates the interactions within the Logic component, taking execute("delete /0000") API call as an example (assuming that 0000 is a valid UUID).
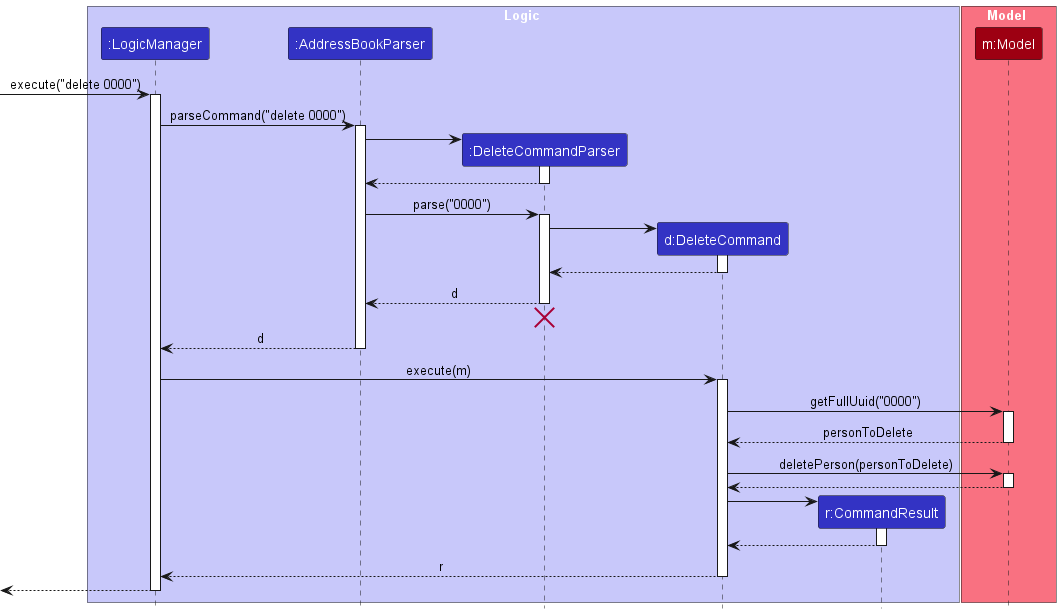
Note : The lifeline for DeleteCommandParser should end at the destroy marker (X) but due to a limitation of PlantUML, the lifeline continues till the end of diagram.
How the Logic component works:
- When
Logicis called upon to execute a command, it is passed to anAddressBookParserobject which in turn creates a parser that matches the command (e.g.,DeleteCommandParser) and uses it to parse the command. - This results in a
Commandobject (more precisely, an object of one of its subclasses e.g.,DeleteCommand) which is executed by theLogicManager. - The command can communicate with the
Modelwhen it is executed (e.g. to delete a person).
Note that although this is shown as a single step in the diagram above (for simplicity), in the code it can take several interactions (between the command object and theModel) to achieve. - The result of the command execution is encapsulated as a
CommandResultobject which is returned back fromLogic.
Here are the other classes in Logic (omitted from the class diagram above) that are used for parsing a user command:
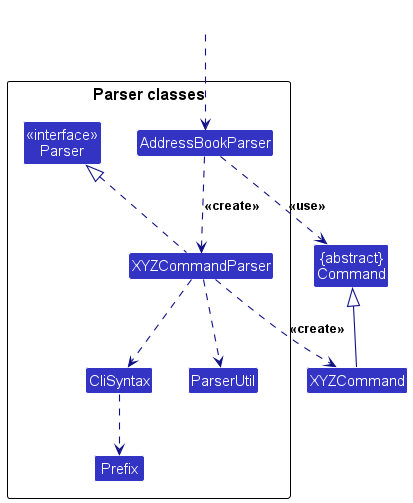
How the parsing works:
- When called upon to parse a user command, the
AddressBookParserclass creates anXYZCommandParser(XYZis a placeholder for the specific command name e.g.,AddCommandParser) which uses the other classes shown above to parse the user command and create aXYZCommandobject (e.g.,AddCommand) which theAddressBookParserreturns back as aCommandobject. - All
XYZCommandParserclasses (e.g.,AddCommandParser,DeleteCommandParser, …) inherit from theParserinterface so that they can be treated similarly where possible e.g, during testing.
Model component
API : Model.java
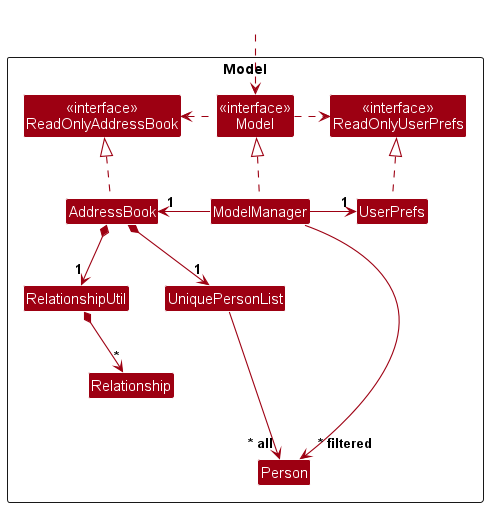
The Model component,
- stores the address book data where
-
Personobjects are contained in aUniquePersonListobject. -
Relationshipobjects are contained in aRelationshipUtilobject.
-
- stores the currently ‘selected’
PersonandRelationshipobjects (e.g., results of a search query) as a separate filtered list which is exposed to outsiders as an unmodifiableObservableList<Person>andObservableList<Relationship>respectively that can be ‘observed’ i.e. the UI can be bound to these lists so that the UI automatically updates when the data in the list change. - stores a
UserPrefobject that represents the user’s preferences. This is exposed to the outside as aReadOnlyUserPrefobjects. - does not depend on any of the other three components (as the
Modelrepresents data entities of the domain, they should make sense on their own without depending on other components)
Model component - Person
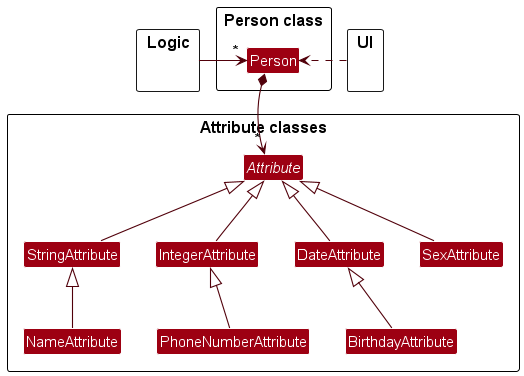
The Person component,
- contains details about the person, stored as
Attributeobjects.- The
Personcomponent,- stores the Unique User ID or UUID of the person
- stores any number of
Attributeobjects in thePersonobject in the hash map - is not required to have any
Attributeobjects
- The
Unique User IDcomponent,- acts as the unique identifier for a person
- the UUID is generated by the system and is unique for each person
- it is used for identifying the person in the system whenever calls are made to the system
- does not depend on the other components (as the
Unique User IDis a standalone store of details about thePerson)
- The
Model component - Attribute
Attribute is an abstract class that represents a detail about a Person. All other attribute classes extend from this class.
- The
Attributecomponent,- is used to store details about a
Person - each attribute has a
nameand avalue - stores
Attributeobjects in thePersonobject in the hash map - Has general types of attributes (
StringAttribute,IntegerAttribute,DateAttribute)-
StringAttribute- stores a string value -
IntegerAttribute- stores an integer value -
DateAttribute- stores a date value
-
- Users are able to create their own attributes using the
StringAttributeclass- They will have their own
Stringname andStringvalue
- They will have their own
- Has specific types of attributes (e.g.
NameAttribute,PhoneNumberAttribute) with unique constraints relevant to their validity-
NameAttribute- stores the name of the person -
PhoneNumberAttribute- stores the phone number of the person and must be an integer of less than 10 digits -
SexAttribute- stores the gender of the person and must be eitherMaleorFemale
-
- does not depend on the other components (as the
Attributeare standalone stores of details about thePerson)
- is used to store details about a
Model component - Relationship
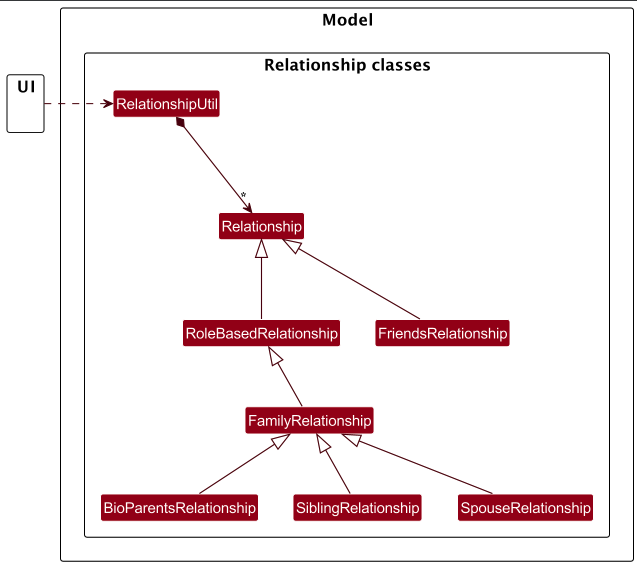
The Relationship component,
- contains details about a relationship between two persons.
- has a
relationTypethat defines the type of relationship. - stores UUIDs of
Personobjects that are connected by theRelationshipobject. - can be a general
Relationshipwhich allows the user to define their ownrelationTypeor a specific one that has a predefinedRelationType.-
FriendsRelationshipis a relationship class that has a predefinedrelationTypeoffriends.
-
- can be a general
RoleBasedRelationshipwhich allows the user to define their ownRelationTypeand roles for each Person or a specific one that has those predefined.-
FamilyRelationshipis a abstract class that extends fromRoleBasedRelationship. It is the superclass ofBioParentsRelationship,SpousesRelationshipandSiblingsRelationship.-
BioParentsRelationshipis a relationship class that has a predefinedrelationTypeofbioparentsand has predefined rolesparentandchild. -
SpousesRelationshipis a relationship class that has a predefinedrelationTypeofspousesand has predefined roleshusbandandwife. -
SiblingRelationshipis a relationship class that has a predefinedrelationTypeofsiblingsand has predefined rolesbrotherandsister.
-
-
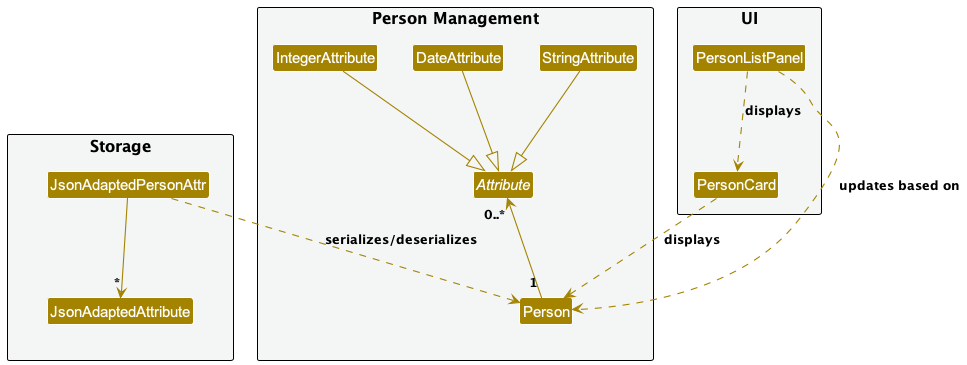
Storage component
API : Storage.java
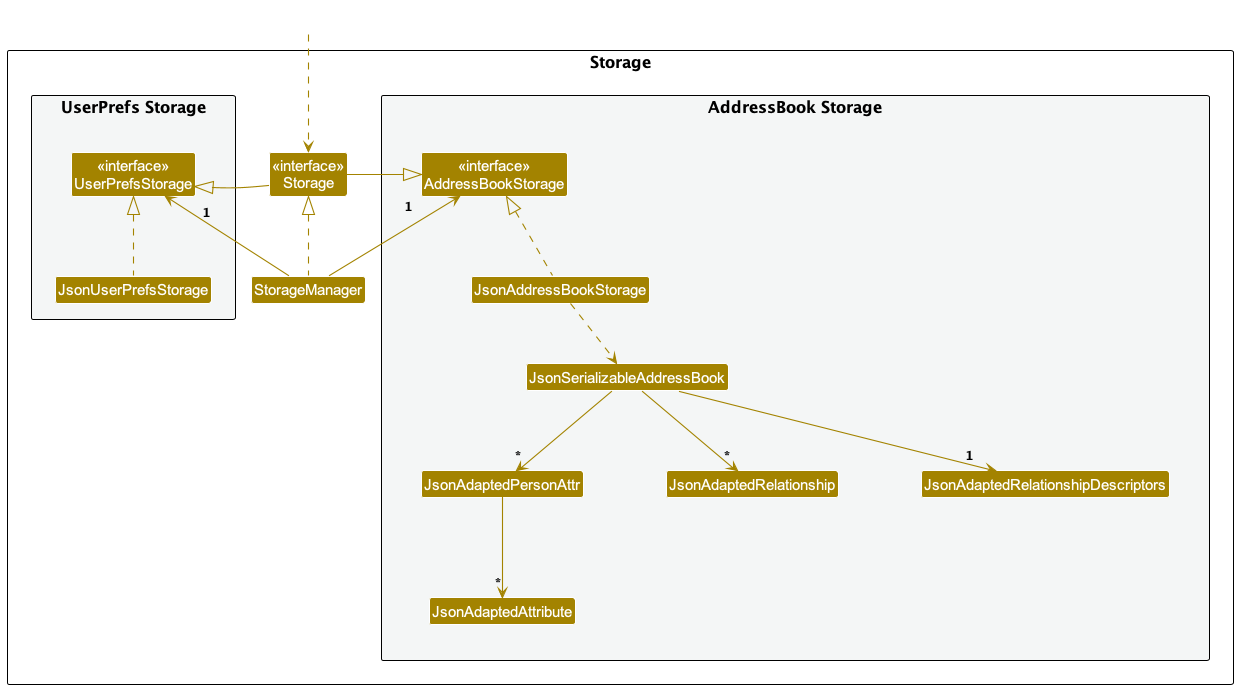
The Storage component,
- can save both Gene-nie data and user preference data in JSON format, and read them back into corresponding objects.
- inherits from both
AddressBookStorageandUserPrefStorage, which means it can be treated as either one (if only the functionality of only one is needed). - depends on some classes in the
Modelcomponent (because theStoragecomponent’s job is to save/retrieve objects that belong to theModel)
Common classes
Classes used by multiple components are in the seedu.addressbook.commons package.
Implementation
This section describes some noteworthy details on how certain features are implemented.
Add Person feature
This feature is the Add command that allows users to add a person to the address book.
This feature creates a person with 0 or more attributes, and then adds that person to the address book.
Implementation
Adding a person is carried out using AddCommand and AddCommandParser.
The AddCommand class extends the Command class.
The AddCommandParser class extends the Parser class.
Given below is an example usage scenario and how adding a person works.
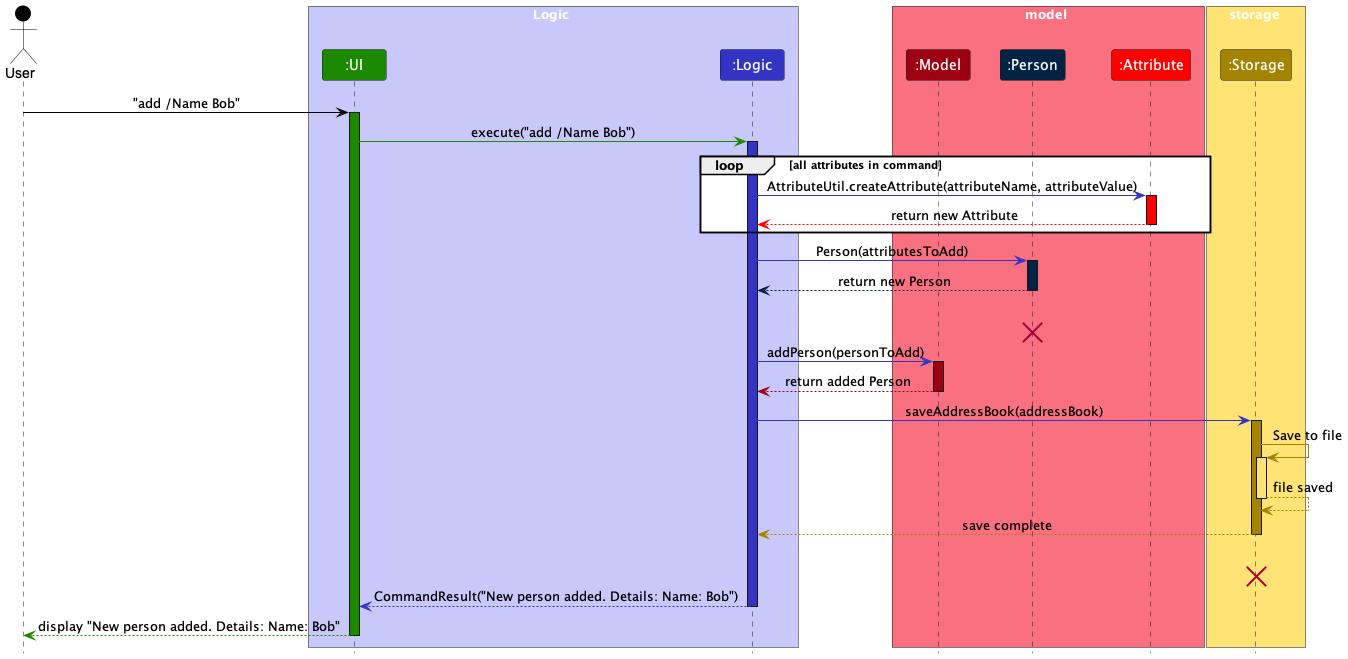
Step 1: The user enters a command to add a person with Name attribute to their family tree in Gene-nie.
For example: add /Name Bob.
Step 2: The LogicManager component receives this command as a string and passes it to the AddressBookParser.
Step 3: The AddressBookParser recognizes the add keyword and creates a new AddCommandParser.
Step 4: The AddCommandParser parses the rest of the command /Name Bob.
It creates a HashMap containing the attribute Name with value Bob.
It then creates a new AddCommand with this HashMap.
In this step, duplicate attribute names are also checked for, as part of the HashMap creation process in ParserUtil.
Step 5: The AddCommand is executed.
Step 6: AddCommand#execute continues by calling the following method from Model:
-
Model#addPerson(Person)It adds a given person to the address book.
Step 7: The AddCommand#execute method returns the CommandResult object to the LogicManager component.
The following sequence diagram shows how adding a person works:
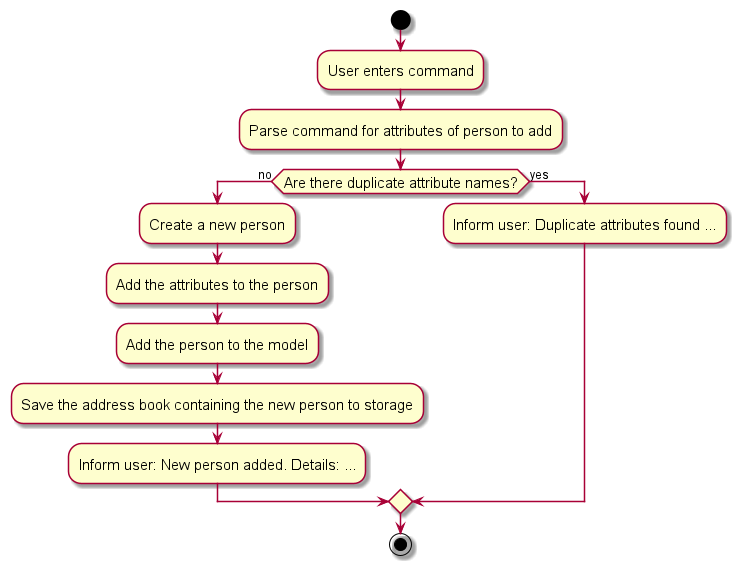
The following activity diagram sheds more light on exactly what happens when a user executes the ‘add’ command:
Design Considerations
Aspect: When to check for duplicate attributes
- Alternative 1 (current choice):
AddCommand#executechecks for duplicates before adding the person to the addressbook.- Pros: Makes the command more atomic - if there is an error, no changes are made.
- Cons: Less efficient as the program iterates through all attributes twice.
- Alternative 2:
AddCommand#executeadds an empty person to the address book and then checks for duplicates while appending attributes to that person.- Pros: Shorter code, less repetition of actions.
- Cons: Duplicate attributes would halt command and leave the address book in a partially edited state. Fixing this would result in less readable code.
Delete Person feature
This feature is the Delete command that allows users to remove a person from the address book.
Implementation
Deleting a person is carried out using DeleteCommand and DeleteCommandParser.
The DeleteCommand class extends the Command class.
The DeleteCommandParser class extends the Parser class.
Given below is an example usage scenario and how deleting a person works.
Step 1: The user enters a command to delete a person with the UUID 0001.
For example: delete /0001.
Step 2: The LogicManager component receives this command as a string and passes it to the AddressBookParser.
Step 3: The AddressBookParser recognizes the delete keyword and creates a new DeleteCommandParser.
Step 4: The DeleteCommandParser parses the rest of the command /0001.
It then creates a new DeleteCommand with the UUID 0001.
Step 5: The DeleteCommand is executed.
Step 6: DeleteCommand#execute continues by calling the following method from Model:
-
Model#getFullUuid(String)It takes in the partial 4-character UUID provided by the user and converts it to theUUIDobject representative of the person to delete. -
Model#getPersonByUuid(UUID)It takes the full UUID obtained earlier and returns the correspondingPersonobject. -
Model#deletePerson(Person)It deletes the provided person from the address book. -
Model#deleteRelationshipsOfPerson(UUID)It deletes all relationships associated with the person being deleted.
Step 7: The DeleteCommand#execute method returns the CommandResult object to the LogicManager component.
The following sequence diagram shows how deleting a person works:

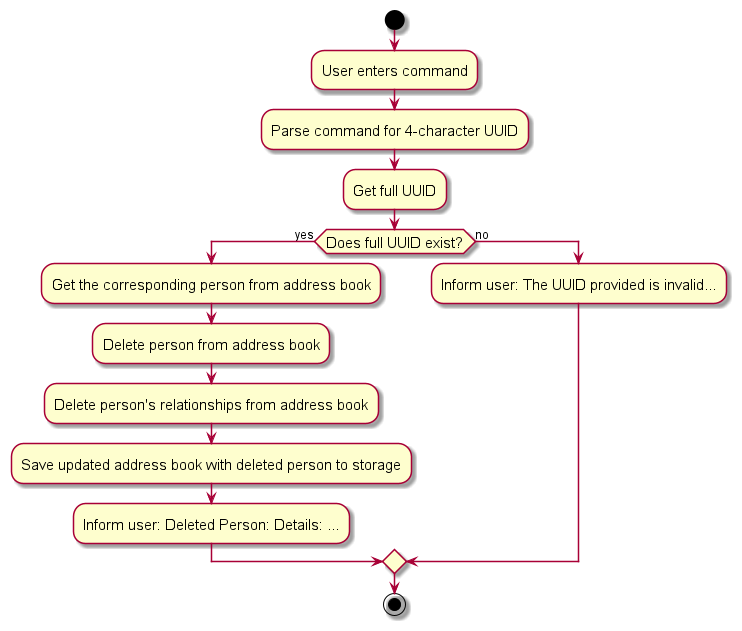
The following activity diagram sheds more light on exactly what happens when a user executes the ‘delete’ command:
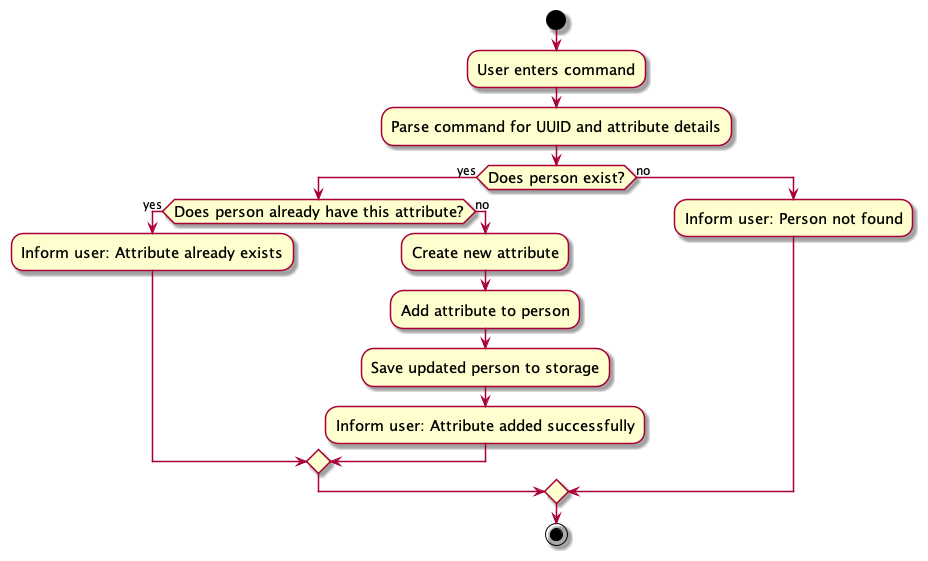
Add Attribute feature
An AddAttribute feature that allows users to add attributes to a person in the address book. This feature ensures that only unique attributes are added to a person, maintaining data integrity.
Implementation
The Add Attribute mechanism is facilitated by the AddAttributeCommand and AddAttributeParser.
The AddAttributeCommand class extends the Command class.
Given below is an example usage scenario and how adding attributes to a person works.
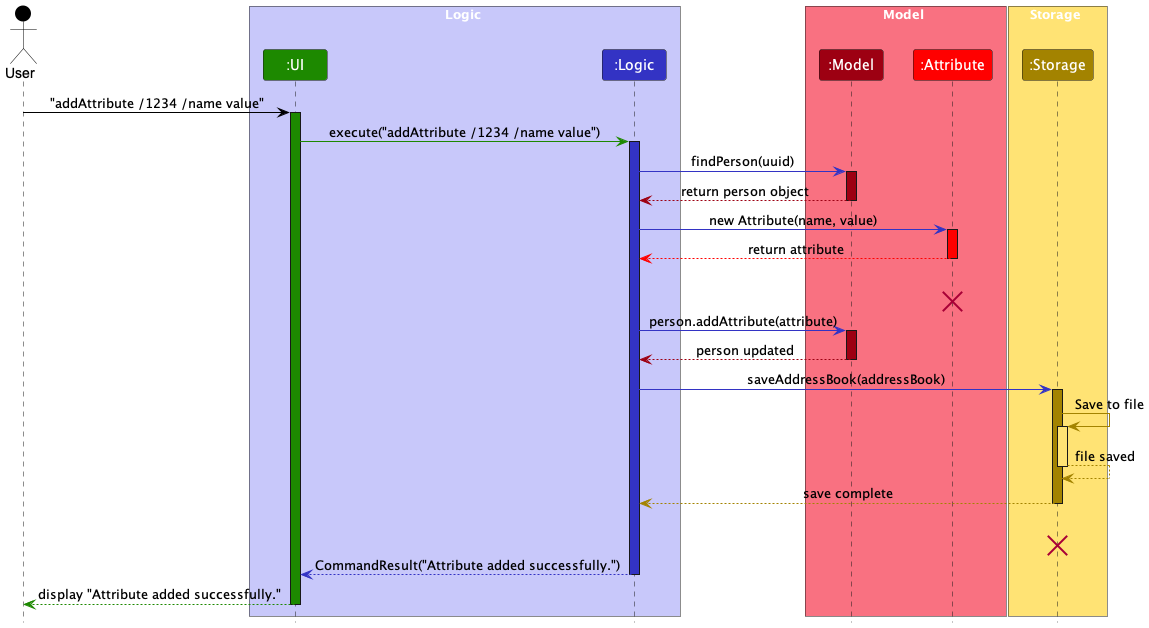
Step 1: The user enters a command to add an attribute to a person, for example: addattribute /1234 /Phone 12345678.
Step 2: The LogicManager component receives this command as a string and passes it to the AddressBookParser.
Step 3: The AddressBookParser recognizes the addattribute keyword and creates a new AddAttributeParser.
Step 4: The AddAttributeParser parses the rest of the command /1234 /Phone 12345678 and creates a new AddAttributeCommand with the provided UUID and attribute.
Step 5: The AddAttributeCommand is executed.
Step 6: AddAttributeCommand#execute calls the following methods from Model:
-
Model#getFullUuid(String)It retrieves the full UUID of the person passed into theAddAttributecommand. -
Model#getPersonByUuid(UUID)It retrieves the person with the providedUUIDfrom theModel. -
Model#hasAttribute(String, String)It checks whether the person given already has the attribute that we are adding.
Step 7: If the person does not have the attribute, the AddAttributeCommand adds the attribute to the person object by calling the following methods from AttributeUtil:
-
AttributeUtil#createAttribute(String, String)It creates a new attribute with the provided name and value.
Step 8: AddAttributeCommand#execute returns the CommandResult object to the LogicManager component.
The following sequence diagram shows how the AddAttribute command works:
Attribute and Storage should end at the destroy marker (X) but due to a limitation of PlantUML, the lifeline reaches the end of diagram.
The following activity diagram sheds more light on exactly what happens a user executes the addattribute command:
Design considerations
Aspect: How the attribute is created:
-
Alternative 1 (current choice): The
AttribueteUtilclass is responsible for creation of the object during the execution of the command.- Pros: Modular approach. Easy to extend and change the implementation of the attribute creation in the future.
- Cons: Might be over engineering for a simple task.
-
Alternative 2: The
AddAttributeCommandclass is responsible for creation of the object during the execution of the command.- Pros: Simple and straightforward.
- Cons: Might lead to a bloated class.
Aspect: Addition of existing attribute to a person:
-
Alternative 1 (current choice): The
Modelcomponent checks if the person already has the attribute before adding it.- Pros: Ensures that the person does not have duplicate attributes.
- Cons: Might cause performance issues if the person has a large number of attributes.
-
Alternative 2: The
Modelclass does not check if the person already has the attribute before adding it.- Pros: Straightforward implementation where the attribute rewrites over all existing data.
- Cons: Might cause confusion for the user when adding an attribute that already exists.
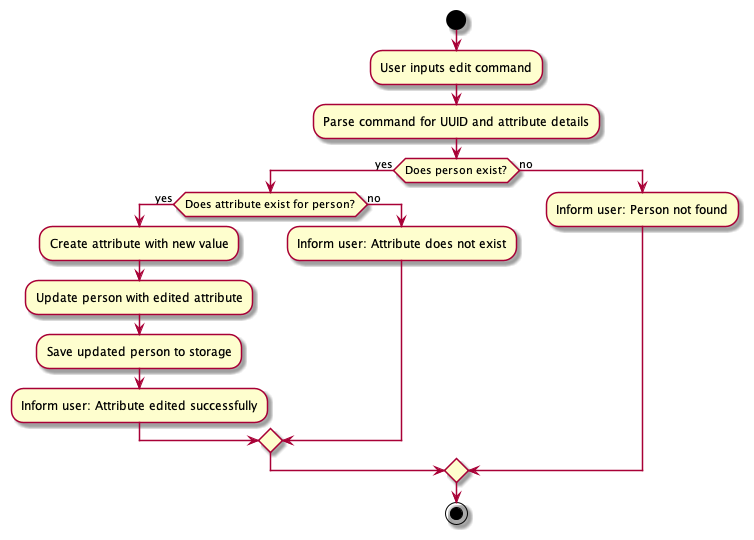
Edit Attribute feature
An EditAttribute feature that allows users to edit attributes of a person in the address book. This feature ensures that only existing attributes are edited, maintaining data integrity.
Implementation
The Edit Attribute mechanism is facilitated by the EditAttributeCommand and EditCommandParser.
The EditAttributeCommand class extends the Command class.
Step 1: The user inputs a command to edit an attribute of a person, such as: editattribute /4000 /Name John Doe /Phone 12345678.
Step 2: The LogicManager component receives this command as a string and forwards it to the AddressBookParser.
Step 3: The AddressBookParser identifies the command keyword editattribute and initializes a new EditAttributeParser.
Step 4: The EditAttributeParser processes the rest of the command /4000 /Name John Doe /Phone 12345678 and generates a new EditAttributeCommand with the specified UUID and attributes to be edited.
Step 5: The EditAttributeCommand is executed.
Step 6: EditAttributeCommand#execute performs the following actions through the Model:
- It calls
Model#getFullUuid(String)to fetch the completeUUIDfor the person specified in theEditAttributeCommand. - It retrieves the
personassociated with the providedUUIDby callingModel#getPersonByUuid(UUID). - For each
attributeto be edited, it checks if the person already has the attribute withPerson#hasAttribute(String). If the attribute does not exist, an exception is thrown indicating that the attribute cannot be edited because it does not exist.
Step 7: If the person does have the attribute, EditAttributeCommand updates the person’s attribute by calling:
-
AttributeUtil#createAttribute(String, String)to create a newattributeobject with the new value. -
Person#updateAttribute(Attribute)to update the existingattributewith the new one.
Step 8: After successfully editing the attributes, EditAttributeCommand#execute returns a CommandResult object to the LogicManager, indicating that the attributes were edited successfully.
The following sequence diagram illustrates how the EditAttribute command functions:
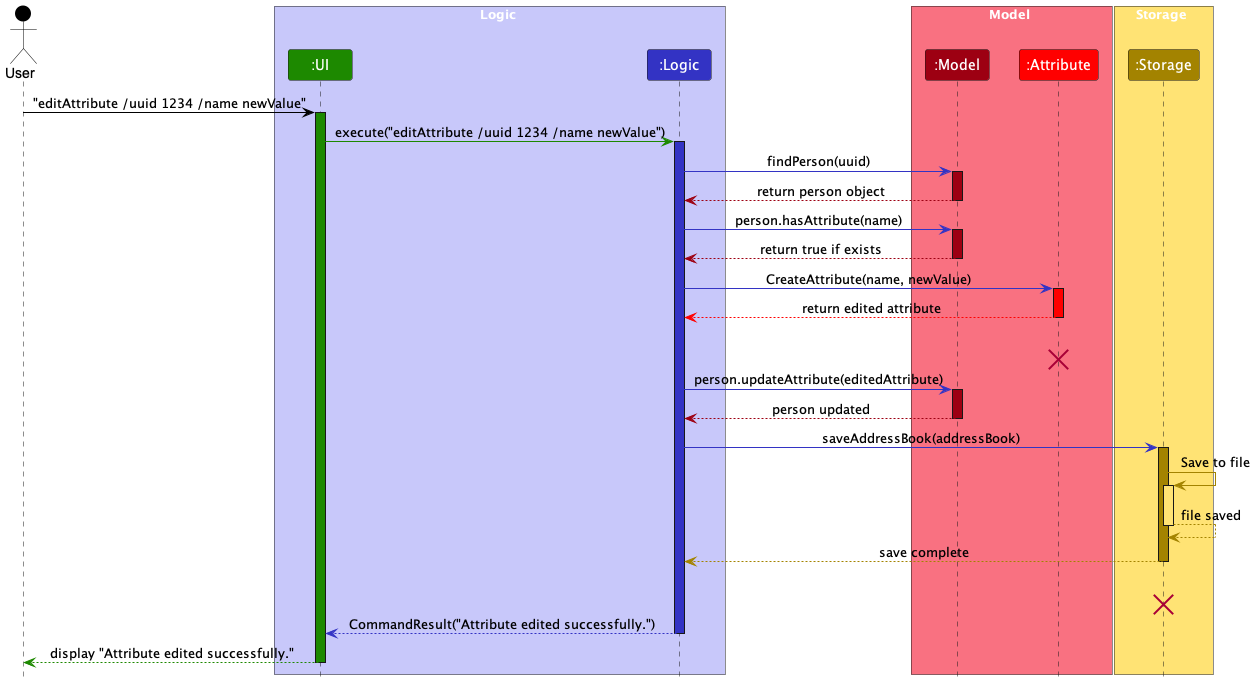
Attribute and Storage should end at the destroy marker (X) but due to a limitation of PlantUML, the lifeline reaches the end of diagram.
The following activity diagram provides a more detailed view of what happens when a user executes the editattribute command:
Design considerations
Aspect: How the attribute is updated:
-
Alternative 1 (current choice): The
AttributeUtilclass is responsible for creating the object during the command execution.- Pros: Modular approach. Easy to extend and change the implementation of the attribute creation in the future.
- Cons: Might be over engineering for a simple task.
-
Alternative 2: The
EditAttributeCommandclass is responsible for creating the object during the command execution.- Pros: Simple and straightforward.
- Cons: Might lead to a bloated class.
Aspect: Editing a non-existent attribute of a person:
-
Alternative 1 (current choice): The
Modelcomponent checks if the person already has the attribute before editing it.- Pros: Ensures that the user can only edit existing attributes and prevents the creation of new attributes.
- Cons: Might cause performance issues if the person has a large number of attributes.
-
Alternative 2: The
Modelclass does not check if the person already has the attribute before editing it and creates a new attribute.- Pros: Straightforward implementation where the user adds the attribute regardless if it exists or not.
- Cons: Might cause confusion for the user when editing an attribute that does not exist.
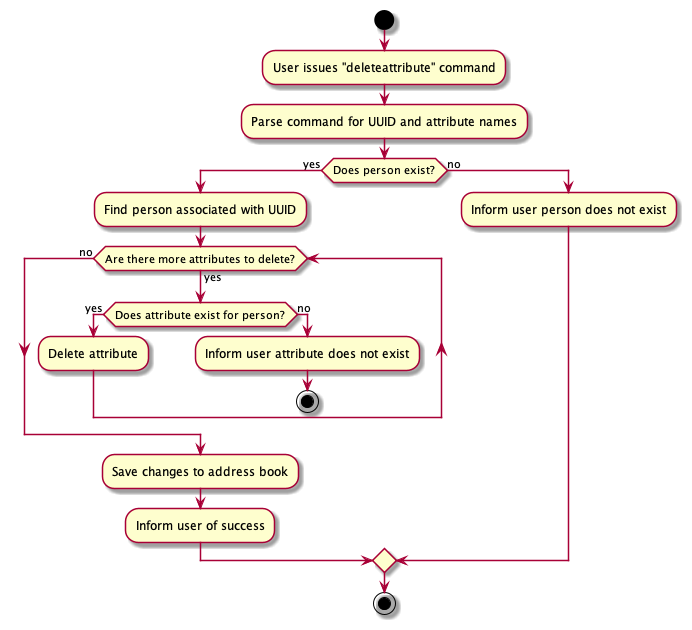
Delete Attribute feature
The DeleteAttribute feature that allows users to delete attributes of a person in the address book. This feature ensures that only existing attributes are deleted, maintaining data integrity.
Implementation
The Delete Attribute mechanism is facilitated by the DeleteAttributeCommand and DeleteAttributeCommandParser.
The DeleteAttributeCommand class extends the Command class.
Step 1: The user inputs a command to delete one or more attributes from a person, such as: deleteattribute /f8d9 /Name /Phone.
Step 2: The LogicManager component receives this command as a string and forwards it to the AddressBookParser.
Step 3: The AddressBookParser recognizes the command keyword deleteattribute and initiates a new DeleteAttributeCommandParser.
Step 4: The DeleteAttributeCommandParser analyzes the rest of the command /f8d9 /Name /Phone and creates a new DeleteAttributeCommand with the specified UUID and the attributes to be deleted.
Step 5: The DeleteAttributeCommand is executed.
- It first uses
Model#getFullUuid(String)to obtain the completeUUIDof the person specified in theDeleteAttributeCommand. - It then retrieves the person associated with the provided
UUIDby callingModel#getPersonByUuid(UUID).
Step 6: For each attribute listed to be deleted, DeleteAttributeCommand#execute performs the following checks and actions through the Model:
- It verifies if the person already has the specified
attributeby callingPerson#hasAttribute(String). If theattributedoes not exist, aCommandExceptionis thrown indicating that theattributecannot be deleted because it does not exist. - If the
attributeexists, it is removed from the person’sattributes list. - If the attribute is successfully deleted, the
DeleteAttributeCommandupdates the person’s attributes list by callingPerson#deleteAttribute(String).
Step 7: If all specified attributes exist and are successfully deleted, DeleteAttributeCommand#execute returns a CommandResult object to the LogicManager, indicating that the attributes were deleted successfully.
This workflow ensures that attributes are only deleted if they exist for the specified person, maintaining data integrity and providing clear user feedback if an attempt is made to delete an attribute that does not exist.
The following sequence diagram illustrates how the DeleteAttribute command functions:
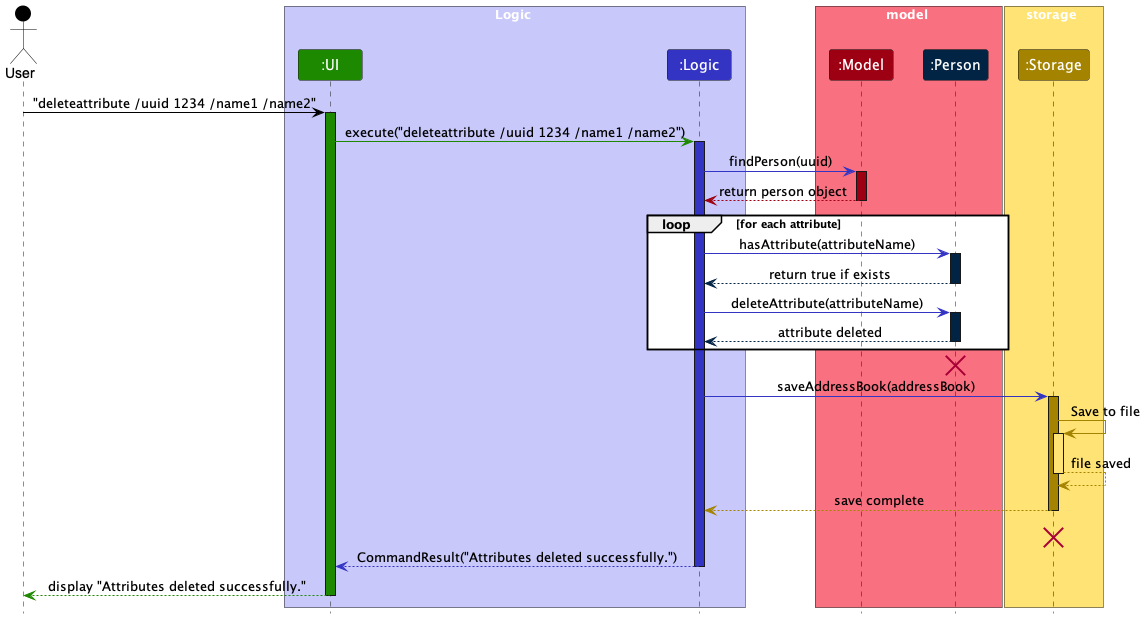
Person and Storage should end at the destroy marker (X) but due to a limitation of PlantUML, the lifeline reaches the end of diagram.
The following activity diagram provides a more detailed view of what happens when a user executes the deleteattribute command:
Design considerations
Aspect: How the attribute names are stored before being deleted:
-
Alternative 1 (current choice): The
DeleteAttributeCommandclass stores the attribute names to be deleted in an array.- Pros: Simple and straightforward.
- Cons: Leads to additional checks being required to ensure that there are not multiples of the same attributes to be deleted in one command.
-
Alternative 2: The
DeleteAttributeCommandclass stores the attribute names to be deleted in an arraylist.- Pros: Ensures that only one instance of an attribute is allowed to be parsed for deletion.
- Cons: Harder to implement and maintain.
Aspect: Deleting a non-existent attribute of a person:
-
Alternative 1 (current choice): The
Modelcomponent checks if the person already has the attribute before deleting it.- Pros: Ensures that the user can only delete existing attributes and prevents the deletion of non-existent attributes.
- Cons: Might cause performance issues if the person has a large number of attributes.
-
Alternative 2: The
Modelclass does not check if the person already has the attribute before deleting it.- Pros: Straightforward implementation where the attribute is deleted without any checks.
- Cons: Might cause confusion for the user when deleting an attribute that does not exist.
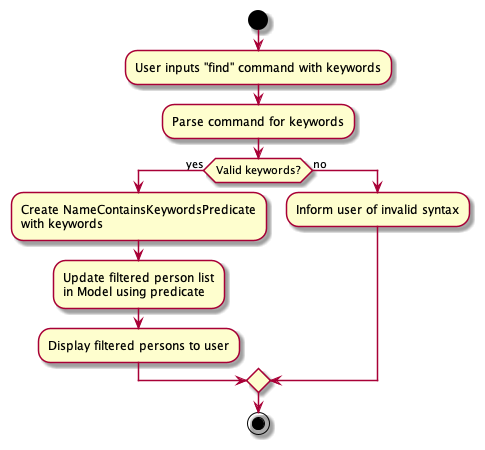
Find Attribute or UUID feature
The FindCommand provides the capability to search for persons within the address book whose names contain any of the specified keywords. The operation is case-insensitive and enhances the user experience by enabling efficient and flexible searches.
Implementation
The FindCommand is responsible for filtering the list of all persons in the address book to those whose names contain any of the specified keywords. The command updates the model's filtered person list to reflect only the search results.
The find operation is facilitated by the NameContainsKeywordsPredicate class, the FindCommandParser class and the FindCommand class.
The FindCommand class extends the Command class.
Here’s a step-by-step description of the FindCommand execution process:
Step 1: The user issues the find command along with the key-phrases to search for.
Step 2: The LogicManager receives the string input and forwards it to the AddressBookParser.
Step 3: The AddressBookParser employs the FindCommandParser to extract the keywords from the input and instantiate a FindCommand with a NameContainsKeywordsPredicate.
Step 4: The FindCommand is executed, which involves the following steps:
- It calls
Model#updateFilteredPersonList(predicate)to filter the list of persons using theNameContainsKeywordsPredicate. - It updates the relationship list to show all relationships via
Model#updateFilteredRelationshipList(PREDICATE_SHOW_ALL_RELATIONSHIPS).
Step 5: The FindCommand concludes by returning a CommandResult that includes a message about the number of persons found and the person objects which are contain the keywords given.
The following sequence diagram illustrates how the Find command functions:
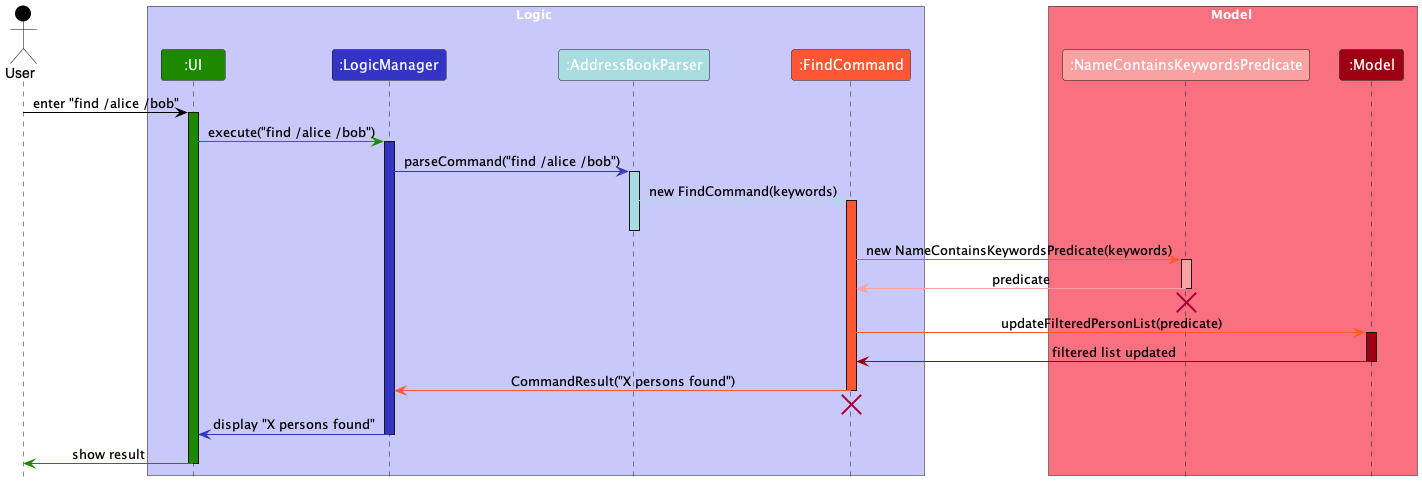
FindCommand and NameContainsKeywordsPredicate should end at the destroy marker (X) but due to a limitation of PlantUML, the lifeline reaches the end of diagram.
The following activity diagram provides a more detailed view of what happens when a user executes the find command:
Design considerations
Aspect: How the search is performed:
-
Alternative 1 (current choice): The
NameContainsKeywordsPredicateclass is responsible for filtering the list of persons based on the keywords.- Pros: Modular approach. Easy to extend and change the implementation of the search in the future.
- Cons: Might be over engineering for a simple task.
-
Alternative 2: The
FindCommandclass is responsible for filtering the list of persons based on the keywords.- Pros: Simple and straightforward.
- Cons: Might lead to a bloated class.
Aspect: Case sensitivity of the search:
-
Alternative 1 (current choice): The search is case-insensitive.
- Pros: Enhances user experience by enabling efficient and flexible searches.
- Cons: Might lead to unexpected search results if the user is not aware of the case-insensitivity.
-
Alternative 2: The search is case-sensitive.
- Pros: Ensures that the search results are accurate and precise.
- Cons: Might limit the user’s ability to search flexibly.
Add relationship feature
Implementation
The Add relationship mechanism is facilitated by the AddRelationshipCommand and AddRelationshipCommandParser.
The AddRelationshipCommand class extends the Command class and implements the following operation:
-
AddRelationshipCommand#execute()— Adds a relationship between two persons.
Scenario 1 - Adding a roleless relationship
Given below is an example usage scenario and how adding a roleless relationship behaves at each step.
Step 1: The user executes addRelation /1234 /5678 /friends to add a roleless relationship.
Step 2: When LogicManager is called upon to execute this command, it will pass it to an AddressBookParser object.
Step 3: The AddressBookParser recognizes the addRelation keyword and creates a new AddRelationshipCommandParser. The AddRelationshipCommandParser#parse method is then called on the object to parse the rest of the command /1234 /5678 /friends.
Step 4: ParserUtil#getRelationshipHashMapFromRelationshipStrings(details)is then called to parse the relationship details. This method checks that the relationship details are provided in the correct format and that the UUIDs and relationship descriptors are valid. It then returns a LinkedHashMap<String, String> containing the relationship details.
Step 5: ParserUtil#relationKeysAndValues(linkedHashmap, index, boolean) is then called to extract the keys and values from the LinkedHashMap<String, String> at the specified index and boolean according to the provided relationship details. It then returns a String containing the key/value of the relationship details. This method is called multiple times to extract the originUuid, targetUuid and relationshipDescriptor.
Step 6: AddRelationshipCommandParser#parse then returns a new AddRelationshipCommand object with the parsed relationship details.
Step 7: AddRelationshipCommand#execute calls the following methods from Model:
-
Model#getFullUuid(String)It retrieves the full UUID of the person passed into theAddRelationshipcommand. This is called twice to get the full UUIDs of both persons in the relationship. -
Model#isRelationRoleBased(relationshipDescriptor)It checks whether therelationshipDescriptoris a existing role-based relationshipDescriptor. If it is, an exception is thrown stating that therelationshipDescriptoris already added as a role-based relationshipDescriptor, and can’t be added as a roleless relationshipDescriptor. -
Model#hasRelationshipWithDescriptor(toAdd)It checks whether the relationship to be added between the two persons already exists. If it does, an exception is thrown stating that the relationship already exists. -
Model#addRelationship(toAdd)It communicates with theModelto add the relationship. -
Model#addRolelessDescriptor(relationshipDescriptor)It communicates with theModelto add therelationshipDescriptor.
Step 8: AddRelationshipCommand#execute returns the CommandResult object to the LogicManager component.
The following sequence diagram shows how adding a roleless relationship works:
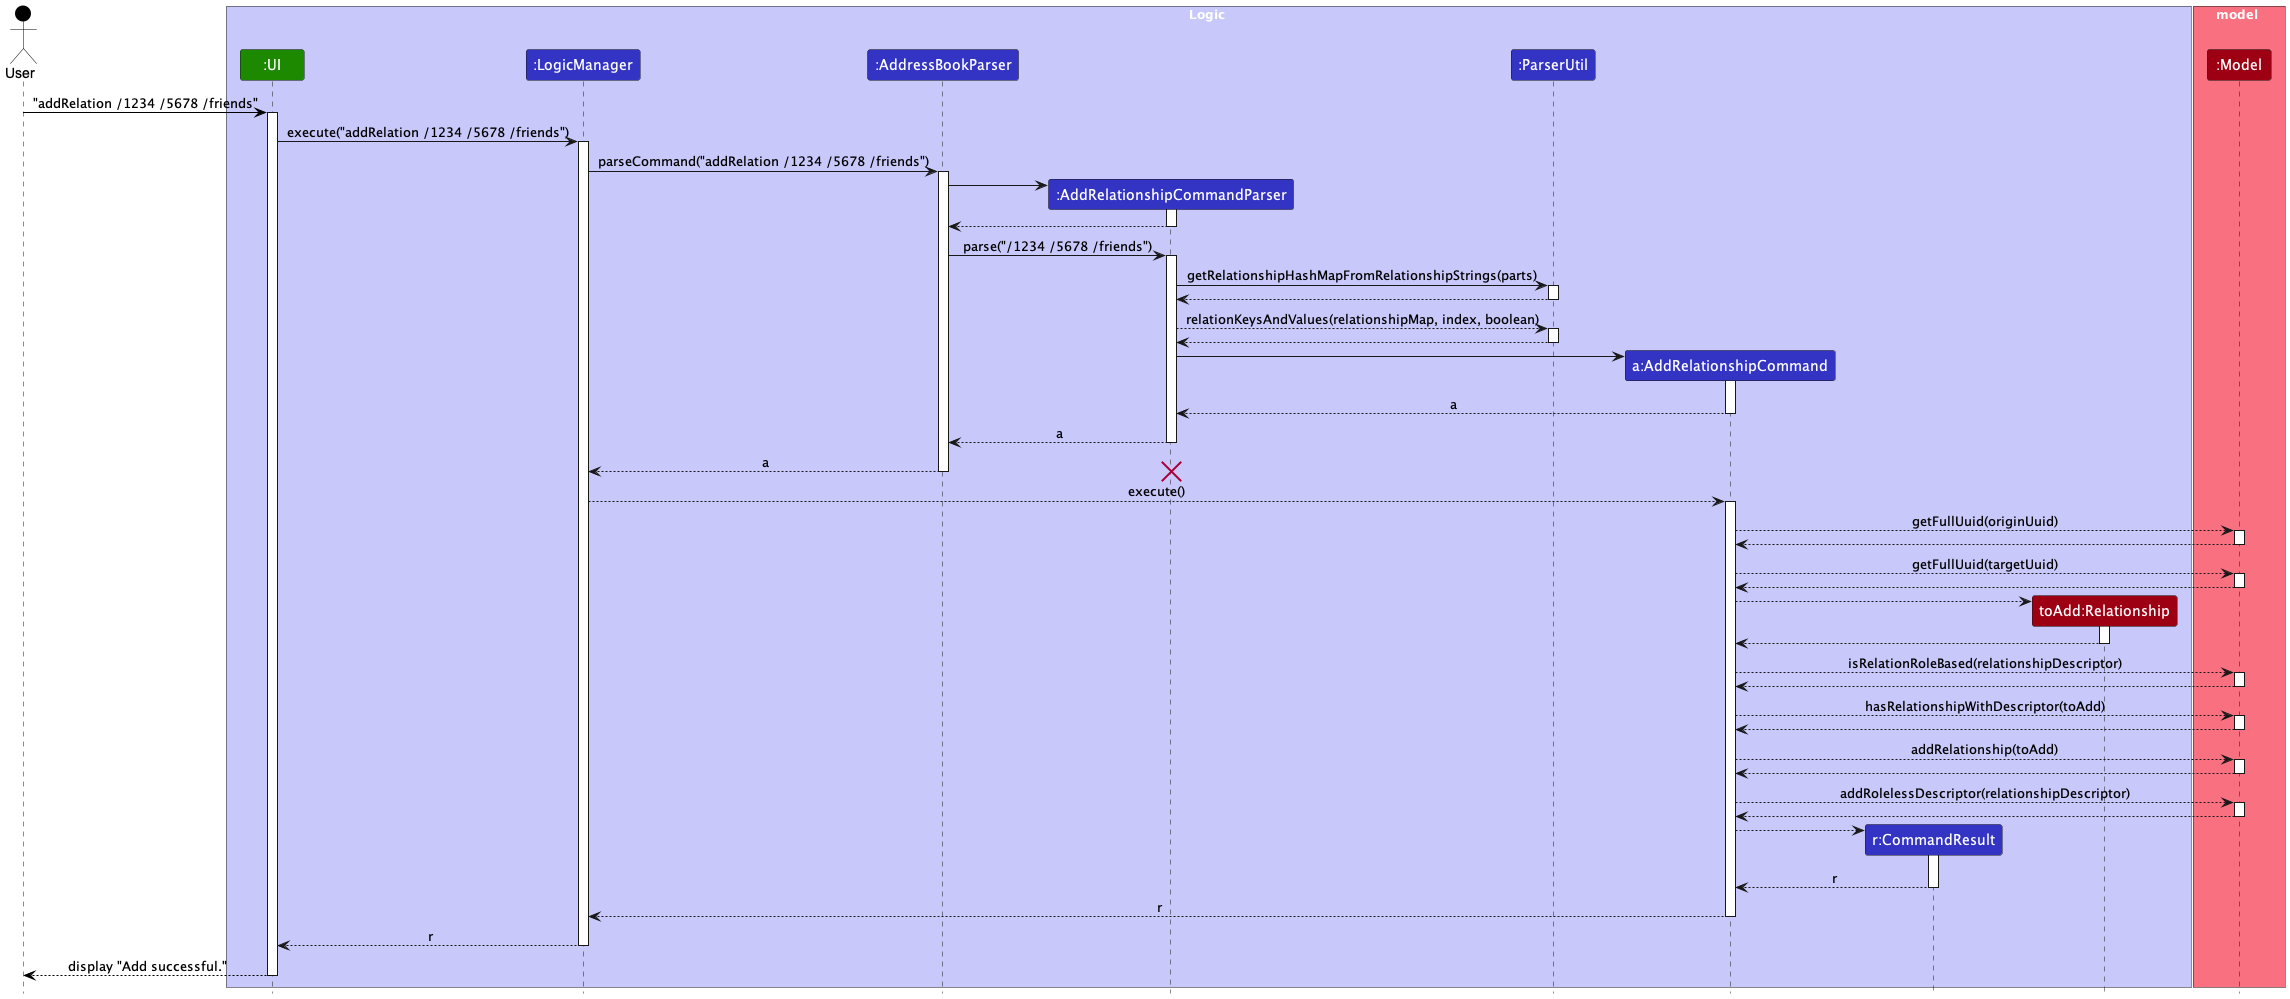
![]() Note:
Note:
- The lifeline for AddRelationshipCommandParser should end at the destroy marker (X) but due to a limitation of PlantUML, the lifeline reaches the end of diagram.
Scenario 2 - Adding a role-based relationship
Given below is an example usage scenario and how adding a role-based relationship behaves at each step.
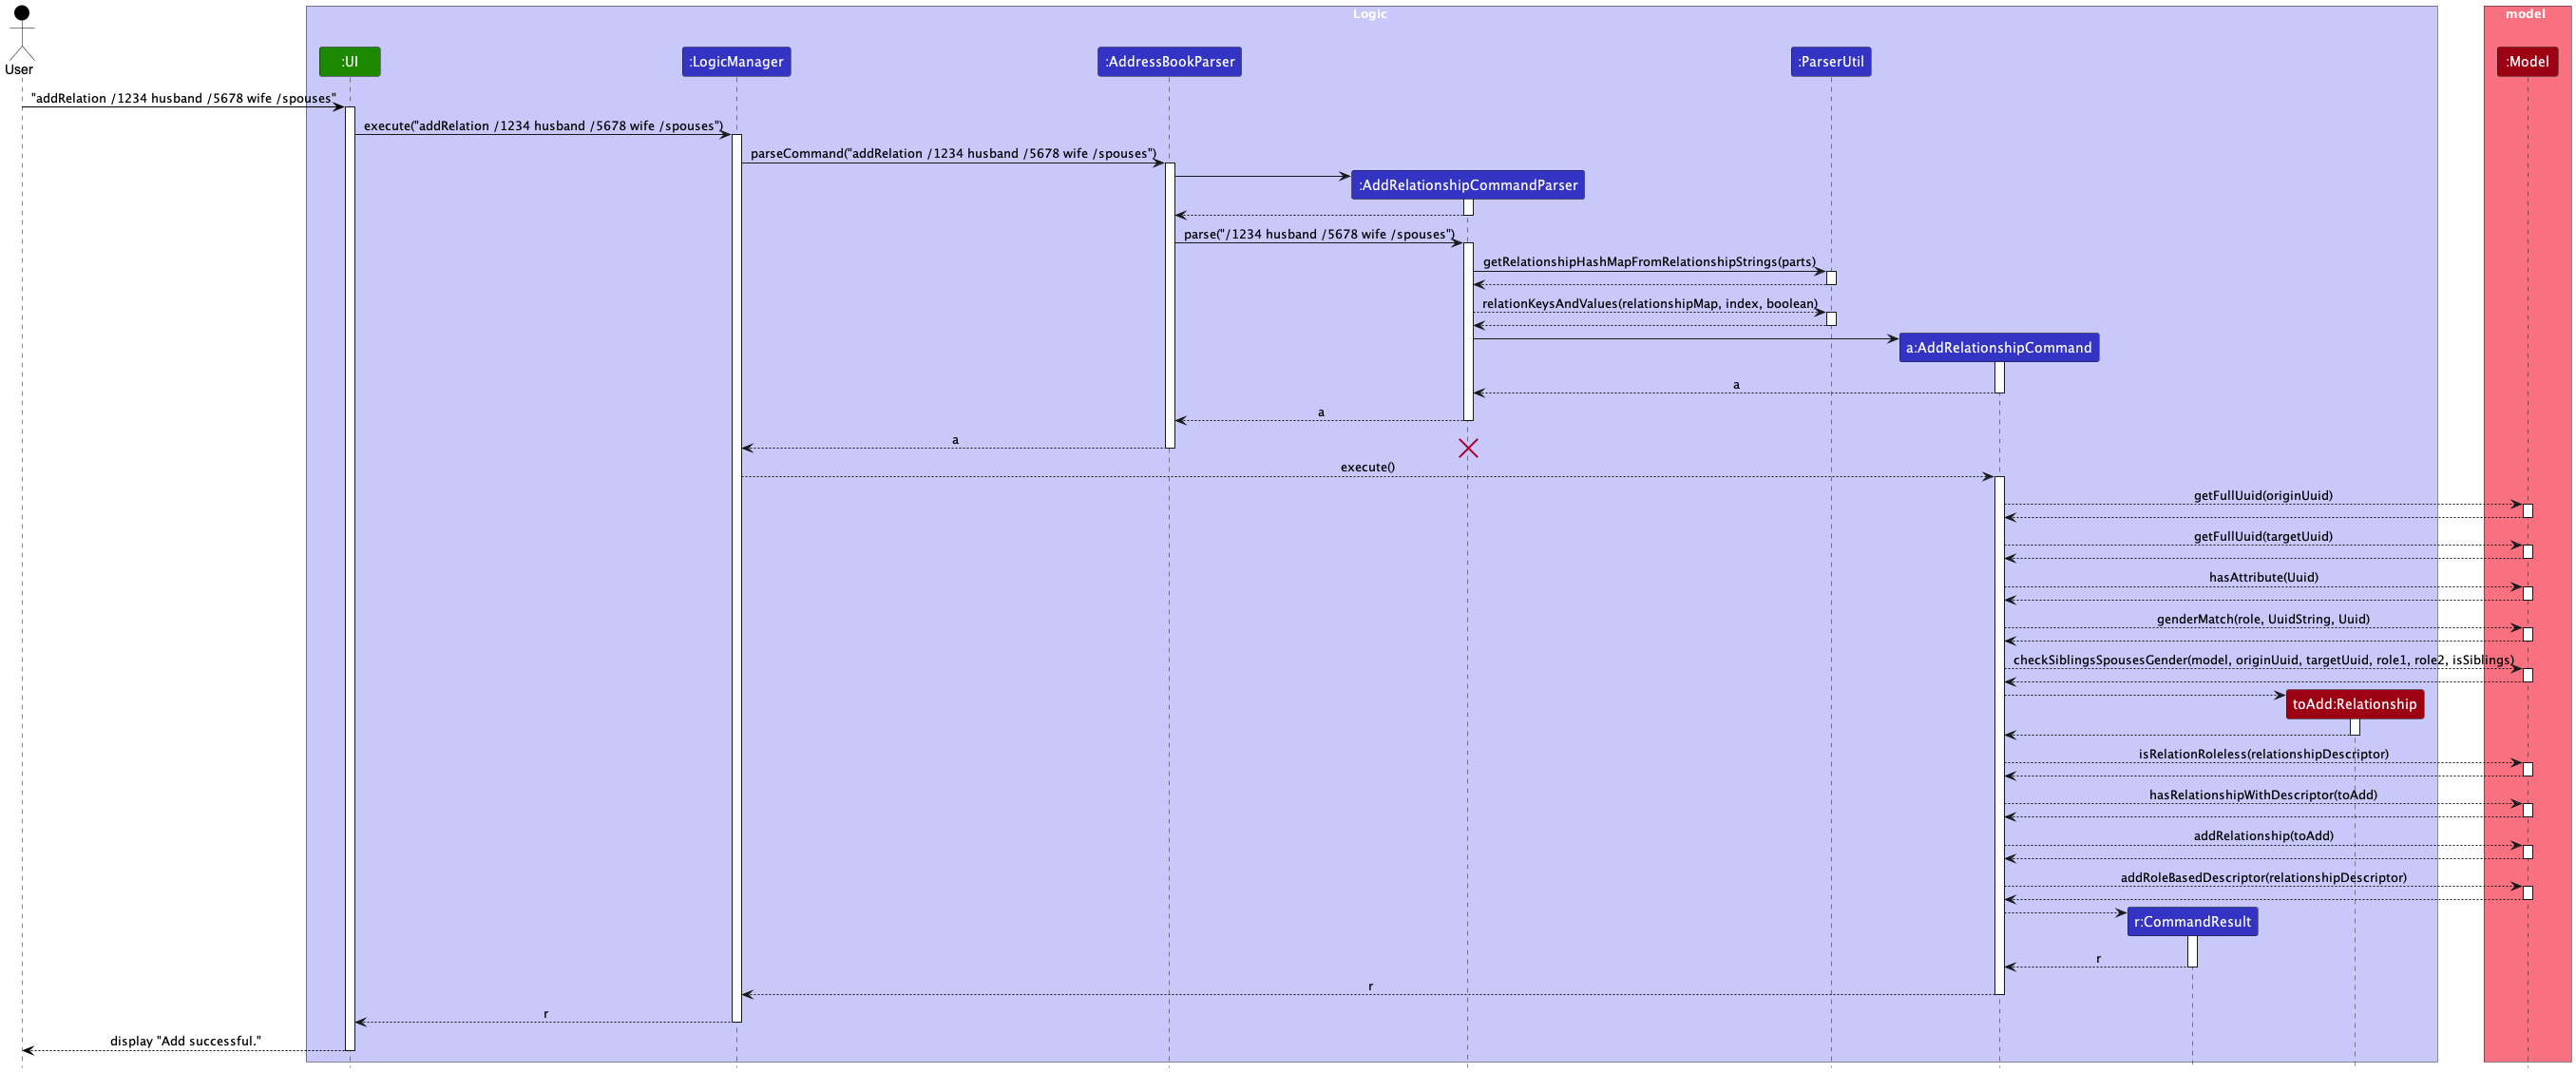
Step 1: The user executes addRelation /1234 husband /5678 wife /spouses to add a relationship with roles.
Step 2: When LogicManager is called upon to execute this command, it will pass it to an AddressBookParser object.
Step 3: The AddressBookParser recognizes the addRelation keyword and creates a new AddRelationshipCommandParser. The AddRelationshipCommandParser#parse method is then called on the object to parse the rest of the command /1234 husband /5678 wife /spouses.
Step 4: ParserUtil#getRelationshipHashMapFromRelationshipStrings(details)is then called to parse the relationship details. This method checks that the relationship details are provided in the correct format and that the UUIDs and relationship descriptors are valid. It then returns a LinkedHashMap<String, String> containing the relationship details.
Step 5: ParserUtil#relationKeysAndValues(linkedHashmap, index, boolean) is then called to extract the keys and values from the LinkedHashMap<String, String> at the specified index and boolean according to the provided relationship details. It then returns a String containing the key/value of the relationship details. This method is called multiple times to extract the originUuid, role1, targetUuid, role2 and relationshipDescriptor.
Step 6: AddRelationshipCommandParser#parse then returns a new AddRelationshipCommand object with the parsed relationship details.
Step 7: AddRelationshipCommand#execute calls the following methods from Model:
-
Model#getFullUuid(String)It retrieves the full UUID of the person passed into theAddRelationshipcommand. This is called twice to get the full UUIDs of both persons in the relationship. -
Model#hasAttribute(Uuid)It checks whether the attributeSexexists for the person with the given Uuid. -
Model#genderMatch(role, UuidString, Uuid)It checks whether the role gender matches with the gender of the “Sex” attribute of the person with the given Uuid. This method is only called if the “Sex” attribute exists for the person. -
Model#checkSiblingsSpousesGender(model, originUuid, targetUuid, role1, role2, isSiblings)It checks whether the roles of the relationship for each person are valid according to the other existing relationships of the person. -
Model#isRelationRoleless(relationshipDescriptor)It checks whether therelationshipDescriptoris a existing roleless relationshipDescriptor. If it is, an exception is thrown stating that therelationshipDescriptoris already added as a roleless relationshipDescriptor, and can’t be added as a role-based relationshipDescriptor. -
Model#hasRelationshipWithDescriptor(toAdd)It checks whether the relationship to be added between the two persons already exists. If it does, an exception is thrown stating that the relationship already exists. -
Model#addRelationship(toAdd)It communicates with theModelto add the relationship. -
Model#addRoleBasedDescriptor(relationshipDescriptor, role1, role2)It communicates with theModelto add the relationship descriptor with the provided roles.
Step 8: AddRelationshipCommand#execute returns the CommandResult object to the LogicManager component.
The following sequence diagram shows how adding a role-based relationship works:
![]() Note:
Note:
- The lifeline for AddRelationshipCommandParser should end at the destroy marker (X) but due to a limitation of PlantUML, the lifeline reaches the end of diagram.
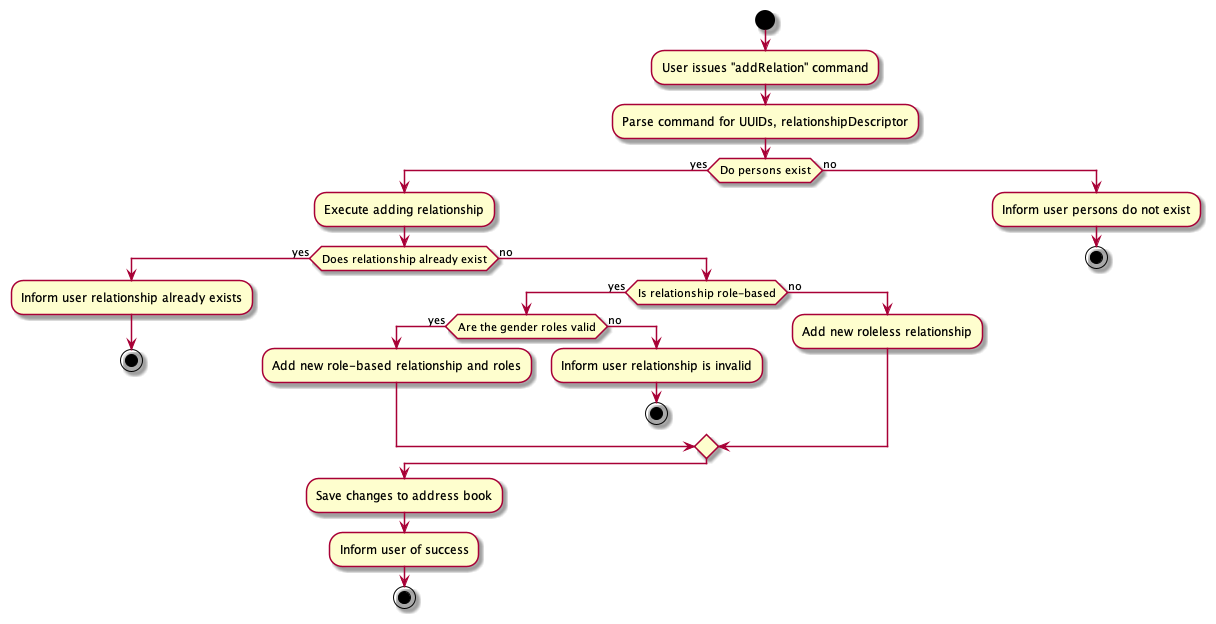
The following activity diagram sheds more light on exactly what happens a user executes the addrelation command:
Design considerations
Aspect: How different types of relationships are added:
-
Alternative 1 (current choice): The
AddRelationshipCommandsupports both adding a role-based and roleless relationship.- Pros: Simple and straightforward implementation.
- Cons: May lead to a more complex implementation as more relationship types are added.
-
Alternative 2: The
AddRelationshipCommandis split into two separate commands,AddRolelessRelationshipCommandandAddRoleBasedRelationshipCommand.- Pros: More modular and easier to maintain.
- Cons: More classes to manage.
Edit Relationship feature
Implementation
The Edit relationship mechanism is facilitated by the EditRelationshipCommand and EditRelationshipCommandParser.
The EditRelationshipCommand class extends the Command class and implements the following operation:
-
EditRelationshipCommand#execute()— Edits a relationship between two persons.
Scenario 1 - Editing a roleless relationship
Given below is an example usage scenario and how editing a roleless relationship behaves at each step.
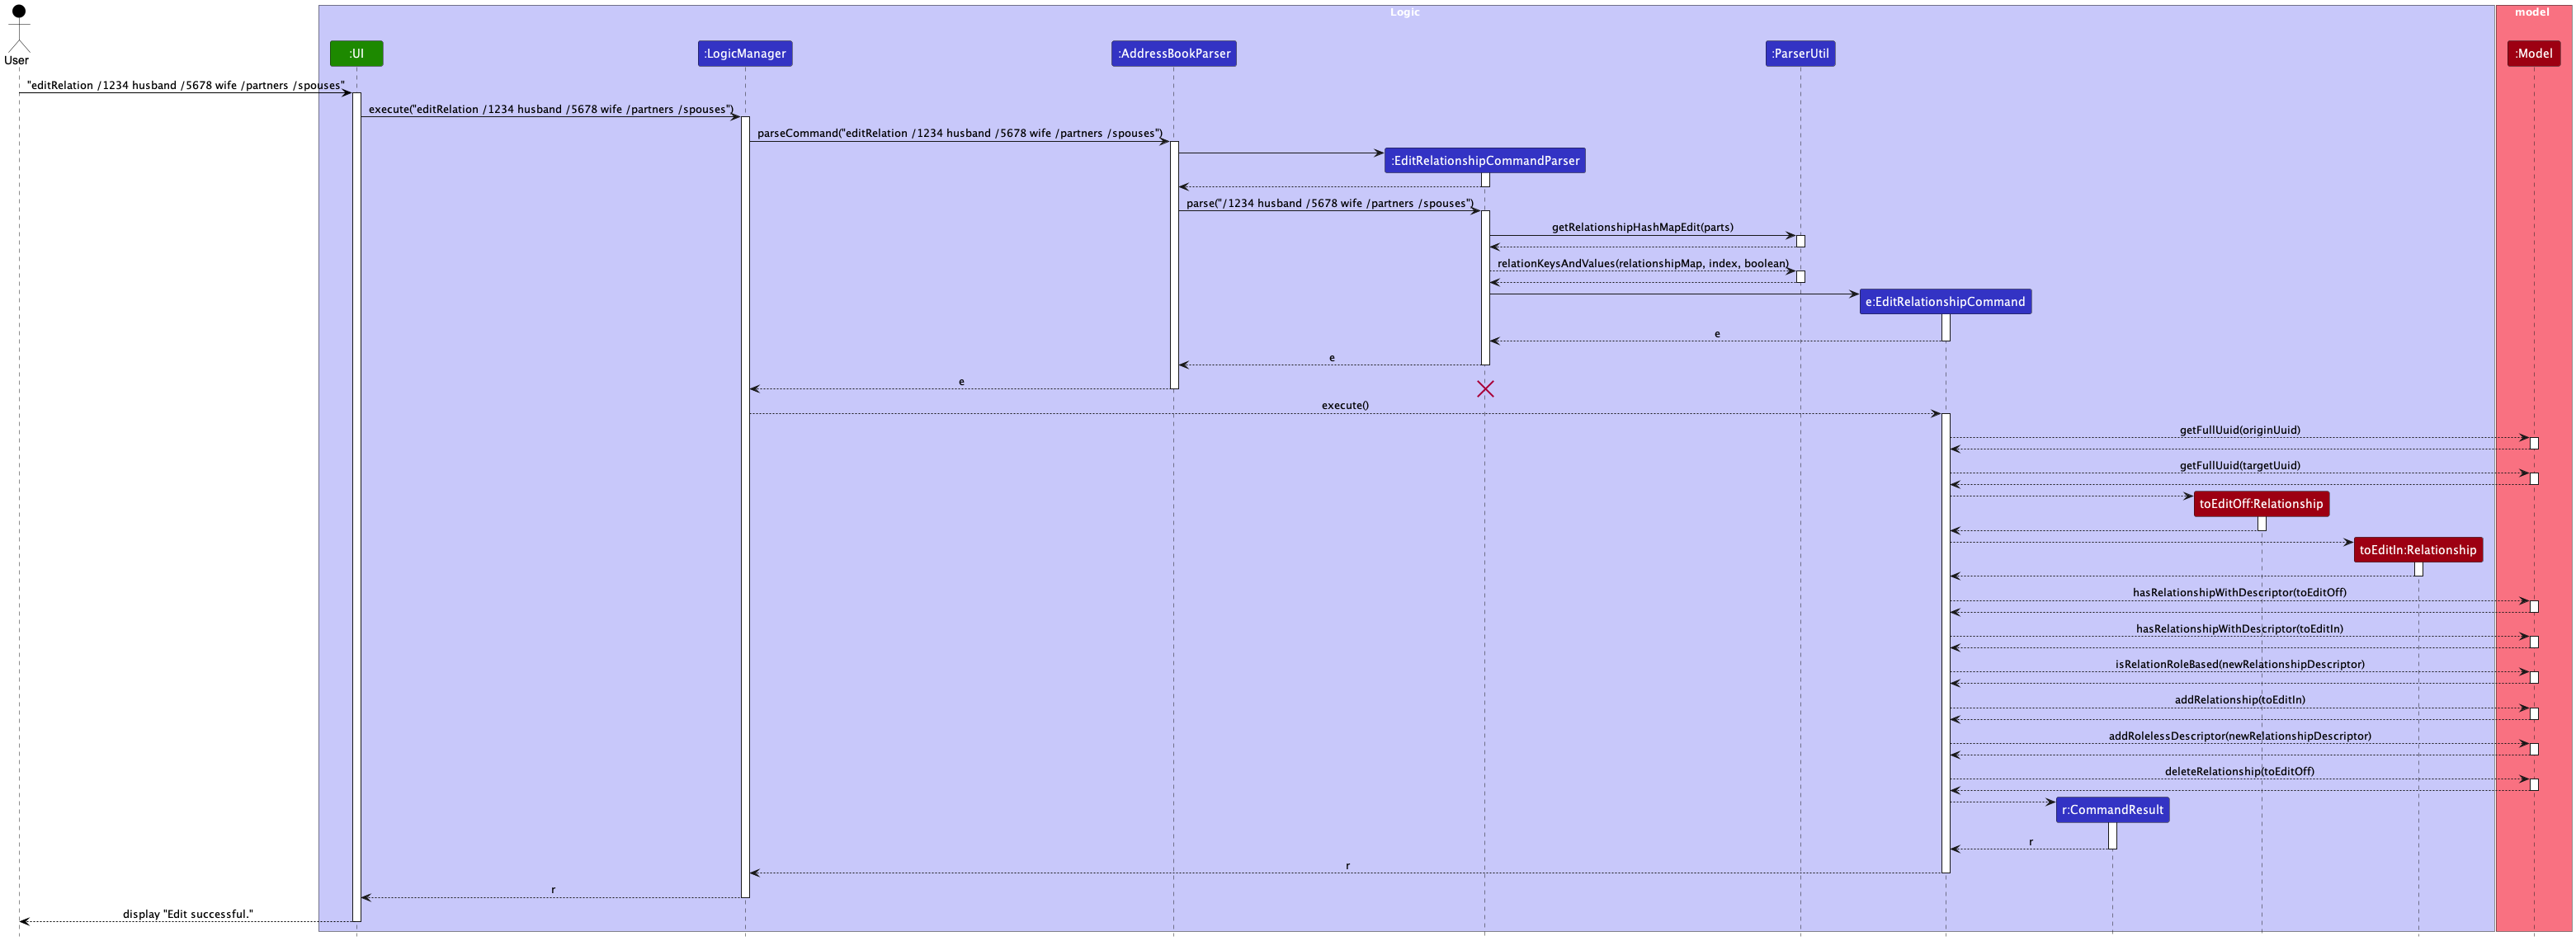
Step 1: The user executes editRelation /1234 /5678 /friends /colleagues to edit a roleless relationship.
Step 2: When LogicManager is called upon to execute this command, it will pass it to an AddressBookParser object.
Step 3: The AddressBookParser recognizes the editRelation keyword and creates a new EditRelationshipCommandParser. The EditRelationshipCommandParser#parse method is then called on the object to parse the rest of the command /1234 /5678 /friends /colleagues.
Step 4: ParserUtil#getRelationshipHashMapEdit(details)is then called to parse the relationship details into a hashmap. This method checks that the relationship details are provided in the correct format and that the UUIDs and relationship descriptors are valid. It then returns a LinkedHashMap<String, String> containing the relationship details.
Step 5: ParserUtil#relationKeysAndValues(linkedHashmap, index, boolean) is then called to extract the key/value according to the boolean(true: get value, false: get key) from the LinkedHashMap<String, String> at the specified index and boolean according to the provided relationship details. It then returns a String containing the result. This method will be called multiple times to extract the correct originUuid, targetUuid, oldRelationshipDescriptor and newRelationshipDescriptor.
Step 6: EditRelationshipCommandParser#parse then returns a new EditRelationshipCommand object with the parsed relationship details.
Step 7: EditRelationshipCommand#execute calls the following methods from Model:
-
Model#getFullUuid(String)It retrieves the full UUID of the person passed into theEditRelationshipcommand. This is called twice to get the full UUIDs of both persons in the relationship. -
Model#hasRelationshipWithDescriptor(toEditOff)It checks whether the relationship to be edited between the two persons exists. -
Model#hasRelationshipWithDescriptor(toEditIn)It checks whether the relationship to be edited to between the two persons already exists. If it does, an exception is thrown stating that the relationship already exists. -
Model#isRelationRoleBased(newRelationshipDescriptor)It checks whether thenewRelationshipDescriptoris a existing role-based relationshipDescriptor. If it is, an exception is thrown stating that thenewRelationshipDescriptoralready exists, and can’t be added as a roleless relationshipDescriptor. -
Model#addRelationship(toEditIn)It communicates with theModelto add the new relationship. -
Model#addRolelessDescriptor(newRelationshipDescriptor)It communicates with theModelto add thenewRelationshipDescriptor. -
Model#deleteRelationship(toEditOff)It communicates with theModelto delete the old relationship .
Step 8: EditRelationshipCommand#execute returns the CommandResult object to the LogicManager component.
The following sequence diagram shows how editing a roleless relationship works:
![]() Note:
Note:
- The lifeline for EditRelationshipCommandParser should end at the destroy marker (X) but due to a limitation of PlantUML, the lifeline reaches the end of diagram.
Scenario 2 - Editing a relationship with roles
Given below is an example usage scenario and how editing a relationship with roles behaves at each step.
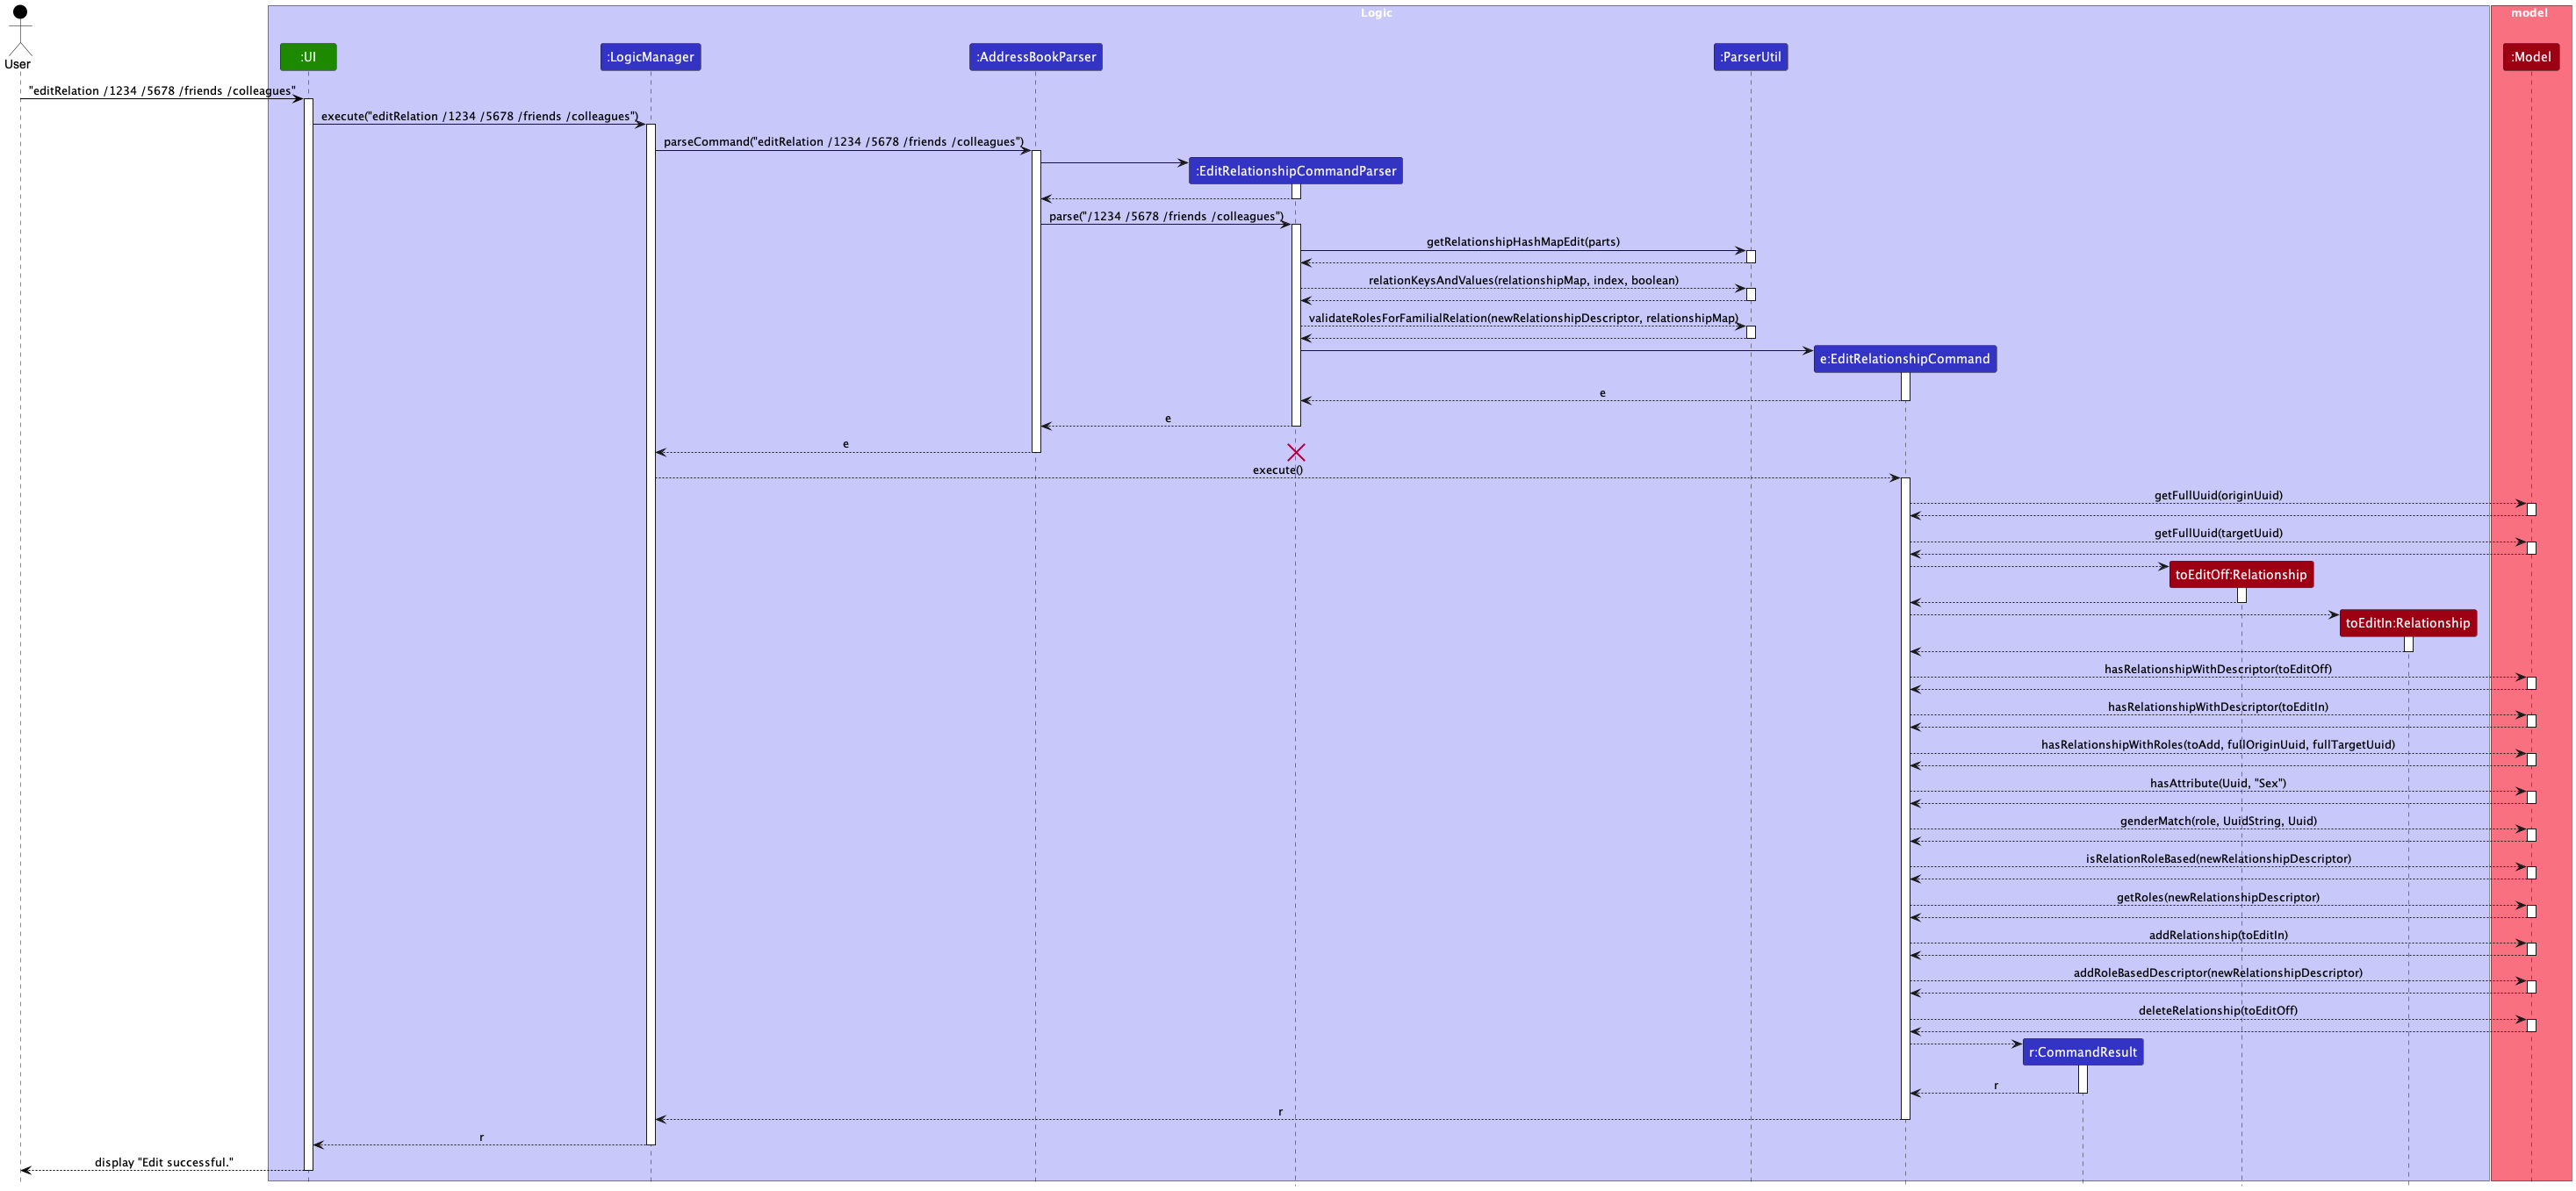
Step 1: The user executes editRelation /1234 husband /5678 wife /partners /spouses to edit a relationship with roles.
Step 2: When LogicManager is called upon to execute this command, it will pass it to an AddressBookParser object.
Step 3: The AddressBookParser recognizes the editRelation keyword and creates a new EditRelationshipCommandParser. The EditRelationshipCommandParser#parse method is then called on the object to parse the rest of the command /1234 husband /5678 wife /partners /spouses.
Step 4: ParserUtil#getRelationshipHashMapEdit(details)is then called to parse the relationship details. This method checks that the relationship details are provided in the correct format and that the UUIDs and relationship descriptors are valid. It then returns a LinkedHashMap<String, String> containing the relationship details.
Step 5: ParserUtil#relationKeysAndValues(linkedHashmap, index, boolean) is then called to extract the key/value according to the boolean(true: get value, false: get key) from the LinkedHashMap<String, String> at the specified index and boolean according to the provided relationship details. It then returns a String containing the result. This method will be called multiple times to extract the correct originUuid, targetUuid, oldRelationshipDescriptor and newRelationshipDescriptor.
Step 6: EditRelationshipCommandParser#parse then returns a new EditRelationshipCommand object with the parsed relationship details.
Step 7: EditRelationshipCommand#execute calls the following methods from Model:
-
Model#getFullUuid(String)It retrieves the full UUID of the person passed into theEditRelationshipcommand. This is called twice to get the full UUIDs of both persons in the relationship. -
Model#hasRelationshipWithDescriptor(toEditOff)It checks whether the relationship to be edited between the two persons exists. -
Model#hasRelationshipWithDescriptor(toEditIn)It checks whether the relationship to be edited to between the two persons already exists. If it does, an exception is thrown stating that the relationship already exists. -
Model#hasAttribute(Uuid, "Sex")It checks whether the attributeSexexists for the person with the given Uuid. -
Model#genderMatch(role, UuidString, Uuid)It checks whether the role gender matches with the gender of the “Sex” attribute of the person with the given Uuid. This method is only called if the “Sex” attribute exists for the person. -
Model#isRelationRoleBased(newRelationshipDescriptor)It checks whether thenewRelationshipDescriptoris a existing role-based relationshipDescriptor. -
Model#getRoles(newRelationshipDescriptor)It communicates with theModelto retrieve the roles of the relationship with the providednewRelationshipDescriptor. -
Model#addRelationship(toEditIn)It communicates with theModelto add the new relationship. -
Model#addRoleBasedDescriptor(newRelationshipDescriptor, role1, role2)It communicates with theModelto add the new relationship descriptor with the provided roles. -
Model#deleteRelationship(toEditOff)It communicates with theModelto delete the old relationship.
Step 8: EditRelationshipCommand#execute returns the CommandResult object to the LogicManager component.
The following sequence diagram shows how editing a relationship with roles works:
![]() Note:
Note:
- The lifeline for EditRelationshipCommandParser should end at the destroy marker (X) but due to a limitation of PlantUML, the lifeline reaches the end of diagram.
The following activity diagram sheds more light on exactly what happens a user executes the editrelation command:
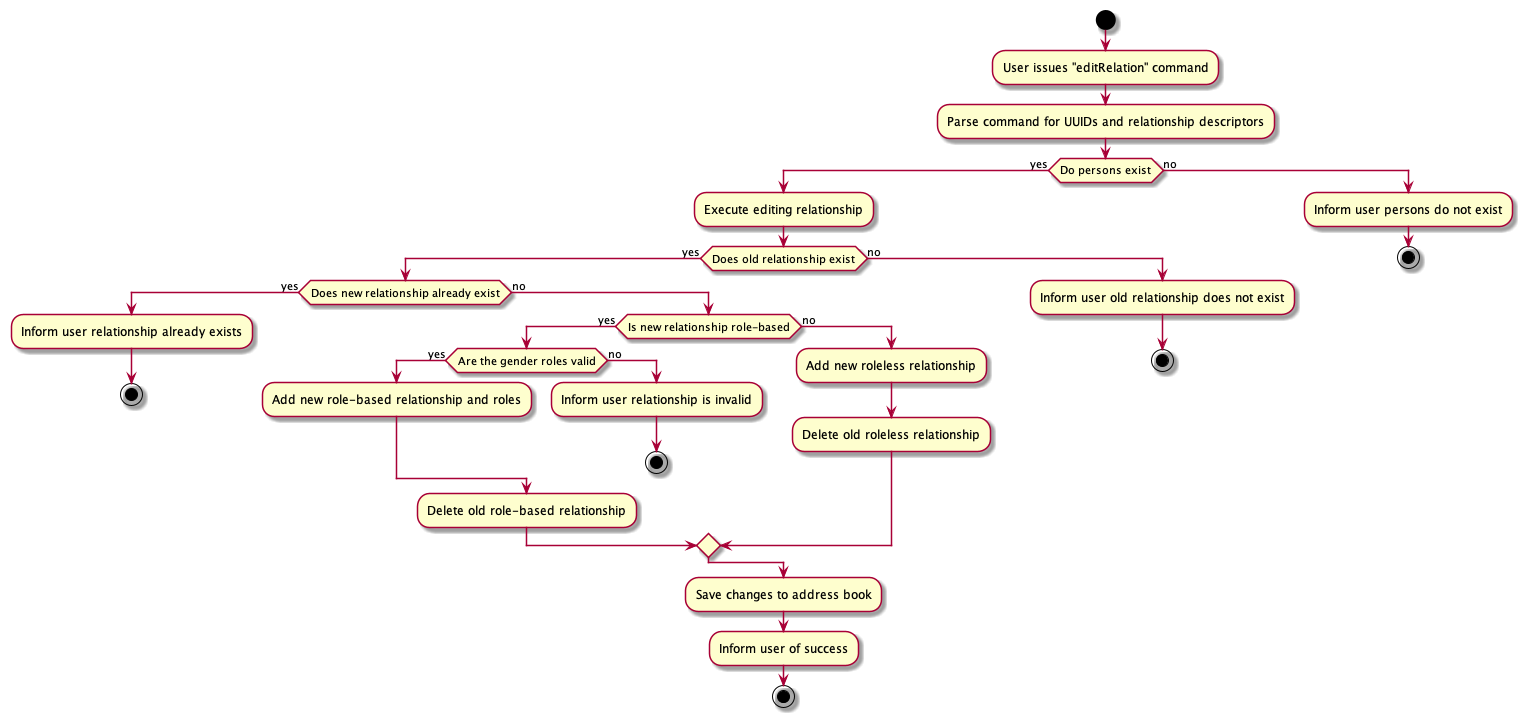
Design considerations
Aspect: How the relationship is edited:
-
Alternative 1 (current choice): The
EditRelationshipCommanddeletes the old relationship and adds the new relationship.- Pros: Straightforward implementation.
- Cons: May cause performance issues if the person has a large number of relationships.
-
Alternative 2: The
EditRelationshipCommandupdates the old relationship with the new relationship.- Pros: More efficient as it does not require deleting and adding relationships.
- Cons: More complex implementation.
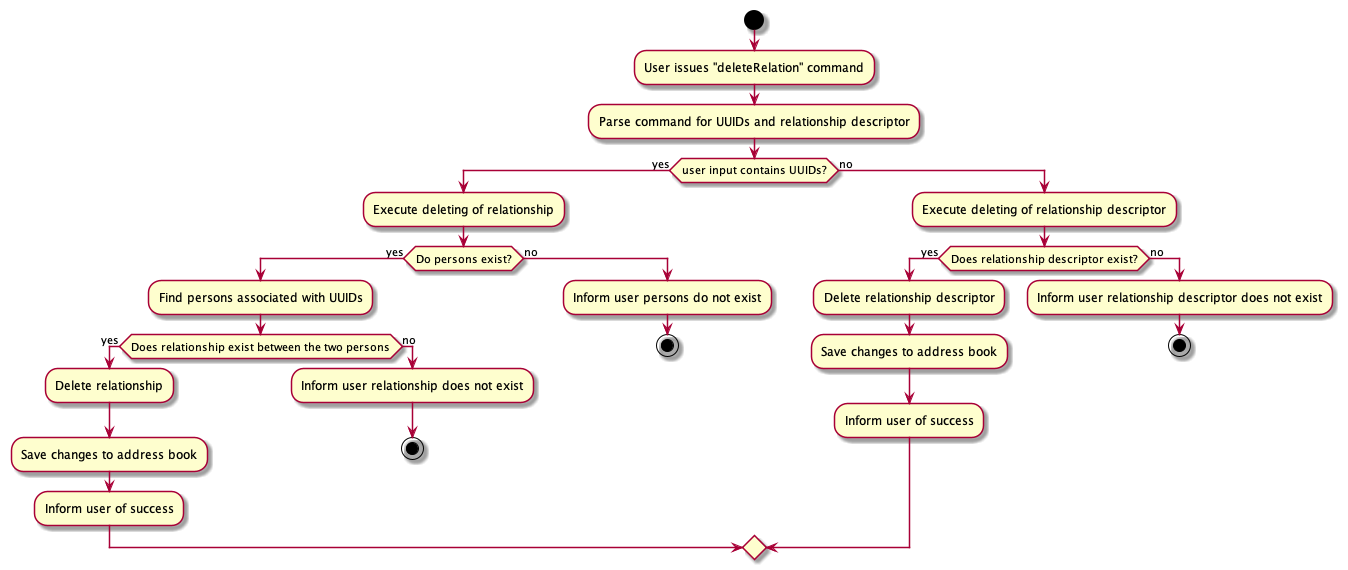
Delete Relationship feature
Implementation
The Delete relationship mechanism is facilitated by the DeleteRelationshipCommand and DeleteRelationshipCommandParser.
The DeleteRelationshipCommand class extends the Command class and implements the following operation:
-
DeleteRelationshipCommand#execute()— Deletes a relationship between two persons.
Scenario 1 - Deleting a relationship
Given below is an example usage scenario and how deleting a relationship behaves at each step.
Step 1: The user executes deleteRelation /1234 /5678 /friends to delete a relationship.
Step 2: When LogicManager is called upon to execute this command, it will pass it to an AddressBookParser object.
Step 3: The AddressBookParser recognizes the deleteRelation keyword and creates a new DeleteRelationshipCommandParser. The DeleteRelationshipCommandParser#parse method is then called on the object to parse the rest of the command /1234 /5678 /friends.
Step 4: ParserUtil#getRelationshipHashMapDelete(details, hasUuids)is then called to parse the relationship details. This method checks that the relationship details are provided in the correct format and that the UUIDs and relationship descriptors are valid. It then returns a LinkedHashMap<String, String> containing the relationship details.
Step 5: ParserUtil#relationKeysAndValues(linkedHashmap, index, boolean) is then called to extract the keys and values from the LinkedHashMap<String, String> at the specified index and boolean according to the provided relationship details. It then returns a String containing the key or value of the relationship details. This method is called once to extract the relationshipDescriptor.
Step 6: DeleteRelationshipCommandParser#parse then returns a new DeleteRelationshipCommand object with the parsed relationship details.
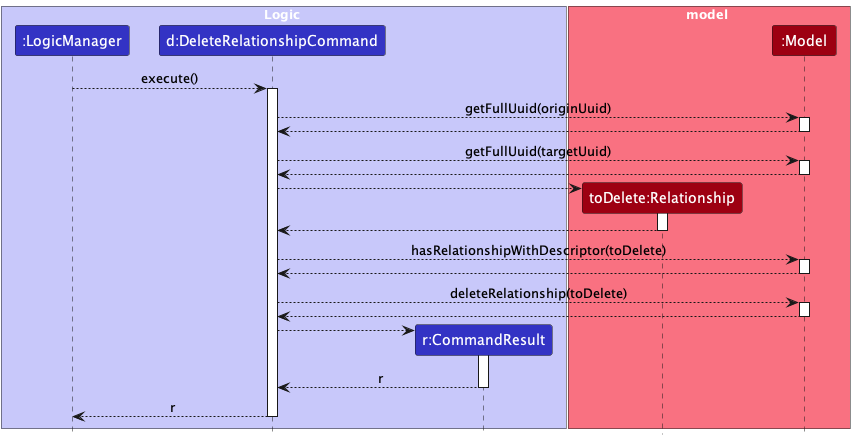
Step 7: DeleteRelationshipCommand#execute calls the following methods from Model:
-
Model#getFullUuid(String)It retrieves the full UUID of the person passed into theDeleteRelationshipcommand. This is called twice to get the full UUIDs of both persons in the relationship. -
Model#hasRelationshipWithDescriptor(toDelete)It checks whether the relationship to be deleted between the two persons exists. If it does not, the method throws an exception stating that the relationship does not exist and cannot be deleted. -
Model#deleteRelationship(toDelete)It communicates with theModelto delete the relationship.
Step 8: DeleteRelationshipCommand#execute returns the CommandResult object to the LogicManager component.
The following sequence diagram shows how deleting a relationship works:
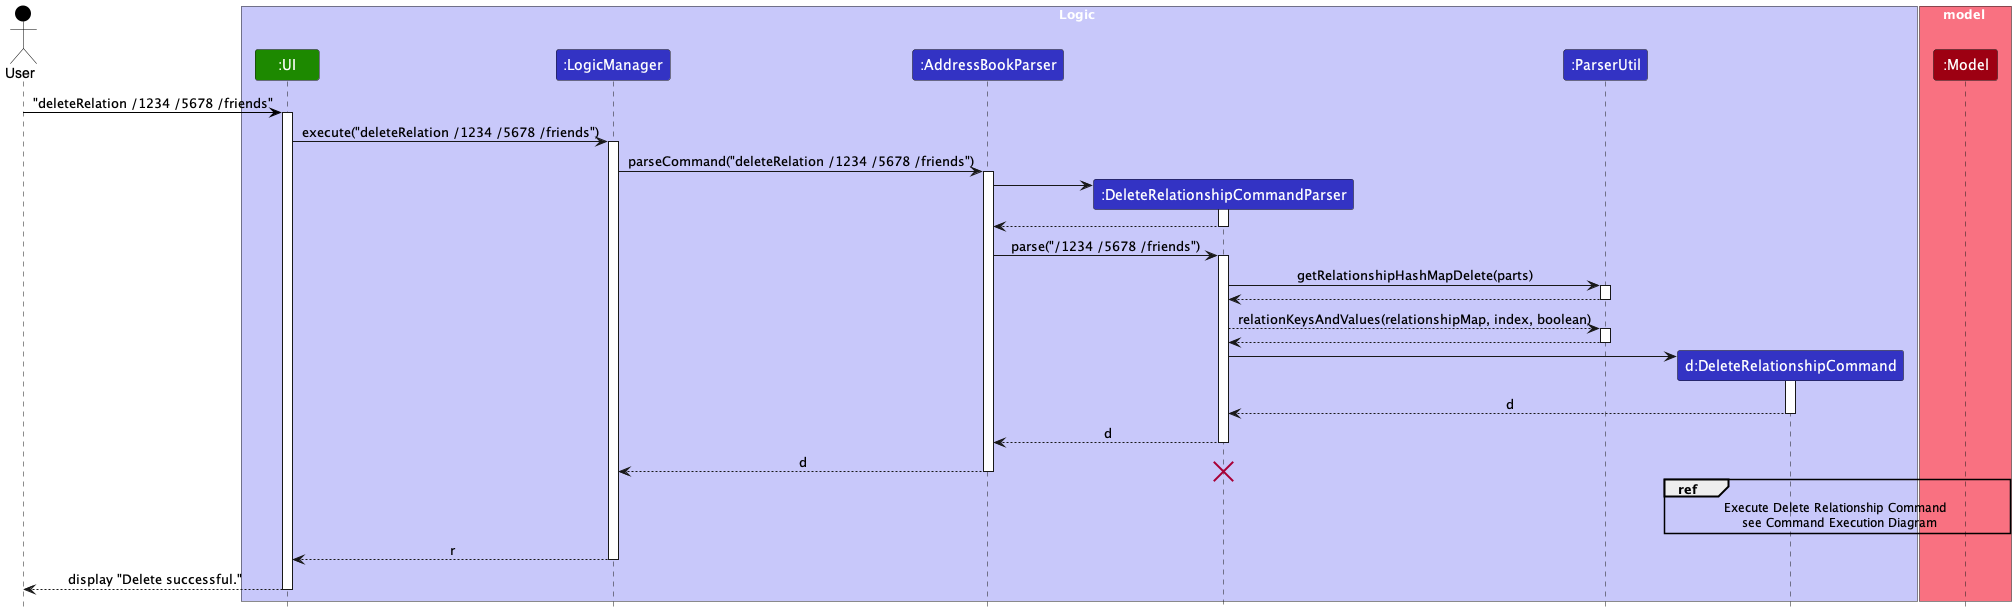
![]() Note:
Note:
- The lifeline for DeleteRelationshipCommandParser should end at the destroy marker (X) but due to a limitation of PlantUML, the lifeline reaches the end of diagram.
Scenario 2 - Deleting a relationType
Given below is an example usage scenario and how deleting a relationType behaves at each step.
Step 1: The user executes deleteRelation /colleagues to delete a relationType.
Step 2: When LogicManager is called upon to execute this command, it will pass it to an AddressBookParser object.
Step 3: The AddressBookParser recognizes the deleteRelation keyword and creates a new DeleteRelationshipCommandParser. The DeleteRelationshipCommandParser#parse method is then called on the object to parse the rest of the command /friends.
Step 4: ParserUtil#getRelationshipHashMapDelete(details, hasUuids)is then called to parse the relationship details. This method checks that the relationship details are provided in the correct format and that the relationship descriptor is valid. It then returns a LinkedHashMap<String, String> containing the relationship Descriptor.
Step 5: ParserUtil#relationKeysAndValues(linkedHashmap, index, boolean) is then called to extract the keys and values from the LinkedHashMap<String, String> at the specified index and boolean according to the provided relationship details. It then returns a String containing the key or value of the relationship details. This method is called once to extract the relationshipDescriptor.
Step 6: DeleteRelationshipCommandParser#parse then returns a new DeleteRelationshipCommand object with the parsed relationship details.
Step 7: DeleteRelationshipCommand#execute calls the following methods from Model:
-
Model#deleteRelationType(toDelete)It communicates with theModelto delete the relationType. If the relationType does not exist, an exception is thrown stating that the relationType does not exist and cannot be deleted.
Step 8: DeleteRelationshipCommand#execute returns the CommandResult object to the LogicManager component.
The following sequence diagram shows how deleting a relationType works:
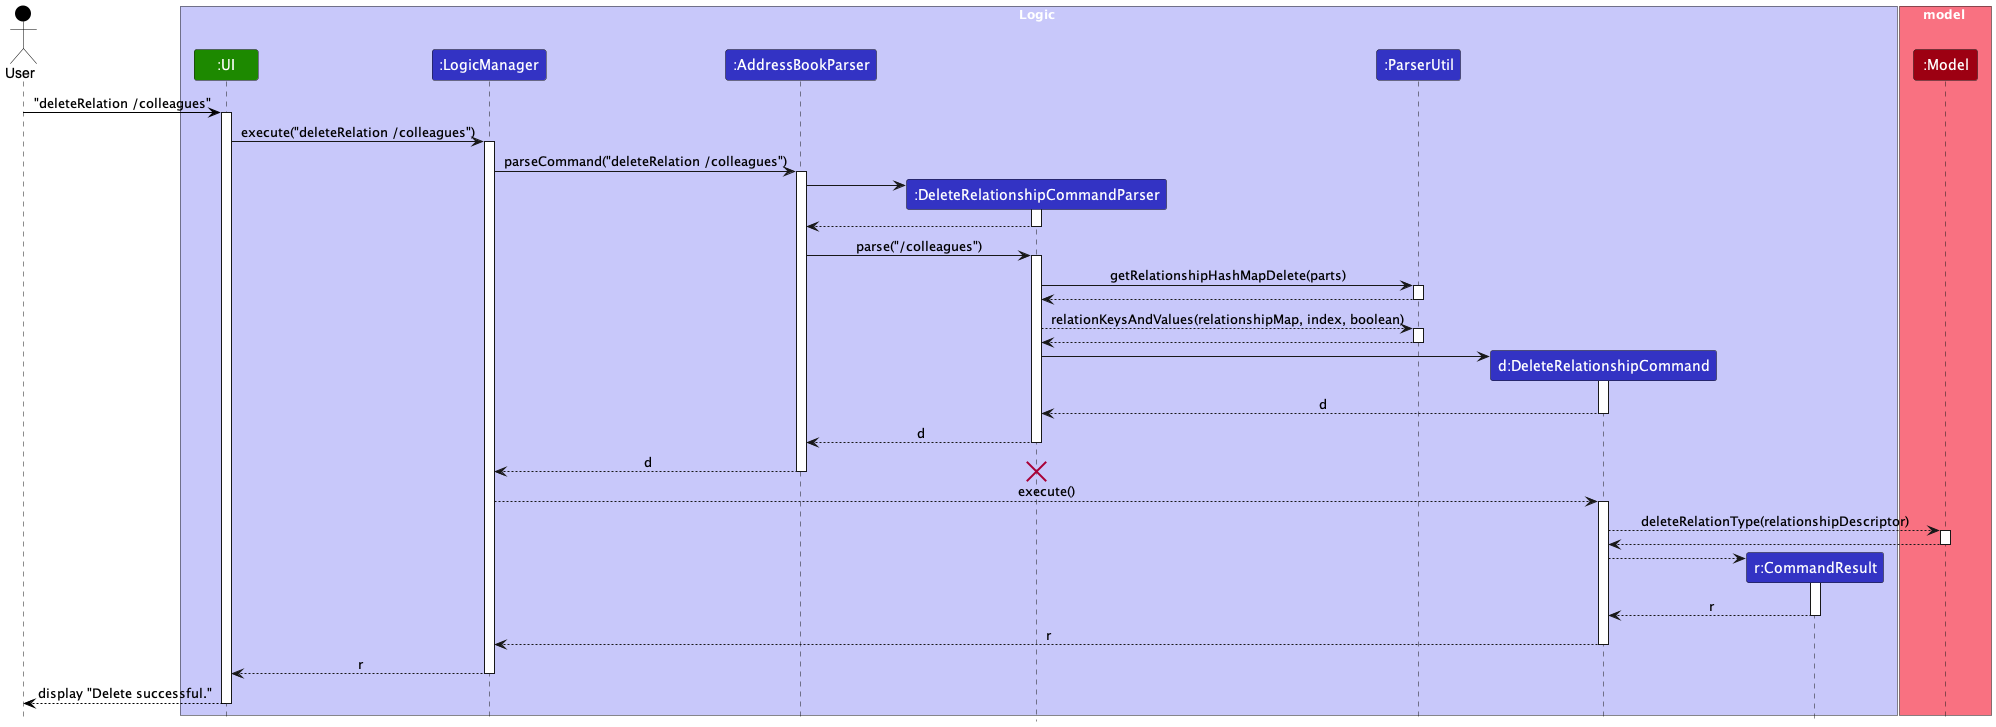
![]() Note:
Note:
- The lifeline for DeleteRelationshipCommandParser should end at the destroy marker (X) but due to a limitation of PlantUML, the lifeline reaches the end of diagram.
The following activity diagram sheds more light on exactly what happens a user executes the deleterelation command:
Design considerations
Aspect: How the relationship vs relationType is deleted:
-
Alternative 1 (current choice): The
DeleteRelationshipCommanddeletes the relationship/relationType based on whether the user provides the UUIDs of the persons.- Pros: Straightforward implementation.
- Cons: May cause confusion for the user whether the relationship or relationType is being deleted.
-
Alternative 2: Have a separate command for deleting the relationType specifically.
- Pros: More explicit for the user.
- Cons: More commands to implement, resulting in a more complex overall system.
Clear terminal feature
The ClearCommand provides the capability to clear the terminal screen. The operation is designed to provide a clean and uncluttered interface for the user.
Implementation
The ClearCommand is straightforward in its execution: it clears the terminal screen by printing a series of newline characters. The command extends the Command class.
This feature is implemented within the GUI controller class, responsible for handling user input and updating the GUI components accordingly.
Process Overview When the user inputs c or clear and presses the enter key, the following actions are performed:
Step 1: The command text input area is cleared.
Step 2: The command dialog container, which displays the command’s output or feedback to the user, is also cleared.
Step 3: If an image or any additional GUI component is displayed as part of the command’s output, it is hidden.
Step 4: The application checks the height of the command section dialog scroll pane. If it is less than or equal to 150 pixels, a short welcome dialog is added. Otherwise, a standard welcome dialog is displayed.
Step 5: The flag isDisplayingCommand is set to false, indicating that no command output is currently being displayed.
The following sequence diagram illustrates how the Clear Terminal command functions:
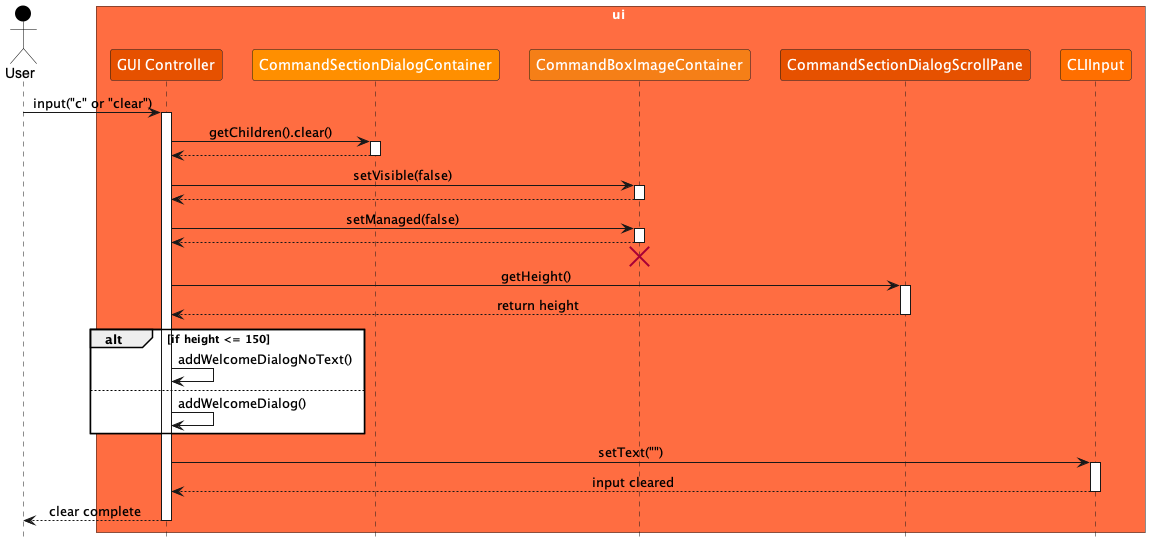
GUIController should end at the destroy marker (X) but due to a limitation of PlantUML, the lifeline reaches the end of diagram.
The following activity diagram provides a more detailed view of what happens when a user executes the clear command:

Design considerations
Aspect: How the terminal is cleared:
-
Alternative 1 (current choice): The
GUIControllerclass is responsible for clearing the terminal screen.- Pros: Centralized logic for clearing the terminal screen.
- Cons: Might lead to a bloated
GUIControllerclass if additional functionalities are added in the future.
-
Alternative 2: Splitting of clearing the terminal screen into a separate class.
- Pros: Simple and straightforward.
- Cons: Might result in many overlapping classes and methods.
Aspect: Display of welcome dialog after clearing the terminal:
-
Alternative 1 (current choice): The application displays a short welcome dialog if the height of the command section dialog scroll pane is less than or equal to 150 pixels.
- Pros: Provides a clean and uncluttered interface for the user.
- Cons: Might lead to a cluttered interface if the user has a large number of commands.
-
Alternative 2: The application does not display a welcome dialog after clearing the terminal screen.
- Pros: Provides a clean and uncluttered interface for the user.
- Cons: Might lead to a lack of feedback for the user after clearing the terminal screen.
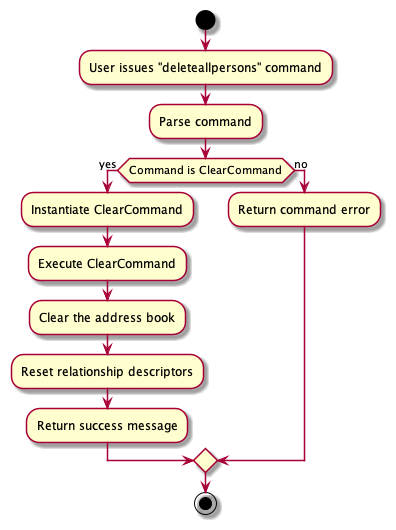
Delete All Persons feature
The DeleteAllCommand provides the capability to delete all persons from the address book. The operation is irreversible and is designed to provide a quick and efficient way to clear the address book.
Implementation
The ClearCommand is straightforward in its execution: it replaces the current address book model with a new, empty instance of AddressBook, and also resets any relationship descriptors that might be associated with the address book entries.
The ClearCommand class extends the Command class.
This is the command execution flow for the ClearCommand:
Step 1: The user inputs the command to clear the address book using the keyword deleteallpersons or the shorthand dap.
Step 2: The input is parsed by the LogicManager, which identifies the command as a ClearCommand.
Step 3: The ClearCommand#execute(Model model) method is called.
- Within the execute method, the
ClearCommandcallsmodel.setAddressBook(new AddressBook())to replace the current address book with a new, empty instance. - It then calls
model.resetRelationshipDescriptors()to clear any existing relationship descriptors.
Step 4: After clearing the address book and relationships, the command returns a new CommandResult with a success message indicating that the address book has been cleared.
The following sequence diagram illustrates how the Clear command functions:
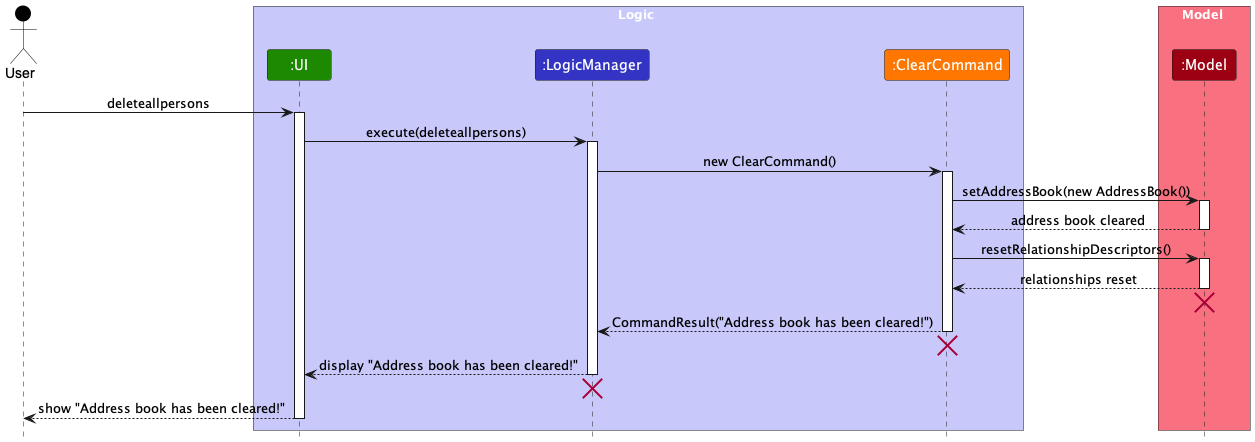
Model, ClearCommand and LogicManager should end at the destroy marker (X) but due to a limitation of PlantUML, the lifeline reaches the end of diagram.
The following activity diagram provides a more detailed view of what happens when a user executes the deleteallpersons command:
Design considerations
Aspect: How the address book is cleared:
-
Alternative 1 (current choice): The
Modelcomponent is responsible for clearing the address book, attributes and relationship descriptors.- Pros: Centralized logic for clearing the address book and relationships.
- Cons: Might lead to a bloated
Modelclass if additional functionalities are added in the future.
-
Alternative 2: Splitting of clearing address book, attribute and relationship descriptors into separate classes.
- Pros: Simple and straightforward.
- Cons: Might result in many overlapping classes and methods.
Aspect: Irreversibility of the clear operation:
-
Alternative 1 (current choice): The clear operation is irreversible.
- Pros: Prevents accidental data loss by requiring user confirmation before clearing the address book.
- Cons: Might lead to data loss if the user executes the command unintentionally.
-
Alternative 2: The clear operation is reversible.
- Pros: Provides a safety net for users who might accidentally clear the address book.
- Cons: Might lead to data clutter if the user is unable to clear the address book.
AnySearch feature
Implementation
The AnySearch mechanism is facilitated by the AnySearchCommand and AnySearchCommandParser.
The AnySearchCommand class extends the Command class and implements the following operation:
-
AnySearchCommand#execute()— Searches for the relationship pathway between two persons.
Given below is an example usage scenario and how the AnySearch feature behaves at each step.
Step 1: The user executes anySearch /1234 /5678 to search for the relationship pathway between two persons.
Step 2: When LogicManager is called upon to execute this command, it will pass it to an AddressBookParser object.
Step 3: The AddressBookParser recognizes the anySearch keyword and creates a new AnySearchCommandParser. The AnySearchCommandParser#parse method is then called on the object to parse the rest of the command /1234 /5678.
Step 4: AnySearchCommandParser#parse then returns a new AnySearchCommand object with the parsed Uuid details.
Step 5: AnySearchCommand#execute calls the following methods from Model:
-
Model#getFullUuid(String)It retrieves the full UUID of the person passed into theAnySearchcommand. This is called twice to get the full UUIDs of both persons in the relationship. -
Model#anySearch(fullOriginUuid, fullTargetUuid)It communicates with theModelto search for the relationship pathway between the two persons. -
Model#updateFilteredPersonList(predicate)It communicates with theModelto update the filtered person list with the results of the search. -
Model#updateFilteredRelationshipList(predicate)It communicates with theModelto update the filtered relationship list with the results of the search.
Step 6: AnySearchCommand#execute returns the CommandResult object to the LogicManager component.
The following sequence diagram shows how the AnySearch feature works:
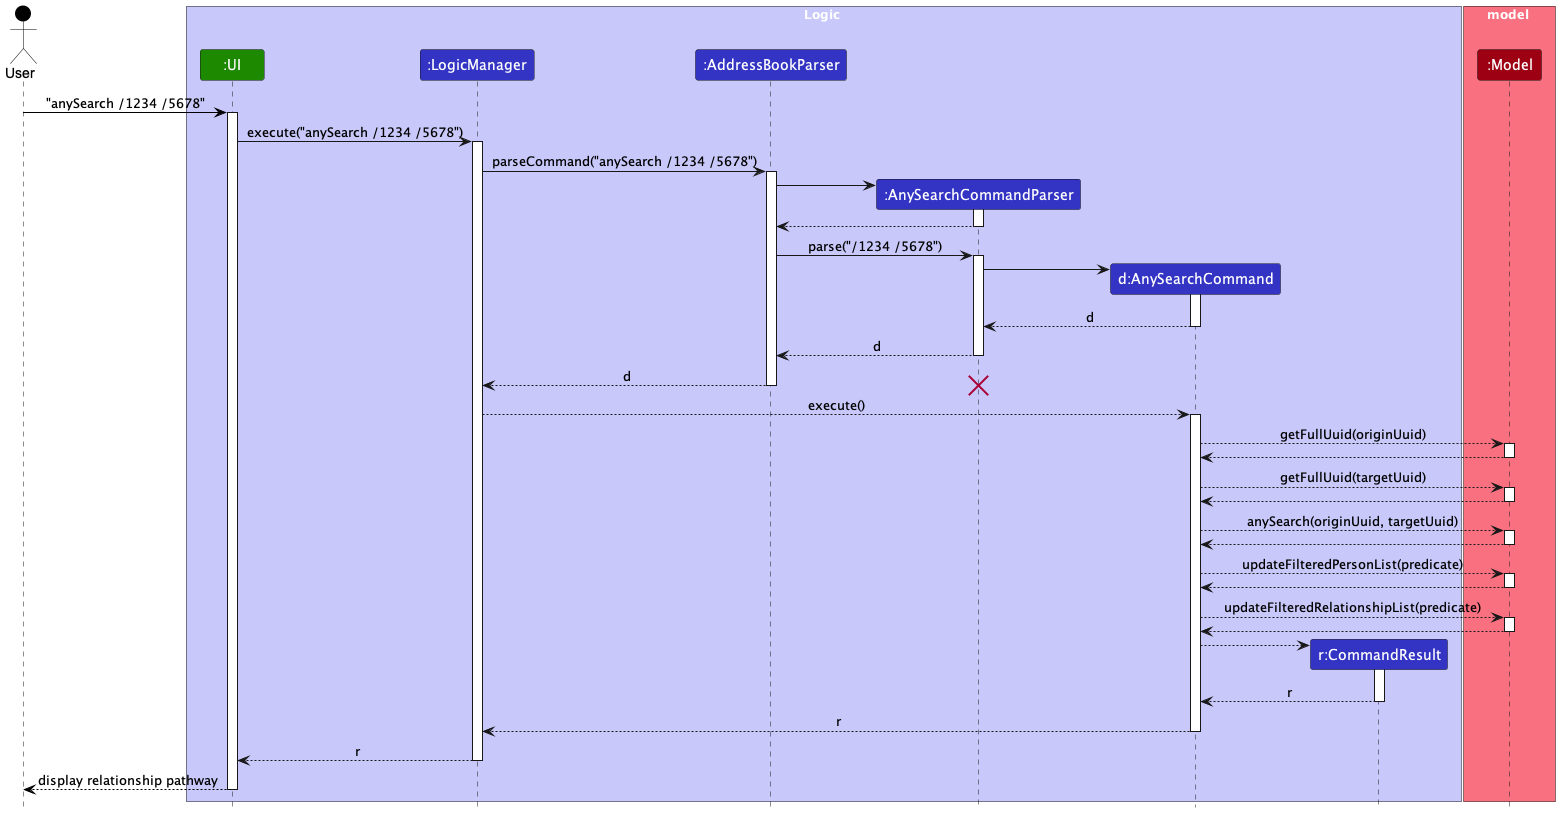
![]() Note:
Note:
- The lifeline for
AnySearchCommandParsershould end at the destroy marker (X) but due to a limitation of PlantUML, the lifeline reaches the end of diagram.
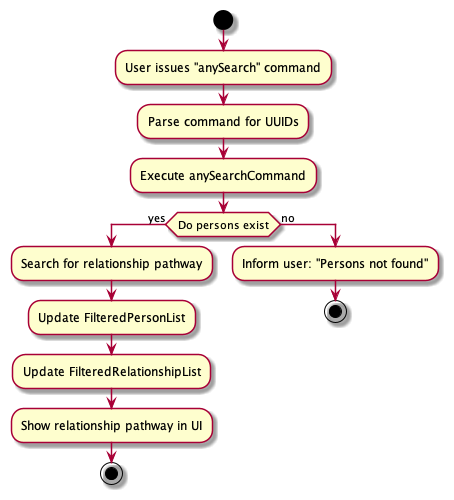
The following activity diagram sheds more light on exactly what happens a user executes the anySearch command:
Design considerations
Aspect: How the relationship pathway is searched:
-
Alternative 1 (current choice): The
AnySearchCommandsearches for the relationship pathway between two persons using Breadth-First-Search(BFS).- Pros: Efficient and scalable for large address books.
- Cons: Might be overkill for small address books.
-
Alternative 2: The
AnySearchCommandsearches for the relationship pathway between two persons using Depth-First-Search(DFS).- Pros: Simple and straightforward.
- Cons: Might be less efficient for large address books.
Aspect: Display of relationship pathway:
-
Alternative 1 (current choice): The
AnySearchCommanddisplays the shortest relationship pathway between two persons.- Pros: Provides a clear and concise output for the user.
- Cons: Might not display all possible relationship pathways.
-
Alternative 2: The
AnySearchCommanddisplays all possible relationship pathways between two persons.- Pros: Provides a comprehensive view of the relationship pathways.
- Cons: Might lead to information overload for the user.
Documentation, logging, testing, configuration, dev-ops
Appendix: Requirements
Product scope
Target user profile:
- Has many family members to keep track off
- Wants to keep various information about these different family members
- Wants to visualize connections between family members
- Often only has provisional or partial information about their family members
Value proposition: Gene-nie puts connections between people at the forefront. It allows users to easily visualize and understand the relationships between people in their lives. It also allows users to store personal information about each individual, making it a one-stop solution for managing relationships.
User stories
Priorities: High (must have) - * * *, Medium (nice to have) - * *, Low (unlikely to have) - *
| Priority | As a … | I want to … | So that I can… |
|---|---|---|---|
* * * |
user | Create a new person with a Unique User ID | Ensure every person in my address book is distinct |
* * * |
user | Add custom attributes to each person | Store personal information relevant to each individual |
* * * |
user | Establish and record relationships between people | Visualize connections between people |
* * * |
user | Find the relationship path between people | Understand how everyone is connected |
* * |
user | Have clear success or failure messages after actions | Ensure that the intended action has taken place |
* * |
user | Sort and search a person by their attributes | Find specific individuals more easily |
* * * |
user | Have my data automatically saved once i exit the app and loaded once i start the app | Seamless experience across different sessions |
Use cases
(For all use cases below, the System is the Gene-nie and the Actor is the user, unless specified otherwise)
Use case: Assessing help page
MSS
- User requests to view the help page.
-
Gene-nie displays a message with a link to the help page.
Use case ends.
Use case: Listing all persons
MSS
- User requests to view the list of persons.
-
Gene-nie displays a list of all students along with their details.
Use case ends.
Use case: Add a new person
MSS
- User requests to add a new person with their attributes to Gene-nie.
- Gene-nie adds the person with the provided attributes.
-
Gene-nie displays new person added and confirmation message.
Use case ends.
Extensions
- 1a. User enters an invalid command format.
-
1a1. Gene-nie shows an error message.
Use case ends.
-
- 1b. User enters an invalid attribute.
-
1b1. Gene-nie shows an error message.
Use case ends.
-
Use case: Delete a person
MSS
- User selects a specific person in the list to delete by providing the person’s UUID.
- Gene-nie deletes the person.
-
Gene-nie displays confirmation message.
Use case ends.
Extensions
- 1a. Given UUID is invalid or does not exist.
-
1a1. Gene-nie shows an error message.
Use case ends.
-
Use case: Add an attribute to a person
MSS
- User requests to add an attribute to a person by providing the person’s UUID and new attribute.
- Gene-nie adds attribute details to specific person’s profile.
-
Gene-nie displays attribute in person’s profile and confirmation message.
Use case ends.
Extensions
- 1a. Attribute details are invalid.
-
1a1. Gene-nie shows an error message.
Use case ends.
-
- 1b. Given UUID is invalid or does not exist.
-
1b1. Gene-nie shows an error message.
Use case ends.
-
Use case: Edit an attribute of a person
MSS
- User requests to edit an attribute of a person by providing the person’s UUID and the attribute they want to edit, along with the new attribute value.
- Gene-nie updates attribute details to specific person’s profile.
-
Gene-nie updates the new attribute in person’s profile and confirmation message.
Use case ends.
Extensions
- 1a. Attribute details are invalid.
-
1a1. Gene-nie shows an error message.
Use case ends.
-
- 1b. Given UUID is invalid or does not exist.
-
1b1. Gene-nie shows an error message.
Use case ends.
-
Use case: Delete an attribute of a person
MSS
- User requests to delete an attribute of a person by providing the person’s UUID and the attribute they want to delete.
-
Gene-nie deletes the attribute from the specified person’s profile.
Use case ends.
Extensions
- 1a. Attribute details are invalid.
-
1a1. Gene-nie shows an error message.
Use case ends.
-
- 1b. Given UUID is invalid or does not exist.
-
1b1. Gene-nie shows an error message.
Use case ends.
-
Use case: Find persons by attribute
MSS
- User requests to find persons by attribute by entering the attribute name/value.
-
Gene-nie displays list of persons with each of the specified attribute name/value.
Use case ends.
Extensions
- 1a. Attribute details are invalid or does not exist.
-
1a1. Gene-nie shows an error message.
Use case ends.
-
Use case: List all valid relationTypes
MSS
- User requests to list all valid relationTypes.
-
Gene-nie displays list of all current relationTypes.
Use case ends.
Use case: Add a relationship between two persons
MSS
- User requests to add a relationship between two persons by providing both persons UUID and the relationship type.
- Gene-nie creates a relationship with the provided details.
-
Gene-nie displays new relationship added under both persons’ profiles and confirmation message.
Use case ends.
Extensions
- 1a. Relationship type is invalid.
-
1a1. Gene-nie shows an error message.
Use case ends.
-
- 1b. Given UUIDs are invalid or does not exist.
-
1b1. Gene-nie shows an error message.
Use case ends.
-
Use case: Edit a relationship between two persons
MSS
- User requests to edit a specific relationship between two persons by providing both persons UUID, the existing and new relationship type.
- Gene-nie edits the specified relationship with the provided details.
-
Gene-nie displays edited relationship under both persons’ profiles and confirmation message.
Use case ends.
Extensions
- 1a. Relationship types are invalid.
-
1a1. Gene-nie shows an error message.
Use case ends.
-
- 1b. Given UUIDs are invalid or does not exist.
-
1b1. Gene-nie shows an error message.
Use case ends.
-
Use case: Delete a relationship between two persons
MSS
- User requests to delete a specific relationship between two persons by providing both persons UUID and the relationship type.
- Gene-nie deletes the specified relationship.
-
Gene-nie displays confirmation message.
Use case ends.
Extensions
- 1a. Relationship type is invalid.
-
1a1. Gene-nie shows an error message.
Use case ends.
-
- 1b. Given UUIDs are invalid or does not exist.
-
1a1. Gene-nie shows an error message.
Use case ends.
-
Use case: Search a relationship pathway between two persons
MSS
- User requests to search for a relationship pathway between two persons by providing both persons UUID and the relationship type.
-
Gene-nie displays the relationship pathway.
Use case ends.
Extensions
- 1a. Given UUIDs are invalid or does not exist.
-
1a1. Gene-nie shows an error message.
Use case ends.
-
- 1b. No relationship pathway exists between the two persons.
- 1a1. Gene-nie says that there is no relationship pathway found.
Use case ends.
Use case: Deleting all persons
MSS
- User requests to delete all persons from Gene-nie.
-
Gene-nie deletes all persons and displays the updated view.
Use case ends.
Use case: Clearing command history
MSS
- User requests to clear command history
-
Gene-nie clears the whole command history.
Use case ends.
Use case: Exit Gene-nie
MSS
- User requests to exit Gene-nie.
- Gene-nie saves current data.
-
Gene-nie closes the application window.
Use case ends.
{More to be added}
Non-Functional Requirements
- Should work on any mainstream OS as long as it has Java
11or above installed. - Should be able to hold up to 1000 persons and relationships without a noticeable sluggishness in performance for typical usage.
- A user with above average typing speed for regular English text (i.e. not code, not system admin commands) should be able to accomplish most of the tasks faster using commands than using the mouse.
- User actions should prompt responses within 5 seconds, maintaining acceptable performance standards.
- The user interface must be intuitive for users of varying technical proficiency levels, enhancing usability.
- The codebase should be well-documented and maintainable to facilitate future updates and enhancements.
- Comprehensive documentation should be provided for developers, administrators, and end-users, supporting ease of use.
- The system should be able to handle data corruption or loss gracefully, minimizing the impact on users.
- The system architecture should support future extensions or customizations, allowing for easy addition of new features.
- Interoperability with other systems should be supported through standard protocols and formats, promoting seamless integration.
- The system should be designed with testability in mind, allowing for comprehensive testing of all components, features, and scenarios.
Glossary
- Mainstream OS: Windows, Linux, Unix, MacOS
- Private contact detail: A contact detail that is not meant to be shared with others
- Command Line Interface (CLI): A text-driven user interface used for program execution, file management, and overall computer interaction.
- Graphical User Interface (GUI): An operating system interface reliant on graphics, utilising icons, menus, and a mouse for user interaction.
- Main Success Scenario (MSS): Describes the most direct interaction path for a given use case, assuming no errors or complications.
- Actor: Within use cases, an actor represents the role a person assumes while interacting with the system.
- Application Programming Interface(API): Facilitates communication between distinct components of a program.
- Architecture: In the realm of software, architecture illustrates the systematic organization of the entire system.
- Framework: Comprises pre-written code with predefined classes and functions, aiding developers in constructing software.
Appendix: Instructions for manual testing
Given below are instructions to test the app manually.
Launch and shutdown
-
Initial launch
- Download the jar file and copy into an empty folder
- Double-click the jar file.
If nothing happens after double-clicking the jar file, runjava -jar Gene-nie.jarin the folder containing the jar file.
Expected Outcome: Shows the GUI with a set of sample contacts. The window size may not be optimum.
-
Saving window preferences
- Resize the window to an optimum size. Move the window to a different location.
- Close the window.
- Re-launch the app by double-clicking the jar file.
Expected Outcome: The most recent window size and location is retained.
Listing all persons
Prerequisites: There should be at least one person in Gene-nie.
- Listing all persons:
-
Test case:
list
Expected Outcome: A list of all persons with their details is shown.
-
Test case:
Help
- Seeking help:
-
Test case:
help
Expected Outcome: A new window is opened with a link to the help page.
-
Test case:
Adding a person
- Adding a person with no attributes:
-
Test case:
add
Expected Outcome: A new person with a random UUID shown on the left panel of the PersonCard is added to Gene-nie. Attributes panel displays “No attributes found”.
-
Test case:
- Adding a person with one attribute:
-
Test case:
add /Name John
Expected Outcome: A new person with a random UUID shown on the left panel of the PersonCard is added to Gene-nie. Attributes panel displays the attribute added.
-
Test case:
- Adding a person with multiple attributes:
-
Test case:
add /Name John /Phone 98765432 /Email John@example.com
Expected Outcome: A new person with a random UUID shown on the left panel of the PersonCard is added to Gene-nie. Attributes panel displays all the attributes added.
-
Test case:
- Adding a person with duplicate attributes:
-
Test case:
add /Name John /Name Chad
Expected Outcome: The last attribute value is taken. A new person with a random UUID shown on the left panel of the PersonCard is added to Gene-nie. Attributes panel displays “Name: Chad”.
-
Test case:
- Adding a person with an invalid attribute:
-
Test case:
add /Name
Expected Outcome: Error message highlighted in red is shown. The command format and an example is also shown in the error message. -
Test case:
add /Sex dhdkag
Expected Outcome: Error message highlighted in red is shown. It reads “Sex must only be male or female for Sex.”
-
Test case:
Deleting a person
Prerequisites: There should be at least one person in Gene-nie.
- Deleting a person with a valid uuid:
-
Additional Prerequisites: Replace the UUID in the test case with a valid UUID (e.g. 0001) from your list of persons.
Test case:delete /UUID
Expected Outcome: The person with the given UUID is removed from Gene-nie. Details of the deleted person is shown in the status message.
-
Additional Prerequisites: Replace the UUID in the test case with a valid UUID (e.g. 0001) from your list of persons.
- Deleting a person with an invalid uuid:
-
Test case:
delete /!!!!
Expected Outcome: No person is deleted. An error message is shown, indicating that the UUID provided is invalid.
-
Test case:
- Deleting a person with no uuid provided:
-
Test case:
delete
Expected Outcome: No person is deleted. An error message is shown, indicating that the command format is invalid.
-
Test case:
Adding attributes to existing persons
Prerequisites: There should be at least one person in Gene-nie.
- Adding an attribute to a person with a valid uuid:
-
Additional Prerequisites: Replace the UUID in the test case with a valid UUID (e.g. 0001) from your list of persons.
Test case:addattribute /UUID /Phone 12345678
Expected Outcome: The attribute is added to the person with the given UUID. The new attribute is shown in the attributes panel of the person.
-
Additional Prerequisites: Replace the UUID in the test case with a valid UUID (e.g. 0001) from your list of persons.
- Adding multiple attributes to a person with a valid uuid:
-
Additional Prerequisites: Replace the UUID in the test case with a valid UUID (e.g. 0001) from your list of persons.
Test case:addattribute /UUID /Phone 12345678 /Email john@example.com
Expected Outcome: The attributes are added to the person with the given UUID. The new attributes are shown in the attributes panel of the person.
-
Additional Prerequisites: Replace the UUID in the test case with a valid UUID (e.g. 0001) from your list of persons.
- Adding an attribute to a person with an invalid uuid:
-
Test case:
addattribute /!!!! /Phone 12345678
Expected Outcome: No attribute is added. An error message is shown, saying “Person not found.”
-
Test case:
- Adding an attribute with no uuid provided:
-
Test case:
addattribute /Phone 12345678
Expected Outcome: No attribute is added. An error message is shown, indicating that the command format is invalid.
-
Test case:
- Adding a duplicate attribute to a person:
-
Additional Prerequisites: Replace the UUID in the test case with a valid UUID (e.g. 0001) from your list of persons.
Test case:addattribute /UUID /Phone 12345678 /Phone 87654321
Expected Outcome: No attribute is added. An error message is shown, indicating that the attribute is a duplicate.
-
Additional Prerequisites: Replace the UUID in the test case with a valid UUID (e.g. 0001) from your list of persons.
Editing attributes of existing persons
Prerequisites: There should be at least one person in Gene-nie, and that person should have at least one attribute.
- Editing an attribute of a person with a valid uuid and valid attribute:
-
Additional Prerequisites: Replace the UUID in the test case with a valid UUID (e.g. 0001) from your list of persons. Person must also have the attribute
Phone.
Test case:editattribute /UUID /Phone 12345678
Expected Outcome: The attribute is edited for the person with the given UUID. The new attribute is shown in the attributes panel of the person.
-
Additional Prerequisites: Replace the UUID in the test case with a valid UUID (e.g. 0001) from your list of persons. Person must also have the attribute
- Editing an attribute of a person with an invalid uuid:
-
Test case:
editattribute /!!!! /Phone 12345678
Expected Outcome: No attribute is edited. An error message is shown, saying “Person not found.”
-
Test case:
- Editing an attribute of a person without the attribute provided:
-
Additional Prerequisites: Replace the UUID in the test case with a valid UUID (e.g. 0001) from your list of persons. The person must NOT have the attribute
Email.
Test case:editattribute /UUID /Email john@example.com
Expected Outcome: No attribute is edited. An error message is shown, indicating that the attribute does not exist and cannot be edited.
-
Additional Prerequisites: Replace the UUID in the test case with a valid UUID (e.g. 0001) from your list of persons. The person must NOT have the attribute
- Editing an attribute of a person with no uuid provided:
-
Test case:
editattribute /Phone 12345678
Expected Outcome: No attribute is edited. An error message is shown, indicating that the command format is invalid.
-
Test case:
Deleting attributes of existing persons
Prerequisites: There should be at least one person in Gene-nie, and that person should have at least one attribute.
- Deleting an attribute of a person with a valid uuid and valid attribute:
-
Additional Prerequisites: Replace the UUID in the test case with a valid UUID (e.g. 0001) from your list of persons. Person must also have the attribute
Phone.
Test case:deleteattribute /UUID /Phone
Expected Outcome: The attribute is deleted for the person with the given UUID. The attribute is removed from the attributes panel of the person.
-
Additional Prerequisites: Replace the UUID in the test case with a valid UUID (e.g. 0001) from your list of persons. Person must also have the attribute
- Deleting multiple attributes of a person with a valid uuid and valid attributes:
-
Additional Prerequisites: Replace the UUID in the test case with a valid UUID (e.g. 0001) from your list of persons. Person must also have the attributes
PhoneandEmail.
Test case:deleteattribute /UUID /Phone /Email
Expected Outcome: The attributes are deleted for the person with the given UUID. The attributes are removed from the attributes panel of the person.
-
Additional Prerequisites: Replace the UUID in the test case with a valid UUID (e.g. 0001) from your list of persons. Person must also have the attributes
- Deleting an attribute of a person with an invalid uuid:
-
Test case:
deleteattribute /!!!! /Phone
Expected Outcome: No attribute is deleted. An error message is shown, saying that the UUID provided is invalid.
-
Test case:
- Deleting an attribute of a person without the attribute provided:
-
Additional Prerequisites: Replace the UUID in the test case with a valid UUID (e.g. 0001) from your list of persons. The person must NOT have the attribute
Email.
Test case:deleteattribute /UUID /Email
Expected Outcome: No attribute is deleted. An error message is shown, indicating that the attribute is not found.
-
Additional Prerequisites: Replace the UUID in the test case with a valid UUID (e.g. 0001) from your list of persons. The person must NOT have the attribute
Finding persons
Prerequisites: There should be at least one person in Gene-nie.
- Finding persons by attribute name:
-
Additional Prerequisites: The persons should have the attribute
Name.
Test case:find /Name
Expected Outcome: A list of persons with the specified attribute nameNameis shown.
-
Additional Prerequisites: The persons should have the attribute
- Finding persons by attribute value:
-
Additional Prerequisites: The persons should have an attribute with the value
John.
Test case:find /John
Expected Outcome: A list of persons with the specified attribute containing the valueJohnis shown.
-
Additional Prerequisites: The persons should have an attribute with the value
- Finding persons by uuid:
-
Additional Prerequisites: Replace the UUID in the test case with a valid UUID (e.g. 0001) from your list of persons.
Test case:find /UUID
Expected Outcome: The person with the specified UUID is shown.
-
Additional Prerequisites: Replace the UUID in the test case with a valid UUID (e.g. 0001) from your list of persons.
- Finding persons using an attribute name/value that does not exist:
-
Additional Prerequisites: All persons do not have the attribute
Countryand do not have any attribute with the valueSingapore.
Test case:find /Country
Expected Outcome: The left panel is empty, with no person found. -
Test case:
find /Singapore
Expected Outcome: The left panel is empty, with no person found.
-
Additional Prerequisites: All persons do not have the attribute
- Finding persons using an invalid uuid:
-
Test case:
find /!!!!
Expected Outcome: The left panel is empty, with no person found.
-
Test case:
Listing all valid relationship types
- Listing all valid relationship types:
-
Test case:
listrelations
Expected Outcome: A list of all valid relationship types is shown.
-
Test case:
Adding relationships between persons
Prerequisites: There should be at least two persons in Gene-nie.
- Adding a roleless relationship between two persons with valid uuids:
-
Additional Prerequisites: Replace the UUIDs in the test case with valid UUIDs (e.g. 0001 and 0002) from your list of persons.
Test case:addrelation /UUID1 /UUID2 /friends
Expected Outcome: A relationship of typefriendsis added between the two persons with the given UUIDs. The relationship is shown in the relationships panel of both persons.
-
Additional Prerequisites: Replace the UUIDs in the test case with valid UUIDs (e.g. 0001 and 0002) from your list of persons.
- Adding a role-based relationship between two persons with valid uuids:
-
Additional Prerequisites: Replace the UUIDs in the test case with valid UUIDs (e.g. 0001 and 0002) from your list of persons.
Test case:addrelation /UUID1 husband /UUID2 wife /spouses
Expected Outcome: A relationship of typespousesis added between the two persons with the given UUIDs. The relationship is shown in the relationships panel of both persons, each with their respective role.
-
Additional Prerequisites: Replace the UUIDs in the test case with valid UUIDs (e.g. 0001 and 0002) from your list of persons.
- Adding a relationship between two persons with an invalid uuid:
-
Test case:
addrelation /!!!! /UUID2 /friends
Expected Outcome: No relationship is added. An error message is shown, indicating that the UUID provided is invalid.
-
Test case:
- Adding a relationship between two persons with no relationship type provided:
-
Additional Prerequisites: Replace the UUIDs in the test case with valid UUIDs (e.g. 0001 and 0002) from your list of persons.
Test case:addrelation /UUID1 /UUID2
Expected Outcome: No relationship is added. An error message is shown, indicating that the command format is invalid.
-
Additional Prerequisites: Replace the UUIDs in the test case with valid UUIDs (e.g. 0001 and 0002) from your list of persons.
- Adding a relationship between two persons with an invalid relationship type:
-
Additional Prerequisites: Replace the UUIDs in the test case with valid UUIDs (e.g. 0001 and 0002) from your list of persons.
Test case:addrelation /UUID1 /UUID2 /!!!!
Expected Outcome: No relationship is added. An error message is shown, indicating that the relationship type provided is invalid.
-
Additional Prerequisites: Replace the UUIDs in the test case with valid UUIDs (e.g. 0001 and 0002) from your list of persons.
Editing relationships between persons
Prerequisites: There should be at least two persons in Gene-nie, and they should have at least one relationship between them.
- Editing a relationship between two persons with valid uuids and valid relationship type from a roleless relationship to a roleless relationship:
-
Additional Prerequisites: Replace the UUIDs in the test case with valid UUIDs (e.g. 0001 and 0002) from your list of persons. The persons must have a relationship of type
friends.
Test case:editrelation /UUID1 /UUID2 /friends /colleagues
Expected Outcome: The relationship type is edited for the two persons with the given UUIDs. The relationship is shown in the relationships panel of both persons with the new relationship type.
-
Additional Prerequisites: Replace the UUIDs in the test case with valid UUIDs (e.g. 0001 and 0002) from your list of persons. The persons must have a relationship of type
- Editing a relationship between two persons with valid uuids and valid relationship type from a role-based relationship to a role-based relationship:
-
Additional Prerequisites: Replace the UUIDs in the test case with valid UUIDs (e.g. 0001 and 0002) from your list of persons. The persons must have a relationship of type
siblingswith rolesbrotherandsisterrespectively.
Test case:editrelation /UUID1 husband /UUID2 wife /siblings /spouses
Expected Outcome: The relationship type is edited for the two persons with the given UUIDs. The relationship is shown in the relationships panel of both persons with the new relationship type and roles.
-
Additional Prerequisites: Replace the UUIDs in the test case with valid UUIDs (e.g. 0001 and 0002) from your list of persons. The persons must have a relationship of type
- Editing a relationship between two persons with an invalid uuid:
-
Test case:
editrelation /!!!! /UUID2 /friends /colleagues
Expected Outcome: No relationship is edited. An error message is shown, indicating that the UUID provided is invalid.
-
Test case:
- Editing a relationship between two persons with an invalid relationship type:
-
Additional Prerequisites: Replace the UUIDs in the test case with valid UUIDs (e.g. 0001 and 0002) from your list of persons.
Test case:editrelation /UUID1 /UUID2 /friends /!!!!
Expected Outcome: No relationship is edited. An error message is shown, indicating that the relationship type provided is invalid.
-
Additional Prerequisites: Replace the UUIDs in the test case with valid UUIDs (e.g. 0001 and 0002) from your list of persons.
- Editing a relationship between two persons with the old relationship type not present:
-
Additional Prerequisites: Replace the UUIDs in the test case with valid UUIDs (e.g. 0001 and 0002) from your list of persons. The persons must NOT have a relationship of type
colleagues.
Test case:editrelation /UUID1 /UUID2 /colleagues /friends
Expected Outcome: No relationship is edited. An error message is shown, indicating that the relationshipcolleaguesdoes not exist.
-
Additional Prerequisites: Replace the UUIDs in the test case with valid UUIDs (e.g. 0001 and 0002) from your list of persons. The persons must NOT have a relationship of type
Deleting relationships between persons
Prerequisites: There should be at least two persons in Gene-nie, and they should have at least one relationship between them.
- Deleting a relationship between two persons with valid uuids and valid relationship type:
-
Additional Prerequisites: Replace the UUIDs in the test case with valid UUIDs (e.g. 0001 and 0002) from your list of persons. The persons must have a relationship of type
friends.
Test case:deleterelation /UUID1 /UUID2 /friends
Expected Outcome: The relationship is deleted for the two persons with the given UUIDs. The relationship is removed from the relationships panel of both persons.
-
Additional Prerequisites: Replace the UUIDs in the test case with valid UUIDs (e.g. 0001 and 0002) from your list of persons. The persons must have a relationship of type
- Deleting a relationship between two persons with an invalid uuid:
-
Test case:
deleterelation /!!!! /UUID2 /friends
Expected Outcome: No relationship is deleted. An error message is shown, indicating that the UUID provided is invalid.
-
Test case:
- Deleting a relationship between two persons without the relationship present:
-
Additional Prerequisites: Replace the UUIDs in the test case with valid UUIDs (e.g. 0001 and 0002) from your list of persons. The persons must NOT have a relationship of type
colleagues.
Test case:deleterelation /UUID1 /UUID2 /colleagues
Expected Outcome: No relationship is deleted. An error message is shown, indicating that the relationshipcolleaguesdoes not exist.
-
Additional Prerequisites: Replace the UUIDs in the test case with valid UUIDs (e.g. 0001 and 0002) from your list of persons. The persons must NOT have a relationship of type
- Deleting a relationship between two persons with no relationship type provided:
-
Additional Prerequisites: Replace the UUIDs in the test case with valid UUIDs (e.g. 0001 and 0002) from your list of persons.
Test case:deleterelation /UUID1 /UUID2
Expected Outcome: No relationship is deleted. An error message is shown, indicating that the command format is invalid.
-
Additional Prerequisites: Replace the UUIDs in the test case with valid UUIDs (e.g. 0001 and 0002) from your list of persons.
Finding the relationship path between two persons
Prerequisites: There should be at least two persons in Gene-nie, and they should have at least one relationship between them.
- Finding the general relationship path between two persons with valid uuids:
-
Additional Prerequisites: Replace the UUIDs in the test case with valid UUIDs (e.g. 0001 and 0002) from your list of persons. The persons must have at least one relationship between them, or be indirectly related through multiple relationships.
Test case:anySearch /UUID1 /UUID2
Expected Outcome: The relationship path between the two persons with the given UUIDs is shown.
-
Additional Prerequisites: Replace the UUIDs in the test case with valid UUIDs (e.g. 0001 and 0002) from your list of persons. The persons must have at least one relationship between them, or be indirectly related through multiple relationships.
- Finding the family relationship path between two persons with valid uuids:
-
Additional Prerequisites: Replace the UUIDs in the test case with valid UUIDs (e.g. 0001 and 0002) from your list of persons. The persons must have at least one family relationship between them, or be indirectly related through multiple family relationships. These family relationships types include “bioparents”, “spouses” and “siblings”.
Test case:familySearch /UUID1 /UUID2
Expected Outcome: The family relationship path between the two persons with the given UUIDs is shown.
-
Additional Prerequisites: Replace the UUIDs in the test case with valid UUIDs (e.g. 0001 and 0002) from your list of persons. The persons must have at least one family relationship between them, or be indirectly related through multiple family relationships. These family relationships types include “bioparents”, “spouses” and “siblings”.
- Finding the family relationship path between two persons with no valid path between them:
-
Additional Prerequisites: Replace the UUIDs in the test case with valid UUIDs (e.g. 0001 and 0002) from your list of persons. The persons must NOT have a valid relationship path between them.
Test case:anySearch /UUID1 /UUID2
Expected Outcome: The left panel is empty, with no relationship path found.
-
Additional Prerequisites: Replace the UUIDs in the test case with valid UUIDs (e.g. 0001 and 0002) from your list of persons. The persons must NOT have a valid relationship path between them.
- Finding the relationship path between two persons with a uuid that does not exist in Gene-nie:
-
Test case:
anySearch /!!!! /UUID2
Expected Outcome: An error message is shown, saying “You have not added the contacts of the people you are looking for!”
-
Test case:
Deleting all persons
Prerequisites: There should be at least one person in Gene-nie.
- Deleting all persons:
-
Test case:
deleteallpersons
Expected Outcome: All persons are deleted. The left panel is empty, with no persons found.
-
Test case:
Clearing command responses
- Clearing the command responses:
-
Test case:
clear
Expected Outcome: All command responses are cleared from the command box.
-
Test case:
Issues with saving data
-
Dealing with missing data file:
Test case: Remove the data file to simulate a missing file
- Go to the location of the data file indicated in the bottom left corner of the application.
- Delete the file named
addressbook.json. - Relaunch Gene-nie.
Expected Outcome: A new file with sample person data is created. Sample person data is shown in the application.
-
Dealing with corrupted file:
Test case: Modify the data file to simulate a corrupted data file- Go to the location of the data file indicated in the bottom left corner of the application.
- Open the file named
addressbook.json. - Modify the file. For example, you could remove the first few lines of the file.
- Relaunch Gene-nie.
Expected Outcome: The left panel is now empty. No person records are shown in the application.
Appendix: Planned Enhancements
C.1 - Display results of find command in Search Results tab
Currently, the results of the find command are displayed in the left panel of the application. This enhancement aims to display the results in the separate already implemented tab called “Search Results” to improve the user experience. This will allow users to view the search results without losing sight of the main list of persons.
- Proposed Enhancement:
- Display the results of the
findcommand in the “Search Results” tab. This tab will be updated with the search results each time thefindcommand is executed. The results will be displayed in a similar format to the current display in the left panel. The “Search Results” tab will be cleared when the user executes a newfindcommand or closes the application.
- Display the results of the
- Implementation Details:
- Update the
findcommand to use the alternateCommandResultconstructor. - Return the appropriate
CommandResult(findSucessMessage, false, false, true)to indicate that the search results should be displayed in the “Search Results” tab. - Update the
MainWindowto display the search results in the “Search Results” tab.
- Update the
C.2 - Improve error handling for invalid commands
Currently, the application displays a generic error message when an invalid command such as add attribute is entered. The current implementation returns the wrong error message and does not provide the user with enough information to correct the error. This enhancement aims to improve the error handling for invalid commands to provide more specific and helpful error messages to the user.
- Proposed Enhancement:
- Improve error handling for invalid commands by ensuring the correct error message is returned.
- Implementation Details:
- Change the command words for all commands to be more than one word. For example,
addwill becomeaddperson. - Update the error handling logic to check for the specific command entered by the user.
- Return a specific error message based on the invalid command entered by the user.
- Change the command words for all commands to be more than one word. For example,
C.3 - Improve saving of valid relationship descriptors
Currently, the application saves the relationship descriptors to the list of valid descriptors everytime the user enters a new relationship with that specific descriptor. As there are no checks performed to ensure that the descriptor is unique, the relationship descriptor can be saved multiple times in the list. This enhancement aims to improve the saving of valid relationship descriptors by checking if the descriptor already exists in the list before saving it.
- Proposed Enhancement:
- Improve the saving of valid relationship descriptors by checking if the descriptor already exists in the list before saving it.
- Implementation Details:
- Update the
addrelationandeditrelationcommand to check if the relationship descriptor already exists in the list of valid descriptors. - If the descriptor already exists, do not save it again. If the descriptor does not exist, save it to the list of valid descriptors.
- Display an appropriate message to the user indicating whether the descriptor was saved or not.
- Update the
C.4 - Improve error handling for duplicate relationship types
Currently, the application allows for users to add any relationTypes with no limitations unless the exact relationType already exists. Thus, the current implementation does not take into account for varied spellings of the same word even if they already exist (e.g., “friend” and “friends”), resulting in potential confusion for users. This enhancement aims to improve the error handling for duplicate relation types to provide clearer guidance to users encountering duplicate relation types.
- Proposed Enhancement:
- Improve error handling for duplicate relation types by checking for similar relation types before adding a new relation type.
- Implementation Details:
- Update the
addrelationandeditrelationcommand to check for similar relation types before adding a new relation type. - If a similar relation type already exists, display an error message to the user indicating that the relation type already exists.
- Provide suggestions for similar relation types to help the user choose the correct relation type.
- Update the
C.5 - Improve display result for UUIDs in certain error messages
Currently, when displaying errors for duplicate relationships, the application shows the full UUIDs of the Persons involved in the relationship in the error message. This can be confusing for users as the UUIDs are long and not easily readable. This enhancement aims to improve the display of UUIDs in error messages to make them more user-friendly.
- Proposed Enhancement:
- Improve the display of UUIDs in error messages by showing only the first few characters of the UUID.
- Implementation Details:
- Update the error messages for duplicate UUIDs to show only the first few characters of the UUID.
- Provide a tooltip or additional information for users to view the full UUID if needed.
C.6 - Add support for extendable roles for relationships
Currently, the application allows for users to add any relationTypes with little limitation in regard to spelling. Thus, users are able to add any roles and relation types that they want to for custom relationships, including roles and relation types that are not valid words (e.g. aaa). This enhancement aims to improve the checking of roles for custom relationships.
- Proposed Enhancement:
- Improve the checking of roles for custom relationships by checking for similar roles before adding a new role.
- Implementation Details:
- Update the
addrelationandeditrelationcommand to check for valid roles before adding the relationship. - Use an external library or dictionary to check if the roles are valid words.
- Display an error message to the user if the role is not a valid word.
- Update the
C.7 - Improve changing of roles for a specific relationship type
Currently, when the user wants to change the roles for a specific relationship type, they would first need to delete all the relationships with that relation type, then delete the relation type from the database, and then redefine it by adding a new relationship with the new roles. This process is cumbersome and time-consuming. This enhancement aims to improve the changing of roles for a specific relationship type by allowing users to directly edit the roles for a specific relationship type.
- Proposed Enhancement:
- Improve the changing of roles for a specific relationship type by allowing users to directly edit the roles for that relationship type.
- Implementation Details:
- Update the
editrelationcommand to allow users to change the roles for a specific relationship type. - Provide a command format that allows users to specify the relationship type and the new roles for that relationship type.
- Display a confirmation message to the user indicating that the roles for the relationship type have been successfully changed.
- Update the
C.8 - Improve the checking of valid roles with respect to the relationType
Currently, the application only supports a few pre-defined relationships with fixed roles (e.g., “spouses” with roles “husband” and “wife”). Users are able to add any roles that they want to for custom role-based relationships. Thus, they are able to add roles unrelated to the relation type (e.g. roles of brother and sister in cousins relationship). This enhancement aims to improve the checking of valid roles with respect to the relationType.
- Proposed Enhancement:
- Improve the checking of valid roles with respect to the relationType by ensuring that the roles are appropriate for the relationType.
- Implementation Details:
- Update the
addrelationandeditrelationcommand to check for valid roles with respect to the relationType. - Use an external library or dictionary to define a set of valid roles for each relationType.
- Ensure that the roles provided by the user match the valid roles for that relationType.
- Display an error message to the user if the roles are not appropriate for the relationType.
- Update the
C.9 - Improve UI handling of filtering commands
Currently, when the user uses a filtering command e.g. find, anysearch and familysearch the subsequent results will remain filtered and other commands will not act as expected.
- Proposed Enhancement:
- Improve the backend handling of filtering commands by automatically clearing the filter after each successful call of the filtering functions.
- Implementation Details:
- Update the list component after every successful
find,anysearchandfamilysearchcommands to automatically clear the filter after displaying the results. - Ensure that the filter is cleared when the user executes a new command or closes the application.
- Display a confirmation message to the user indicating that the filter has been cleared.
- Update the list component after every successful
C.10 - Improve error message for editrelation and deleterelation
Currently, when the user enters an invalid UUID, the error message given is (The UUID you entered was: ) and does not quote the UUID to the user.
- Proposed Enhancement:
- Quote the UUID that the user inputs.
- Implementation Details:
- Add the UUID strings to the end of the error message.